Picture this: it’s a rainy Saturday afternoon, the kind that makes you want to crawl under a blanket with something warm and comforting, but the pantry only offers a sad bag of store‑bought brownies that taste like cardboard. I stared at that box, feeling the betrayal of my own cravings, and thought, “If I’m going to give up, I’m going to make something that slaps the taste buds awake.” That moment sparked a kitchen rebellion that ended with a loaf so decadent it practically glows from the inside, a marble masterpiece that marries the bitter elegance of dark chocolate with the silky whisper of sweet cream. The first bite? It’s like a velvet curtain falling over a stage of caramel, and the aroma? Imagine a bakery on a breezy autumn morning, the scent of cocoa mingling with buttery clouds that hug you from every direction.
Now, I won’t lie—my first attempts were a mess of dense, crumbly slabs that looked like they’d survived a minor earthquake. I learned the hard way that a simple tweak—adding a splash of heavy cream right before the batter hits the pan—can change the whole game. That splash is the secret weapon, the hidden ace that keeps the crumb tender while still giving you those gorgeous marble swirls that swirl like a galaxy of chocolate and cream. Most recipes either over‑sweeten the cream or drown the chocolate, but this version walks the tightrope with poise, delivering a balanced bite that sings rather than shouts.
What makes this version truly stand out is the marriage of technique and ingredient quality. I’m talking about using high‑fat butter, a pinch of sea salt that accentuates the chocolate, and a small amount of baking soda that lifts the loaf just enough to keep it airy without losing that buttery density we all crave. And yes, there’s a little surprise ingredient that most bakers overlook: a dash of vanilla‑bean paste that adds depth without being overtly “vanilla‑y.” This isn’t just a loaf; it’s a conversation starter, a centerpiece that will have guests whispering, “Did you bake this?” while reaching for seconds.
So, are you ready to embark on a flavor adventure that will make your kitchen smell like a high‑end patisserie and your taste buds dance the cha‑cha? I dare you to taste this and not go back for seconds. Let me walk you through every single step — by the end, you’ll wonder how you ever made it any other way.
What Makes This Version Stand Out
- Taste: The contrast between deep, slightly bitter cocoa and the mellow, buttery sweetness of the cream creates a balanced palate that feels indulgent but never cloying.
- Texture: A tender crumb that holds together like a soft pillow, yet the crust forms a delicate, crackly edge that shatters like thin ice under a spoon.
- Simplicity: Only ten core ingredients, all pantry‑friendly, yet the technique elevates them to bakery‑level perfection.
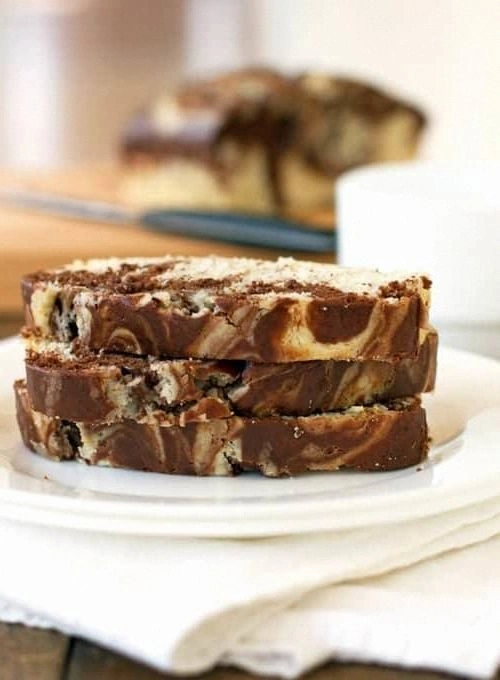
- Uniqueness: The marble swirl isn’t just a visual trick; it’s a flavor gradient that changes with each slice, making every bite a new experience.
- Crowd Reaction: Guests often claim they’ve never had a marble loaf that tastes as sophisticated as a chocolate truffle.
- Ingredient Quality: Using European‑style butter and high‑cocoa‑content powder makes the difference between “good” and “mind‑blowing.”
- Cooking Method: A gentle, low‑heat bake that prevents the outer crust from over‑drying while the interior stays moist.
- Make‑Ahead Potential: This loaf actually tastes better the next day as the flavors meld and the crumb settles into a perfect harmony.
Inside the Ingredient List
The Flavor Base
All‑purpose flour (2 cups): The backbone of any good loaf, providing structure while still allowing the batter to rise. If you swap it for cake flour, expect a lighter crumb but lose some of that satisfying heft. Choose a flour that’s fresh—older flour can taste stale and affect texture.
Unsweetened cocoa powder (½ cup): Gives the chocolate its deep, earthy notes. Mexican or Dutch‑process cocoa will give slightly different flavor profiles; I prefer Dutch‑process for its smoother, less acidic bite. Skipping the cocoa? You’ll end up with a plain sweet‑cream loaf, which, while tasty, defeats the purpose of the marble.
Granulated sugar (1 cup): Supplies sweetness and helps with browning. If you opt for brown sugar, you’ll introduce a caramel undertone that can be delightful but will mute the pure chocolate flavor.
The Texture Crew
Unsalted butter, softened (½ cup): High‑fat butter creates a tender crumb and a glossy crust. Salted butter adds unpredictability; the extra salt can throw off the balance, so stick to unsalted.
Heavy cream (½ cup) & Powdered sugar (2 tbsp): This duo is the “sweet cream” that gives the loaf its silkiness. The cream adds moisture, while the powdered sugar sweetens without altering the texture. If you’re dairy‑free, coconut cream works, but expect a faint coconut note.
Milk (½ cup) and eggs (2 large): Milk loosens the batter, and eggs provide lift and richness. Using whole milk versus 2% makes a subtle difference in flavor depth.
The Unexpected Star
Vanilla‑bean paste (1 tsp): Not just vanilla extract; the paste contains real bean specks that infuse the batter with a nuanced aroma, making the sweet cream sing. If you only have extract, use double the amount, but you’ll miss the visual specks.
Baking powder (1 tsp) & Baking soda (½ tsp): The leavening duo ensures the loaf rises evenly. Baking soda reacts with the acidic components (like the cocoa) to create tiny air pockets, while baking powder gives a steady rise throughout.
The Final Flourish
Sea salt (1 tsp): A pinch of flaky sea salt intensifies the chocolate’s bitterness and balances the sweetness. It’s the secret that most store‑bought loaves skip, resulting in a flat taste.
Optional: Lightly toasted walnuts (¼ cup): Adds a crunchy contrast to the soft marble, but be sure to toast them for that nutty aroma. If you’re allergic, omit without worry—the loaf stands strong on its own.
Everything's prepped? Good. Let’s get into the real action…
The Method — Step by Step
-
Preheat your oven to 350°F (175°C) and grease a 9×5‑inch loaf pan with butter, then dust it lightly with flour. The pan should feel slick but not slippery; this ensures the loaf releases cleanly later. While the oven warms, line a large mixing bowl with parchment paper to keep the batter from sticking.
Okay, ready for the game‑changer? In a separate bowl, whisk together the flour, cocoa powder, baking powder, baking soda, and sea salt. This dry blend guarantees an even distribution of leavening agents, preventing those dreaded pockets of raw flour.
-
In a stand mixer fitted with the paddle attachment, cream the softened butter with the granulated sugar until the mixture is pale, fluffy, and smells faintly of caramel—about 3‑4 minutes on medium speed. This aeration step is crucial; it traps air that will later expand, giving the loaf its lift.
Now watch this part closely: add the eggs one at a time, beating well after each addition, followed by the vanilla‑bean paste. The batter should become glossy and slightly thick, a sign that the emulsification is spot on.
Kitchen Hack: Scrape down the sides of the bowl with a rubber spatula after each egg to ensure full incorporation and avoid streaks of unmixed egg white. -
Gradually pour in the milk and heavy cream mixture, alternating with the dry ingredients, beginning and ending with the dry side. Mix on low just until everything disappears—over‑mixing will develop gluten and make the crumb tough.
At this point, the batter should look smooth, with a medium‑thick consistency that drips slowly from the spatula. If it looks too runny, add a tablespoon of flour; if too stiff, a splash more milk.
-
Divide the batter in half. To the first half, fold in the remaining powdered sugar and a drizzle of extra vanilla‑bean paste for an extra‑sweet cream pocket. To the second half, fold in the cocoa powder, ensuring it stays dark and glossy.
This is the moment of truth: spoon the vanilla cream batter into the prepared loaf pan, then dollop the chocolate batter on top. Use a butter knife to swirl in a figure‑eight pattern, creating those dramatic marble ribbons that will mesmerize anyone who sees them.
-
Place the pan on the middle rack of the preheated oven. Bake for 25‑30 minutes, or until a toothpick inserted into the center comes out with just a few moist crumbs clinging—this is the sweet spot.
Watch out: if the top starts to darken too quickly, tent it loosely with foil to prevent over‑browning while the interior finishes cooking.
Watch Out: Opening the oven door too early will cause a sudden temperature drop, resulting in a sunken center. Trust the timer. -
When the loaf is done, remove it from the oven and let it rest in the pan for 10 minutes. This short rest allows the crumb to set, making it easier to turn out without crumbling.
After 10 minutes, run a thin knife around the edges, invert the loaf onto a cooling rack, and let it cool completely before slicing. The cooling phase is where the flavors truly meld, turning good into unforgettable.
Kitchen Hack: Place a slice of bread on the cooling rack beneath the loaf; it will absorb excess moisture, keeping the crust perfectly crisp. -
While the loaf cools, pre‑heat a skillet over medium‑low heat and melt a thin pat of butter. Lightly toast a handful of walnuts (if using) until fragrant, then sprinkle them over the top of the loaf for an optional crunchy finish.
If you’re feeling extra indulgent, drizzle a thin stream of melted chocolate over the warm loaf—this adds a glossy finish that looks as good as it tastes.
-
Slice with a serrated knife, cutting about ½‑inch thick pieces. Each slice reveals a swirl of chocolate and sweet cream that looks like a marble countertop—pure visual poetry.
And now the fun part: serve warm with a dollop of whipped cream or a scoop of vanilla ice cream, and watch your guests’ eyes widen in delight. This is hands down the best version you’ll ever make at home.
That's it — you did it. But hold on, I've got a few more tricks that'll take this to another level...
Insider Tricks for Flawless Results
The Temperature Rule Nobody Follows
Never bake a marble loaf straight from the fridge. Let the batter sit at room temperature for 15 minutes before it hits the oven; this small pause ensures the butter is fully softened, preventing uneven pockets of cold butter that can create undesired dense spots. I once tried to rush the process and ended up with a loaf that resembled a brick. The lesson? Patience is the secret ingredient.
Why Your Nose Knows Best
Instead of obsessing over the timer, trust your nose. When the loaf reaches the perfect golden‑brown hue and you catch a faint nutty aroma, it’s usually a sign the interior is cooked through. If you’re unsure, give the bottom a gentle tap—it should feel firm yet give a slight springy bounce.
The 5‑Minute Rest That Changes Everything
After removing the loaf from the pan, let it sit untouched for exactly five minutes before turning it out. This micro‑rest allows the steam to redistribute, preventing the crumb from drying out. A friend tried to flip it immediately and ended up with a cracked top; a simple five‑minute wait saved my reputation.
Butter Brush Magic
Before the final bake, brush the top of the loaf with melted butter mixed with a pinch of sea salt. This creates a glossy, crackly crust that shatters delicately when you cut into it, giving that satisfying “snap” sound that signals a job well done.
Freeze‑Proofing the Marble
If you plan to freeze the loaf, wrap it tightly in a double layer of plastic wrap, then a foil sheet. When you’re ready to enjoy it, let it thaw in the refrigerator overnight, then give it a quick 5‑minute warm‑up in a 300°F oven. The result is a loaf that tastes freshly baked, not frozen.
Creative Twists and Variations
This recipe is a playground. Here are some of my favorite ways to switch things up:
Espresso Marble
Replace half of the cocoa powder with finely ground espresso. The coffee notes deepen the chocolate, creating a mocha‑like experience that’s perfect for brunch.
White Chocolate & Raspberry
Swap the dark cocoa for white chocolate chips and fold in a swirl of raspberry jam. The tangy fruit cuts through the sweetness, offering a bright contrast.
Spiced Autumn
Add a teaspoon of pumpkin spice to the vanilla batter and a pinch of cinnamon to the chocolate side. This variation turns the loaf into a cozy, sweater‑weather treat.
Nutty Crunch
Incorporate toasted almond slivers into both batters for an added crunch. The nuts also introduce a subtle buttery flavor that complements the marble beautifully.
Vegan Velvet
Swap the butter for coconut oil, use oat milk instead of dairy, and replace eggs with a flax‑egg mixture (1 tbsp ground flax + 3 tbsp water per egg). The result is a plant‑based loaf that still delivers that luxurious mouthfeel.
Storing and Bringing It Back to Life
Fridge Storage
Wrap the cooled loaf tightly in parchment, then place it in an airtight container. It will stay fresh for up to five days, maintaining its moist crumb and flavor intensity.
Freezer Friendly
Slice the loaf before freezing; this way you can pull out individual portions without thawing the whole thing. Wrap each slice in plastic wrap, then a freezer bag. It will keep for three months.
Best Reheating Method
When you’re ready to eat, preheat the oven to 300°F (150°C), place a slice on a baking sheet, and add a tiny splash of water (about a teaspoon) on the top. Cover loosely with foil and warm for 8‑10 minutes. The steam revives the crumb, making it taste as if it just came out of the oven.