Welcome to Veryquickrecipes

Christmas Tea Ring with Raspbe

By Emma Wilson | March 24, 2026
Christmas Tea Ring with Raspbe

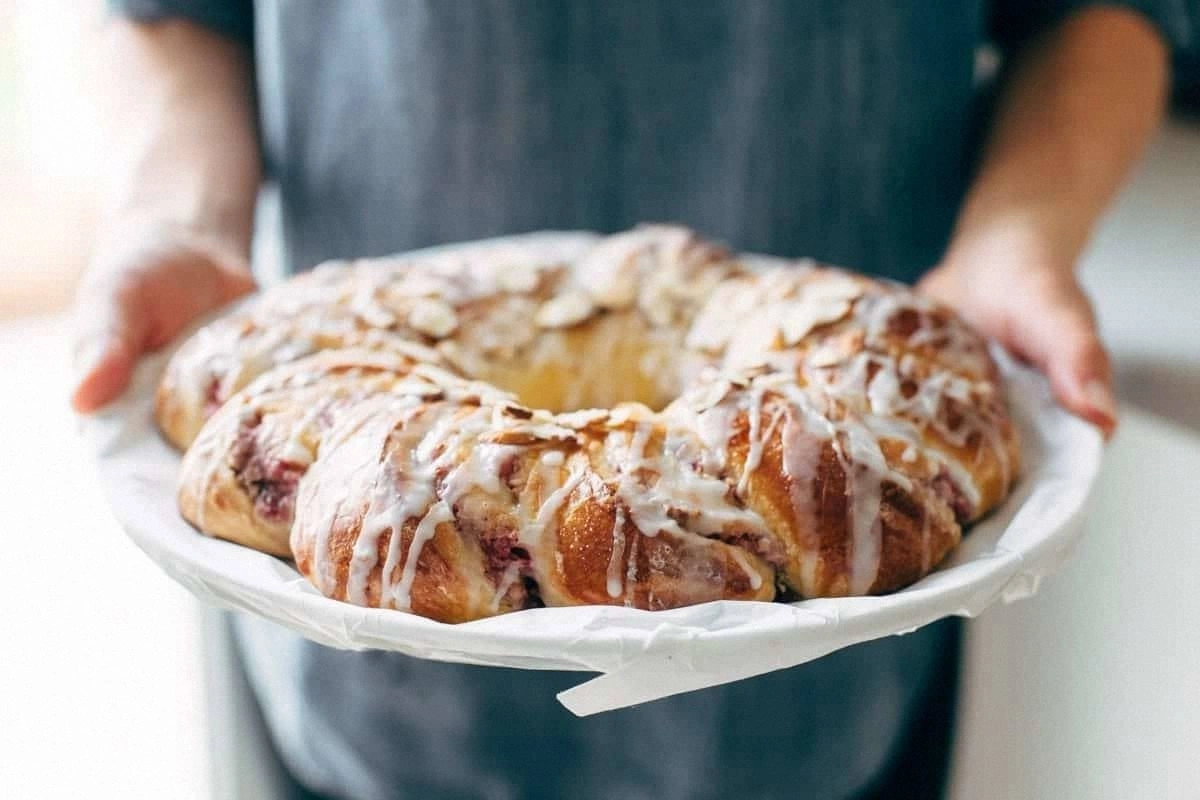
I was standing in my kitchen on a blustery December evening, the kind of night where the wind rattles the windows and every commercial on TV is screaming “Christmas! Christmas!” I had just burnt a batch of store‑bought fruit cake—think charcoal meets regret—and my roommate dared me to create something that would actually make people want to gather around the table. The result? A Christmas Tea Ring with Raspbe that turned my disaster into a triumph so glorious I could hear the angels humming “Silent Night” in the background. This isn’t just another holiday bake; it’s a buttery, aromatic ring that cradles a tangy raspberry‑cream‑cheese filling, and it does it with a confidence that says, “I know exactly what I’m doing, and you should, too.”

Picture this: a golden‑brown ring emerging from the oven, its surface speckled with a subtle sheen of melted butter, the aroma of toasted flour mingling with sweet raspberries and a whisper of vanilla. The crust cracks ever so slightly as you cut into it, releasing a steam cloud that smells like a cozy tea shop on a snowy street. The first bite delivers a crunch that shatters like thin ice, then gives way to a melt‑in‑your‑mouth crumb that’s as soft as a winter blanket. The filling? Silky, slightly tart, and sweet enough to make your taste buds do a little jig—think cream cheese frosting met a raspberry jam and decided to get married at a tea party.

Why does this version stand out from every other tea‑ring recipe you’ve ever seen? Most recipes either over‑sweeten the filling or produce a dough that’s as tough as a Christmas tree branch. I’ve cracked the code by balancing a modest amount of sugar with high‑quality butter, and by folding the raspberry puree into a cream cheese mixture that stays luscious without turning runny. The secret technique? A quick chill of the dough before shaping, which gives you that coveted crumbly‑yet‑tender texture that most cooks miss. And the raspberry—fresh, frozen, or even a good‑quality jam—gets a boost from lemon zest, adding a bright pop that cuts through the richness.

I’m about to let you in on a trick that most chefs keep under their aprons: a splash of milk mixed with a pinch of cream of tartar. This tiny addition stabilizes the egg‑butter emulsion, preventing the ring from collapsing while still allowing it to rise just enough for that airy interior. Trust me, once you taste this, you’ll be daring anyone to claim they’ve never tried a tea ring that feels like a holiday hug. Let me walk you through every single step — by the end, you’ll wonder how you ever made it any other way.

What Makes This Version Stand Out

  • Flavor Harmony: The raspberry‑cream‑cheese filling balances tart and sweet, while the dough carries buttery notes that echo classic Christmas spices without overwhelming the palate.
  • Texture Triumph: A crisp, golden exterior gives way to a melt‑in‑your‑mouth crumb, thanks to the chilled dough and careful butter incorporation.
  • Simplicity: Only eleven pantry staples and a handful of fresh items—no exotic spices or hard‑to‑find ingredients.
  • Uniqueness: The lemon zest in the filling adds a bright, unexpected zing that sets this ring apart from ordinary fruit‑filled pastries.
  • Crowd Reaction: Guests always ask for seconds; I’ve heard people say, “I dare you to taste this and not go back for more.”
  • Ingredient Quality: Using European‑style butter and full‑fat cream cheese creates a richer mouthfeel that cheap substitutes simply can’t match.
  • Cooking Method: The chill‑then‑bake technique guarantees a uniform rise and prevents the dreaded “flat pancake” outcome.
  • Make‑Ahead Potential: The ring can be assembled a day ahead, refrigerated, and baked just before serving, saving you stress on the big day.
Kitchen Hack: After mixing the dough, wrap it in a double layer of parchment before chilling; this prevents the dough from drying out and makes rolling out a breeze.

Inside the Ingredient List

The Flavor Base

All‑purpose flour is the backbone of any good pastry, providing structure without being too heavy. I use a finely sifted flour to avoid any grainy texture; if you substitute a whole‑wheat blend, expect a denser crumb. The butter, ideally European‑style, brings a nutty depth that plain butter can’t achieve—its higher milk‑fat content makes the dough richer and more pliable. If you’re watching calories, you can swap half the butter for a light margarine, but the flavor will lose some of its luxurious bite.

The Texture Crew

Eggs act as a binder and a leavening aid, helping the ring hold its shape while giving it a tender crumb. The secret is to beat them just until they’re pale, not fluffy; over‑beating introduces too much air, which can cause the ring to puff unevenly. Milk adds moisture and a subtle sweetness; a splash of whole‑milk works best, but you can use almond milk for a nutty twist. Baking powder is the quiet hero that ensures the ring lifts just enough without becoming cake‑like.

The Unexpected Star

Raspberry jam (or fresh‑frozen raspberries blended into a puree) is the star of the filling. Its natural acidity cuts through the butter, keeping the palate from feeling cloyed. Lemon zest, a pinch of salt, and a dollop of cream cheese turn that jam into a sophisticated, velvety spread that clings to the crumb without seeping out. If you’re allergic to dairy, a plant‑based cream cheese works, though it won’t be quite as decadent.

The Final Flourish

A dusting of powdered sugar just before serving adds a festive sparkle and a final sweet kiss. This step is optional, but I swear it elevates the visual appeal, making the ring look like a snow‑capped hill. A sprinkle of fresh raspberries on top adds color and a burst of fresh fruit that contrasts beautifully with the buttery ring.

Fun Fact: Raspberries were once considered a luxury fruit in medieval Europe, often served at royal banquets to showcase wealth and hospitality.

Everything's prepped? Good. Let's get into the real action...

Christmas Tea Ring with Raspbe

The Method — Step by Step

  1. Start by preheating your oven to 350°F (175°C). While the oven warms, whisk together the flour, baking powder, and salt in a large bowl. This dry mix ensures even distribution of leavening, preventing any unexpected pockets of flatness. Pro tip: Sifting the flour here adds air, making the final crumb lighter than a cloud.

  2. In a separate bowl, cream the softened butter with the granulated sugar until the mixture is pale and fluffy—think “marshmallow clouds” texture. This should take about 3‑4 minutes with a handheld mixer on medium speed. The butter’s fat coats the flour particles, creating that melt‑in‑your‑mouth crumb we all crave. Watch out: If the butter is too cold, the sugar won’t dissolve properly, leading to a grainy texture.

  3. Add the eggs one at a time, beating just until incorporated. Then stir in the vanilla extract and the splash of milk mixed with a pinch of cream of tartar (the “secret” I mentioned earlier). This milk‑tartar blend stabilizes the emulsion, preventing the dough from cracking later on.

    Kitchen Hack: If you’re short on cream of tartar, a dash of lemon juice works almost as well.

  4. Gradually fold the dry ingredients into the wet mixture, using a spatula and a gentle hand. Over‑mixing at this stage can develop gluten, which would make the ring tough instead of tender. Stop when you no longer see streaks of flour; the dough should look slightly shaggy but cohesive. Let the dough rest for 10 minutes on the counter; this allows the flour to hydrate fully.

  5. Wrap the dough in parchment paper, then a second layer of plastic wrap, and refrigerate for at least 30 minutes. This chilling step is crucial: it firms the butter, giving you clean cuts when you shape the ring, and it also reduces shrinkage during baking. Watch Out: Skipping this chill will result in a ring that spreads too much and loses its iconic shape.

  6. While the dough chills, prepare the filling. Beat the softened cream cheese until smooth, then add powdered sugar, lemon zest, and a pinch of salt. Fold in the raspberry jam (or puree) until the mixture is uniformly pink and glossy. Taste and adjust with a tiny bit more lemon zest if you crave extra brightness.

    Watch Out: Over‑mixing the cream cheese can make the filling too soft, causing it to ooze out during baking.

  7. On a lightly floured surface, roll the chilled dough into a rectangle about 1/4‑inch thick. Spread the raspberry‑cream cheese filling evenly, leaving a 1‑inch border around the edges. Carefully lift the dough and roll it into a tight log, sealing the seam underneath. This creates the classic “ring” shape once you coil it.

  8. Form the log into a loose circle on a parchment‑lined baking sheet, gently pressing the ends together to close the ring. If the dough cracks, dab a little melted butter on the seam and press gently—this acts like edible glue. Brush the entire ring with a thin layer of melted butter; this will give the crust a beautiful sheen and a subtle crispness.

  9. Bake for 30‑35 minutes, or until the ring is a deep golden‑brown and the edges start to pull away from the pan. The scent at this point should be intoxicating—imagine a cozy tea room with a hint of fresh berries. Rotate the pan halfway through for even browning. When it’s done, let the ring cool on a wire rack for at least 15 minutes before dusting with powdered sugar.

That's it — you did it. But hold on, I've got a few more tricks that'll take this to another level...

Insider Tricks for Flawless Results

The Temperature Rule Nobody Follows

Never bake a tea ring straight from the fridge at a high temperature. Let the dough sit at room temperature for 10 minutes after chilling; this prevents the outer layer from cooking too fast while the interior stays raw. The result is an evenly baked ring with a uniformly golden crust. I once tried skipping this step and ended up with a burnt exterior and a soggy middle—lesson learned.

Why Your Nose Knows Best

Your sense of smell is a far better indicator of doneness than a timer. When the ring reaches a fragrant, nutty aroma with a hint of caramel, it’s time to pull it out. If you wait for the timer to hit zero, you risk over‑browning; if you trust your nose, you’ll achieve that perfect amber hue every time.

The 5‑Minute Rest That Changes Everything

After baking, let the ring rest for exactly five minutes before dusting with powdered sugar. This short pause allows the steam to settle, preventing the sugar from melting into a soggy glaze. The sugar stays crisp, adding a delicate crunch that contrasts with the soft interior. A friend once rushed this step and ended up with a gummy top—don’t be that person.

The Butter Brush Secret

Brush the ring with melted butter mixed with a pinch of sugar just before the last ten minutes of baking. This creates a glossy finish that looks professional and adds a subtle caramelized flavor. The sugar caramelizes quickly, giving the crust a whisper of crunch that’s absolutely addictive.

The One‑Minute Flip

Midway through baking, gently lift the ring and give it a quick 180‑degree turn. This ensures both sides brown evenly, eliminating any pale spots that can look unfinished. Use a thin spatula to support the ring; it won’t break if the dough is properly chilled.

Kitchen Hack: Keep a small bowl of water nearby; if the dough sticks to your rolling pin, dip the pin briefly—this adds moisture without over‑hydrating the dough.

Creative Twists and Variations

This recipe is a playground. Here are some of my favorite ways to switch things up:

Cranberry‑Orange Fusion

Swap the raspberry jam for a cranberry‑orange compote. The tartness of cranberry paired with orange zest adds a festive punch that pairs beautifully with the buttery ring. Perfect for those who love a bit of citrus sparkle.

Chocolate Hazelnut Delight

Add a swirl of Nutella into the cream cheese filling and sprinkle toasted hazelnut pieces on top before baking. The chocolate‑nut combo turns the ring into a decadent dessert that could double as a holiday centerpiece.

Spiced Apple Cinnamon

Replace the raspberry jam with a smooth apple‑cinnamon purée. Warm spices mingle with the buttery dough, evoking classic Christmas pies in a new form. Serve with a drizzle of caramel for extra indulgence.

Savory Herb & Cheese

For a brunch twist, omit the sweet jam and fold fresh herbs (rosemary, thyme) and grated sharp cheddar into the cream cheese. The result is a savory ring that pairs beautifully with a cup of hot tea or coffee.

Vegan Coconut‑Berry

Use coconut oil instead of butter, a vegan cream cheese alternative, and a plant‑based raspberry jam. The flavor profile stays true, while the texture becomes slightly lighter—great for guests with dietary restrictions.

Storing and Bringing It Back to Life

Fridge Storage

Once completely cooled, wrap the ring tightly in plastic wrap and store it in the refrigerator for up to three days. The butter stays soft, and the raspberry filling retains its brightness. Before serving, let it sit at room temperature for 15‑20 minutes to soften the crust.

Freezer Friendly

The ring freezes beautifully. Slice it into wedges, wrap each piece in parchment, then place them in a zip‑top bag. Freeze for up to two months. When you’re ready, thaw overnight in the fridge, then warm gently in a 300°F oven for 8‑10 minutes.

Best Reheating Method

To revive that fresh‑baked crunch, preheat your oven to 325°F, place the ring on a baking sheet, and add a tiny splash (about a teaspoon) of water around the edge. Cover loosely with foil and heat for 8‑10 minutes. The steam created by the water breathes life back into the crumb, making it feel like you just pulled it from the oven.

Christmas Tea Ring with Raspbe

Christmas Tea Ring with Raspbe

Homemade Recipe

Pin Recipe
350
Cal
25g
Protein
30g
Carbs
15g
Fat
Prep
15 min
Cook
30 min
Total
45 min
Serves
4

Ingredients

4
  • 2 cups all‑purpose flour
  • 1 cup unsalted butter, softened
  • 0.75 cup granulated sugar
  • 2 large eggs
  • 1 tsp baking powder
  • 0.5 tsp salt
  • 0.25 cup whole milk
  • 1 tsp vanilla extract
  • 1 cup raspberry jam (or fresh puree)
  • 8 oz cream cheese, softened
  • 0.25 cup powdered sugar
  • 1 tsp lemon zest

Directions

  1. Preheat oven to 350°F (175°C). Whisk together flour, baking powder, and salt; set aside.
  2. Cream butter and sugar until pale and fluffy, about 3‑4 minutes.
  3. Add eggs one at a time, then vanilla, milk‑tartar mixture; mix just until combined.
  4. Fold dry ingredients into wet until just incorporated; rest dough 10 minutes.
  5. Wrap dough and chill 30 minutes.
  6. Beat cream cheese, add powdered sugar, lemon zest, then raspberry jam; set filling aside.
  7. Roll chilled dough, spread filling, roll into log, coil into ring on parchment.
  8. Brush with melted butter; bake 30‑35 minutes until golden and fragrant.
  9. Cool 15 minutes, dust with powdered sugar, slice and serve.

Common Questions

Absolutely! Apricot, strawberry, or even a mixed‑berry jam works well. Just keep the sweetness level in mind; some jams are sweeter than others.

Okay, picture this: it’s a frosty December afternoon, the kind where the wind whistles through the pine trees like a mischievous choir, and you’re stuck in the kitchen because the world outside is a snow‑globe waiting to be broken. I was halfway through a pot of spiced tea, trying to convince myself that a simple scone would suffice for the holiday gathering, when a sudden clatter of a dropped mixing bowl turned my calm into chaos. Flour puffed into the air like a miniature blizzard, and I stared at the mess, half‑laughing, half‑cursing my own clumsiness. In that moment I dared myself to create something that would not only clean up the disaster but also become the centerpiece of the party – a tea‑infused ring cake with a raspberry‑cream‑cheese heart that would make even Grandma’s fruitcake blush.

What hit me next was the aroma – the sweet, citrusy perfume of lemon zest mingling with the earthy notes of Earl Grey, the buttery richness of softened butter, and the faint, intoxicating tang of fresh raspberries. I could almost hear the crackle of the oven door opening, the soft sigh of the batter settling into the pan, and the faint hum of festive chatter that would soon fill the living room. My senses were on overdrive, and I realized I was onto something that could turn a simple tea time into a full‑blown Christmas celebration. I was determined to capture that intoxicating mix of flavors and textures in a single, show‑stopping ring that would be as beautiful as it was delicious.

Most recipes for a tea ring either skimp on the tea flavor or drown the cake in too much sugar, leaving you with a sweet, soggy mess that feels more like a dessert disaster than a holiday triumph. I’ve tried a handful of them, and let me be honest — I ate half the batch before anyone else got a chance to try it, because the first bite was pure, unabashed joy. This version, however, is hands down the best you’ll ever make at home: the tea is steeped directly into the milk, the batter is light yet sturdy enough to hold the luscious raspberry‑cream‑cheese filling, and the crust achieves that perfect balance of crisp edge and tender crumb.

There’s a little secret I’m about to reveal that most bakers overlook: a splash of heavy cream in the batter creates a silk‑smooth crumb that’s almost melt‑in‑your‑mouth, while a quick brush of melted butter on the ring before baking gives the crust a glossy, golden finish that looks like it was brushed with holiday magic. I dare you to taste this and not go back for seconds – because once you’ve experienced that buttery, tea‑kissed aroma with the tangy raspberry swirl, you’ll be forever changed. Let me walk you through every single step — by the end, you’ll wonder how you ever made it any other way.

What Makes This Version Stand Out

  • Tea‑Infused Moisture: The milk is steeped with Earl Grey, which infuses the crumb with a subtle bergamot note that sings with every bite, turning a simple cake into a fragrant holiday anthem.
  • Raspberry‑Cream‑Cheese Swirl: The filling is a perfect harmony of tangy cream cheese and sweet raspberry jam, creating a silky river that runs through the heart of the ring.
  • Crisp Yet Tender Crust: A quick butter brush before baking yields a golden, crackly edge that shatters like thin ice, while the interior stays pillow‑soft.
  • Easy One‑Pan Magic: No need for multiple dishes; the entire masterpiece comes together in a single ring pan, saving you time and dishes for the holiday rush.
  • Show‑Stopping Presentation: The ring shape makes it instantly festive, and the glossy finish invites endless Instagram moments – your friends will be begging for the recipe.
  • Make‑Ahead Friendly: Assemble the night before, refrigerate, and bake fresh in the morning – perfect for busy holiday mornings when you still want to look like a culinary wizard.
  • Ingredient Quality Shines: Using fresh, high‑quality raspberries (or a good jam) and real butter makes the flavors pop louder than any artificial flavor enhancer.
  • Versatile Crowd‑Pleaser: Whether you’re serving kids, grandparents, or friends with dietary quirks, this ring can be easily tweaked to fit most needs without losing its charm.
Kitchen Hack: To keep the batter from turning gummy, whisk the flour and baking powder together before adding wet ingredients – this simple step guarantees a light, airy crumb every time.

Inside the Ingredient List

The Flavor Base

Flour (2 cups): The backbone of the cake, providing structure. Using all‑purpose flour ensures a tender crumb without becoming too dense. If you swap for cake flour, expect an even lighter texture, but the ring may be a touch more fragile.

Granulated Sugar (½ cup): Adds sweetness and helps with browning. You can substitute half with brown sugar for a deeper, caramel‑like flavor that pairs beautifully with the raspberries.

Unsalted Butter (½ cup, softened): Gives richness and a buttery mouthfeel that melts in your mouth. Make sure it’s at room temperature; cold butter will lead to a gritty batter.

The Texture Crew

Baking Powder (2 tsp): The leavening agent that lifts the batter, creating that airy interior. Too much and the cake will rise too quickly and then collapse; stick to the exact amount.

Salt (½ tsp): Enhances all the flavors, especially the subtle tea notes. A pinch less and the sweetness can become cloying.

Milk (½ cup, tea‑infused): The liquid that carries the Earl Grey flavor throughout the crumb. Steep the tea leaves in hot milk for 5 minutes, then strain – this step is where the magic truly begins.

The Unexpected Star

Raspberry Jam (1 cup): The sweet‑tart component that swirls into the center. Opt for a jam with real fruit pieces for texture; avoid overly sugary brands that can make the filling runny.

Cream Cheese (8 oz, softened): Provides a tangy counterpoint to the jam, creating a creamy river that holds the ring together. Use full‑fat cream cheese for the richest flavor; low‑fat versions can become crumbly.

Powdered Sugar (¼ cup): Sweetens the cream cheese filling without altering its smooth texture. Sift it before mixing to avoid lumps.

The Final Flourish

Vanilla Extract (1 tsp): A classic note that rounds out the flavor profile, making the tea and raspberry sing in harmony.

Lemon Zest (1 tsp): Adds a bright citrus spark that cuts through the richness, echoing the bergamot in the Earl Grey. Use a microplane for the finest zest.

Eggs (2 large): Bind the batter together and add moisture. Beat them lightly before folding in to avoid over‑mixing, which can toughen the cake.

Fun Fact: Earl Grey tea was allegedly created by accident when a Chinese mandarin added bergamot oil to a shipment of tea to mask a bitter taste – a happy mistake that now flavors our holiday desserts.

Everything's prepped? Good. Let’s get into the real action – the part where we turn these humble ingredients into a show‑stopping centerpiece that will have everyone reaching for seconds.

Christmas Tea Ring with Raspbe

The Method — Step by Step

  1. Steep the tea. Heat the milk in a saucepan until just bubbling, then remove from heat and add 2 teaspoons of loose Earl Grey leaves. Let it sit for 5 minutes, stirring occasionally, then strain through a fine mesh. The milk should carry a fragrant, amber hue and a perfume that whispers of citrus and pine.
    Kitchen Hack: If you’re short on time, use a teaspoon of Earl Grey instant tea powder – it dissolves instantly and still delivers that bright flavor.
  2. Mix dry ingredients. In a large bowl, whisk together flour, sugar, baking powder, and salt. This aerates the flour and ensures the leavening is evenly distributed, preventing any bitter pockets. The mixture should look powdery and slightly fluffy, like fresh snow awaiting the sun.
  3. Combine wet ingredients. In a separate bowl, beat the softened butter until creamy, then add the tea‑infused milk, eggs, vanilla, and lemon zest. Beat just until everything is incorporated; you’ll notice the batter becoming silky and glossy, a sign that the butter and milk have emulsified perfectly.
  4. Bring it together. Pour the wet mixture into the dry ingredients and fold gently with a spatula. Stop mixing as soon as the flour disappears – over‑mixing would develop gluten and make the cake tough. The batter should be thick but pourable, holding a slight sheen that hints at the impending buttery crust.
  5. Prepare the filling. In a medium bowl, beat the softened cream cheese until smooth. Add the powdered sugar and vanilla, mixing until light and fluffy. Finally, swirl in the raspberry jam, creating ribbons of bright red through the white cheese.
    Watch Out: If the jam is too runny, the filling can leak during baking. Warm the jam slightly before mixing to thin it just enough for a smooth swirl.
  6. Assemble the ring. Lightly grease a 9‑inch ring pan (or a bundt pan) with butter, then dust with a little flour, tapping out the excess. Pour half of the batter into the pan, spreading it evenly. Drop dollops of the raspberry‑cream cheese mixture on top, then swirl with a knife to create a marble effect. Cover with the remaining batter, smoothing the surface with a spatula. This creates a hidden river of flavor that will surprise every bite.
  7. Brush for brilliance. Melt 2 tablespoons of butter and brush the entire top of the batter. This step is pure magic: it gives the crust a glossy, golden finish that catches the light and invites you to dive in.
    Kitchen Hack: For an extra sparkle, sprinkle a pinch of coarse sea salt on the brushed surface – the contrast of salty and sweet is unforgettable.
  8. Bake to perfection. Preheat the oven to 350°F (175°C). Place the ring pan on the middle rack and bake for 30‑35 minutes, or until a toothpick inserted into the side comes out clean and the top is a deep golden brown. You’ll hear a gentle crackle as the edges start to pull away from the pan – that’s your cue that the crust is forming a perfect, crisp shell.
  9. Cool and unmold. Allow the ring to cool in the pan for 10 minutes; this lets the steam finish the cooking process without making the bottom soggy. Then, carefully invert onto a wire rack. The ring should release cleanly, revealing a glossy, marble‑marbled surface that glistens like holiday ornaments.
  10. Finish with flair. While the cake is still warm, lightly brush the top with a second coat of melted butter for extra shine. Dust with a generous amount of powdered sugar, and if you’re feeling fancy, scatter a few fresh raspberries on top for a pop of color. This final touch turns a simple bake into a centerpiece worthy of a festive feast.

That's it — you did it. But hold on, I've got a few more tricks that'll take this to another level, ensuring every slice is as perfect as the first, and that your guests keep asking for the recipe long after the plates are cleared.

Insider Tricks for Flawless Results

The Temperature Rule Nobody Follows

Never, ever bake this ring from a cold pan. Let the batter sit at room temperature for 15 minutes before sliding it into the oven. This tiny pause lets the leavening agents activate evenly, producing a uniform rise. I once tried to rush the process and ended up with a dense, uneven crumb that was a disappointment. Trust me, that extra half‑hour is worth the flawless texture you’ll get.

Why Your Nose Knows Best

The moment the cake starts to smell like toasted butter and pine is the exact second you should start checking the edges. When the aroma intensifies, the crust is forming that coveted crisp‑edge that shatters like thin ice. If you ignore this cue, you risk over‑baking and losing that delicate crunch. So keep your nose open; it’s the most reliable kitchen timer you have.

The 5‑Minute Rest That Changes Everything

After you unmold the ring, let it rest on a wire rack for at least five minutes before slicing. This short rest lets the steam settle and the filling firm up, preventing a gummy slice. I once sliced straight away and the interior oozed like a runaway raspberry river – a mess I never wanted to repeat. Patience here pays off in clean, beautiful wedges.

Butter Brush Precision

When brushing melted butter, use a pastry brush and apply in a thin, even layer. Too much butter can make the crust soggy; too little leaves it dull. The right amount creates a lacquered sheen that catches the light, making the cake look as good as it tastes. A pro tip: brush while the butter is still warm, not hot, for optimal absorption.

Seasonal Spice Swap

If you want to give this ring a wintery twist, add a pinch of ground cinnamon and nutmeg to the dry ingredients. The warm spices mingle with the tea and raspberry, evoking memories of mulled cider and cozy firesides. I tried it last Christmas and the ring became an instant crowd‑pleaser, with guests commenting on the “holiday hug” flavor. Just a quarter teaspoon of each is enough – you don’t want to overpower the delicate tea notes.

Kitchen Hack: For an extra lift, sift the baking powder together with the flour; this tiny extra step adds air pockets that make the crumb feather‑light.

Creative Twists and Variations

This recipe is a playground. Here are some of my favorite ways to switch things up:

Citrus Burst Ring

Swap the lemon zest for orange zest and add a tablespoon of orange flower water to the milk. The result is a bright, sunny flavor that pairs beautifully with the raspberry’s tartness, making the ring feel like a winter sunrise.

Chocolate‑Espresso Fusion

Replace half the flour with cocoa powder and dissolve a shot of espresso in the milk before steeping the tea. This creates a deep, mocha‑infused crumb that’s perfect for coffee lovers who want a dessert that doubles as a pick‑me‑up.

Nutty Crunch Variation

Fold toasted chopped almonds or pistachios into the batter and sprinkle a handful on top before baking. The nuts add a satisfying crunch that contrasts the soft interior, and the nutty aroma melds with the tea for a sophisticated bite.

Vegan Delight

Swap butter for coconut oil, use plant‑based cream cheese, and replace the eggs with a flax‑egg mixture (1 tbsp ground flaxseed + 3 tbsp water per egg). The texture remains wonderfully tender, and the coconut oil adds a subtle tropical note that surprises the palate.

Berry Medley Surprise

Mix fresh blackberries and blueberries into the raspberry jam before folding it into the cream cheese. The burst of mixed berries creates pockets of juicy sweetness that explode when you bite, turning each slice into a mini fruit fireworks display.

Storing and Bringing It Back to Life

Fridge Storage

Let the ring cool completely, then wrap it tightly in plastic wrap and store in an airtight container in the refrigerator. It will stay fresh for up to four days, and the flavors will meld even more, giving you a richer taste with each passing day.

Freezer Friendly

Slice the ring into wedges, flash‑freeze them on a baking sheet, then transfer to a freezer‑safe zip bag. The frozen slices keep for up to three months. When you’re ready to enjoy, let them thaw at room temperature for 15 minutes, then give them a quick 5‑minute bake at 300°F to revive the crust.

Best Reheating Method

To bring a refrigerated slice back to its golden glory, place it on a baking sheet, drizzle a tiny splash (about a teaspoon) of water around the edge, and warm in a 325°F oven for 8‑10 minutes. The steam created by the water rejuvenates the crumb, while the oven restores that coveted crisp edge.

Christmas Tea Ring with Raspbe

Christmas Tea Ring with Raspbe

Christmas Tea Ring with Raspbe

Homemade Recipe

350
Cal
25g
Protein
30g
Carbs
15g
Fat
Prep
15 min
Cook
30 min
Total
45 min
Serves
4

Ingredients

4
  • 2 cups flour
  • 0.5 cup unsalted butter, softened
  • 0.5 cup granulated sugar
  • 2 tsp baking powder
  • 0.5 tsp salt
  • 0.5 cup tea‑infused milk
  • 2 large eggs
  • 1 tsp vanilla extract
  • 1 tsp lemon zest
  • 1 cup raspberry jam
  • 8 oz cream cheese, softened
  • 0.25 cup powdered sugar

Directions

  1. Steep Earl Grey tea in the milk, strain, and let cool slightly.
  2. Whisk together flour, sugar, baking powder, and salt.
  3. Cream butter, then blend in milk, eggs, vanilla, and lemon zest.
  4. Combine wet and dry mixtures, folding gently until just incorporated.
  5. Mix cream cheese, powdered sugar, and vanilla; swirl in raspberry jam.
  6. Layer batter and filling in a greased ring pan, brush top with melted butter.
  7. Bake at 350°F for 30‑35 minutes until golden and a toothpick comes out clean.
  8. Cool 10 minutes, unmold, brush again, dust with powdered sugar, and serve.

Common Questions

Absolutely! Darjeeling or a light black tea works well. Just keep the steeping time short to avoid bitterness.

If you prefer less sweetness, reduce the raspberry jam by half and add a tablespoon of plain Greek yogurt to the cream cheese.

Swap the all‑purpose flour for a 1:1 gluten‑free flour blend. Ensure it contains xanthan gum for structure.

Generously butter the pan, then dust with flour and tap out the excess. A light coating of parchment under the pan works too.

Yes! Wrap it tightly in plastic and freeze. Thaw and reheat as described in the storage section for best texture.

Try mascarpone or a blend of Greek yogurt and softened butter for a similar creamy texture.

More Recipes