I was in the middle of a Halloween party prep, juggling a pumpkin carving station, a cauldron of hot cocoa, and a last‑minute request for a snack that would wow the kids. I stared at the pantry, heart racing, and realized I had only a bag of mini pretzels, a box of candy melts, and a jar of plastic eyeballs left. “You’re going to be in trouble,” I muttered, but I also felt that spark of culinary daring—because sometimes the best recipes come from a kitchen crisis. The smell of melted chocolate already hit my nose, the sound of the oven timer ticking, and the sight of those tiny pretzels glistening in the fridge made my stomach growl with anticipation. That moment felt like a thunderclap of flavor potential.
Picture this: the oven’s warm, amber glow, the gentle hiss as the candy melts start to bubble, and the faint crackle of pretzels crisping. I can almost taste the salty, crunchy bite followed by the sweet, creamy coating that melts into a glossy glaze. The texture is a delightful contrast—crispy edges that shatter like thin ice, and a soft, chewy center that invites a second bite. The air fills with a sweet, buttery aroma that’s both comforting and oddly spooky, like a haunted house made of sugar. And that first bite? It’s a perfect harmony of salty, sweet, and a hint of playful horror.
What sets this version apart is that it doesn’t rely on gimmicky decorations or complicated sauces. Instead, it uses everyday pantry staples to create a snack that feels like a treat you’d find in a candy shop, yet it’s completely homemade. I’ve stripped it down to a few simple steps, but the result is a showstopper that will have guests begging for the recipe. Most pretzel snacks on the market are either too plain or too sweet, but this one balances both worlds effortlessly. And because I’ve perfected the technique of melting and coating, the pretzels stay crisp while the candy glaze stays glossy.
I’ll be honest—when I first tried this, I ate half the batch before anyone else even got a taste. That’s a confession you’ll hear from anyone who’s ever made this. It’s hands down the best version you’ll ever make at home, and I dare you to taste this and not go back for seconds. The trick? I added a splash of water to the melted candy melts to keep them silky and prevent clumps. The result is a glaze that coats the pretzels like velvet, turning each bite into a mini celebration.
Most recipes get this completely wrong by over‑baking the pretzels or using too much candy, which turns them into a sticky mess. Here’s what actually works: a low‑heat bake, a quick drizzle, and a sprinkle of eyeballs while the glaze is still tacky. Picture yourself pulling this out of the oven, the whole kitchen smelling incredible, and watching the glaze set into a glossy, slightly caramelized finish. The anticipation is real, and the payoff is even sweeter. And now, ready for the game‑changer? Let me walk you through every single step—by the end, you’ll wonder how you ever made it any other way.
What Makes This Version Stand Out
Flavor: The candy melts provide a deep chocolate base that pairs beautifully with the salty pretzels. The glaze isn’t just sweet; it has a subtle nutty undertone that adds depth. If you’re craving something that feels indulgent yet balanced, this is your go‑to.
Texture: The pretzels stay crisp even after coating because the glaze is applied at the right temperature. The result is a crunch that gives way to a smooth, silky finish. It’s a satisfying bite that keeps you coming back for more.
Simplicity: You only need four ingredients and a sheet of parchment paper. No fancy sauces, no secret spices, and no complex equipment. It’s the kind of recipe that can be whipped up in a flash.
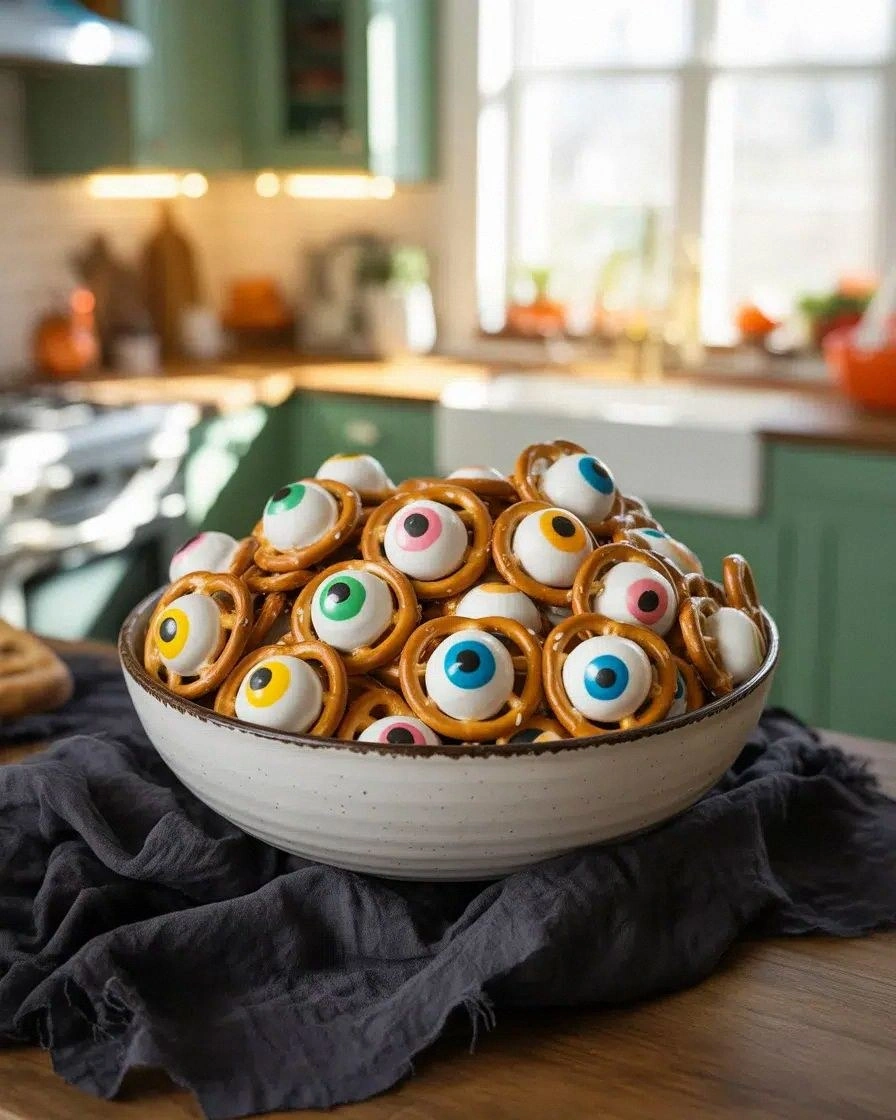
Uniqueness: The monster eyeballs add a playful, spooky twist that turns an ordinary snack into a Halloween centerpiece. It’s a visual and culinary delight that will impress kids and adults alike.
Crowd Reaction: At parties, these pretzels become the instant hit. Guests line up for seconds, and the conversation instantly turns to “Where did you get this?” because it’s so distinctive.
Ingredient Quality: Using high‑quality candy melts ensures a smooth glaze that won’t crack or become gritty. The mini pretzels should be twisty, not flat, to maximize surface area for coating.
Cooking Method: The low‑heat bake and quick drizzle technique keeps the pretzels from burning while allowing the glaze to set perfectly. This method is a game‑changer for anyone who’s struggled with sticky, uneven coatings.
Make‑Ahead Potential: These pretzels can be prepared a day ahead and reheated just before serving. The glaze holds up well, and the crunch returns to its original glory after a quick bake.
Alright, let’s break down exactly what goes into this masterpiece…
Inside the Ingredient List
The Flavor Base
The candy melts are the heart of this recipe. They provide a smooth chocolate coating that transforms the pretzels into a dessert‑like snack. If you’re looking for a twist, try using white candy melts for a sweeter, more caramel‑like glaze, or add a pinch of sea salt to enhance the chocolate’s richness. Skipping this step would leave you with plain pretzels that lack the signature glossy finish.
The Texture Crew
Mini pretzels are the perfect canvas. Their twisty shape offers ample surface area for the glaze to cling to, creating a crisp exterior with every bite. If you prefer a softer bite, you can lightly toast the pretzels before coating, but this will alter the crunchy texture that makes the snack so addictive. The parchment paper keeps the pretzels from sticking during baking, ensuring a clean, even bake.
The Unexpected Star
Candy eyeballs are the visual and flavor surprise. They add a pop of color and a subtle fruity note that contrasts with the chocolate glaze. If you’re not a fan of the plastic feel, you can use real gummy eyeballs or even edible glitter for a different aesthetic. Without them, the pretzels would still be delicious, but they would lose that Halloween flair.
The Final Flourish
Parchment paper is more than a simple baking aid. It creates a barrier that prevents the glaze from sticking, making cleanup a breeze. Additionally, using a sheet that’s slightly larger than the pretzels allows you to spread them out evenly, preventing clumping. If you don’t have parchment, a silicone mat works just as well and can be reused multiple times.
Everything's prepped? Good. Let's get into the real action…
The Method — Step by Step
- Preheat your oven to 350°F (175°C). Line a baking sheet with parchment paper or a silicone mat, ensuring the surface is smooth and clean. This low temperature prevents the candy glaze from burning while the pretzels heat through. The oven should be fully preheated before you place the pretzels inside.
- Spread the mini pretzels in a single layer on the prepared sheet. Avoid piling them up; the glaze needs to touch every surface for an even coating. If you’re working with a large batch, use two sheets to keep the pretzels from clumping.
- In a small saucepan, melt the candy melts over low heat, stirring constantly. Add a tablespoon of water to keep the mixture silky and prevent clumping. Once the chocolate is smooth, remove the pan from heat. This step is crucial for a glossy finish.
- Drizzle the melted candy over the pretzels, ensuring each piece gets a generous coating. Use a spoon or a small ladle to control the amount of glaze. The glaze should be thick enough to cling but thin enough to spread easily.
- While the glaze is still tacky, sprinkle the candy eyeballs over the pretzels. Gently press them into the glaze to ensure they stick. This step adds a fun, spooky element that kids love. If you prefer a more subtle look, you can use only a handful of eyeballs.
- Place the baking sheet in the preheated oven and bake for 10–12 minutes, or until the glaze sets and turns a deep, glossy brown. The pretzels should still be firm; they shouldn’t be soft or soggy. Keep an eye on the oven to avoid over‑baking.
- Remove the sheet from the oven and let the pretzels cool on the parchment for 5 minutes. The glaze will firm up as it cools, creating a crisp, candy‑coated exterior. If you’re in a hurry, you can transfer them to a wire rack to cool faster.
- Serve immediately, or store in an airtight container at room temperature for up to 48 hours. The pretzels are best enjoyed fresh, but they hold up well for a day or two. When you’re ready to reheat, a quick 5‑minute bake at 350°F will restore their crunch.
That’s it — you did it. But hold on, I’ve got a few more tricks that’ll take this to another level. These small adjustments will elevate the flavor profile, texture, and presentation, making your Halloween spread unforgettable.
Insider Tricks for Flawless Results
The Temperature Rule Nobody Follows
Many people bake these pretzels at a higher temperature, which can cause the glaze to burn before the pretzels finish baking. The secret is to keep the oven at a steady 350°F and bake for 10–12 minutes. This low heat allows the chocolate to set slowly, giving it a glossy finish without scorching. If you notice the glaze browning too quickly, simply reduce the oven temperature by 25°F and keep an eye on the progress.
Why Your Nose Knows Best
The aroma of melted candy is a powerful indicator of readiness. When the glaze starts to emit a sweet, chocolatey scent, it’s a sign that the coating is beginning to set. At this point, sprinkle the eyeballs and avoid moving the sheet. If you’re in a rush, you can use a timer to keep track of the 10‑minute window, but trust your nose for the best results.
The 5‑Minute Rest That Changes Everything
Allowing the pretzels to rest on the parchment for 5 minutes after baking is essential. During this rest period, the glaze firms up, making it less likely to crack or peel. It also gives the pretzels time to cool slightly, preventing a sudden temperature shock that could cause the glaze to become brittle. A quick 5‑minute rest is a small step that yields a huge payoff in texture.
The Secret to Even Coating
If you notice uneven glaze distribution, try using a small ladle to pour the melted candy over the pretzels. This allows you to control the flow and ensures each piece receives a consistent coating. Alternatively, you can lightly shake the baking sheet after drizzling to help the glaze spread evenly. A uniform glaze not only looks better but also tastes more consistent.
The Trick for a Glistening Finish
A splash of water (about a teaspoon) in the melted candy helps keep the glaze silky and prevents it from thickening too quickly. This simple trick ensures a smooth, glossy finish that’s almost impossible to achieve with straight candy melts alone. If you’re using white candy melts, adding a few drops of vanilla extract can give the glaze a subtle, pleasant aroma.
Creative Twists and Variations
This recipe is a playground. Here are some of my favorite ways to switch things up:
Cocoa Crunch
Swap the candy melts for dark chocolate chips and drizzle them over the pretzels. The result is a richer, more intense chocolate flavor that pairs well with a splash of sea salt on top. This variation is perfect for chocolate lovers who want a deeper taste profile.
Nutty Delight
Add chopped pecans or walnuts to the glaze before drizzling. The nuts add a satisfying crunch and a nutty aroma that complements the chocolate. This version is great for guests who appreciate a bit of texture and flavor complexity.
Minty Munchies
Use mint candy melts and sprinkle crushed peppermint candy on top. The cool mint flavor provides a refreshing contrast to the sweet glaze, making it a perfect treat for those who enjoy a hint of mint. It’s also a great way to incorporate a seasonal flavor that’s popular in the winter months.
Spicy Surprise
Add a pinch of cayenne pepper or chili flakes to the melted candy before drizzling. The subtle heat adds a surprising twist that pairs wonderfully with the salty pretzels. This spicy version is ideal for adventurous eaters who want to spice up their Halloween snacks.
Gummy Glee
Replace the plastic eyeballs with gummy eyeballs or small gummy candies. The chewy texture adds a fun contrast to the crunchy pretzels. This variation is especially popular with kids who love gummy treats.
Storing and Bringing It Back to Life
Fridge Storage
Store the cooled pretzels in an airtight container in the refrigerator for up to 48 hours. The cold temperature helps maintain the glaze’s integrity, keeping it from softening or becoming sticky. Before serving, let the pretzels sit at room temperature for 10 minutes to bring back the crunch.
Freezer Friendly
For longer storage, place the pretzels on a parchment‑lined tray and freeze for up to 2 weeks. Once frozen, transfer them to a freezer‑safe bag or container. When you’re ready to enjoy, thaw at room temperature for 15 minutes before reheating.
Best Reheating Method
Reheat the pretzels in a 350°F oven for 5 minutes to restore the crispness. If you’re short on time, a quick 30‑second burst in a microwave (on low power) can work, but it may soften the glaze slightly. Adding a splash of water before reheating creates steam that helps the glaze regain its glossy finish.