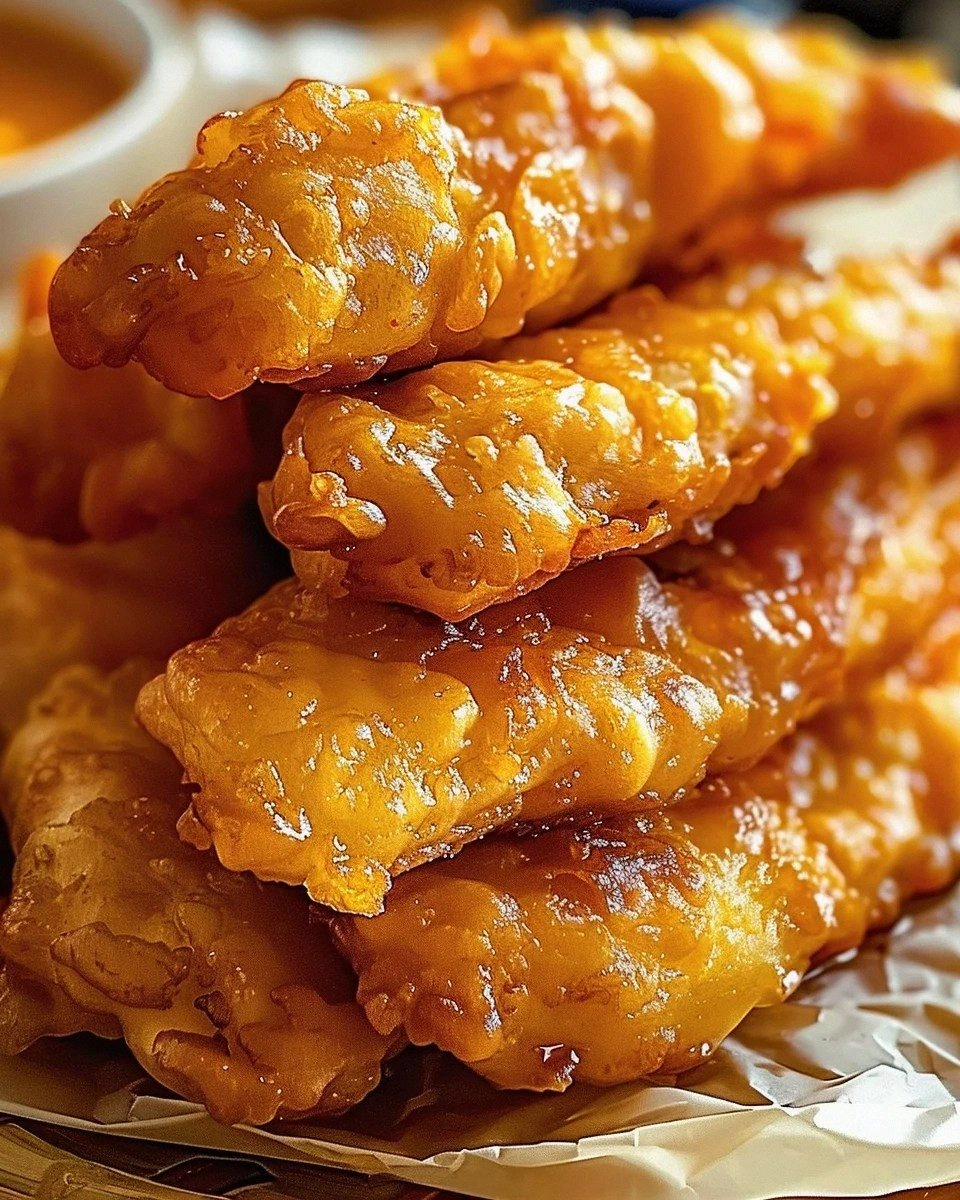
Picture this: it’s a rainy Saturday afternoon, the kitchen lights flicker, and you’ve just survived a culinary catastrophe involving a burnt pot of noodles and a runaway wok. The only thing that’s left to salvage is a craving that’s been gnawing at you all week—crispy, sweet‑and‑sour chicken balls that could make your taste buds do a happy dance. I was determined to rewrite the rules, and after a few trial runs that left me with half a batch on the counter, I finally nailed a version that’s hands down the best you’ll ever make at home. This isn’t just a recipe; it’s a secret weapon for impressing friends and family, a dish that turns an ordinary dinner into a memorable event.
From the first sizzling moment when the batter hits the oil, to the glossy, tangy glaze that coats each bite like velvet, every element of this dish is designed to deliver a sensory overload. The aroma of caramelized ketchup and brown sugar mingles with the sharp tang of vinegar, creating an olfactory cue that tells your brain “deliciousness is on the way.” The sound of the batter crackling as it meets the hot oil is the soundtrack of pure anticipation, while the sight of the golden edges popping up gives you that instant confidence that you’re on the right track.
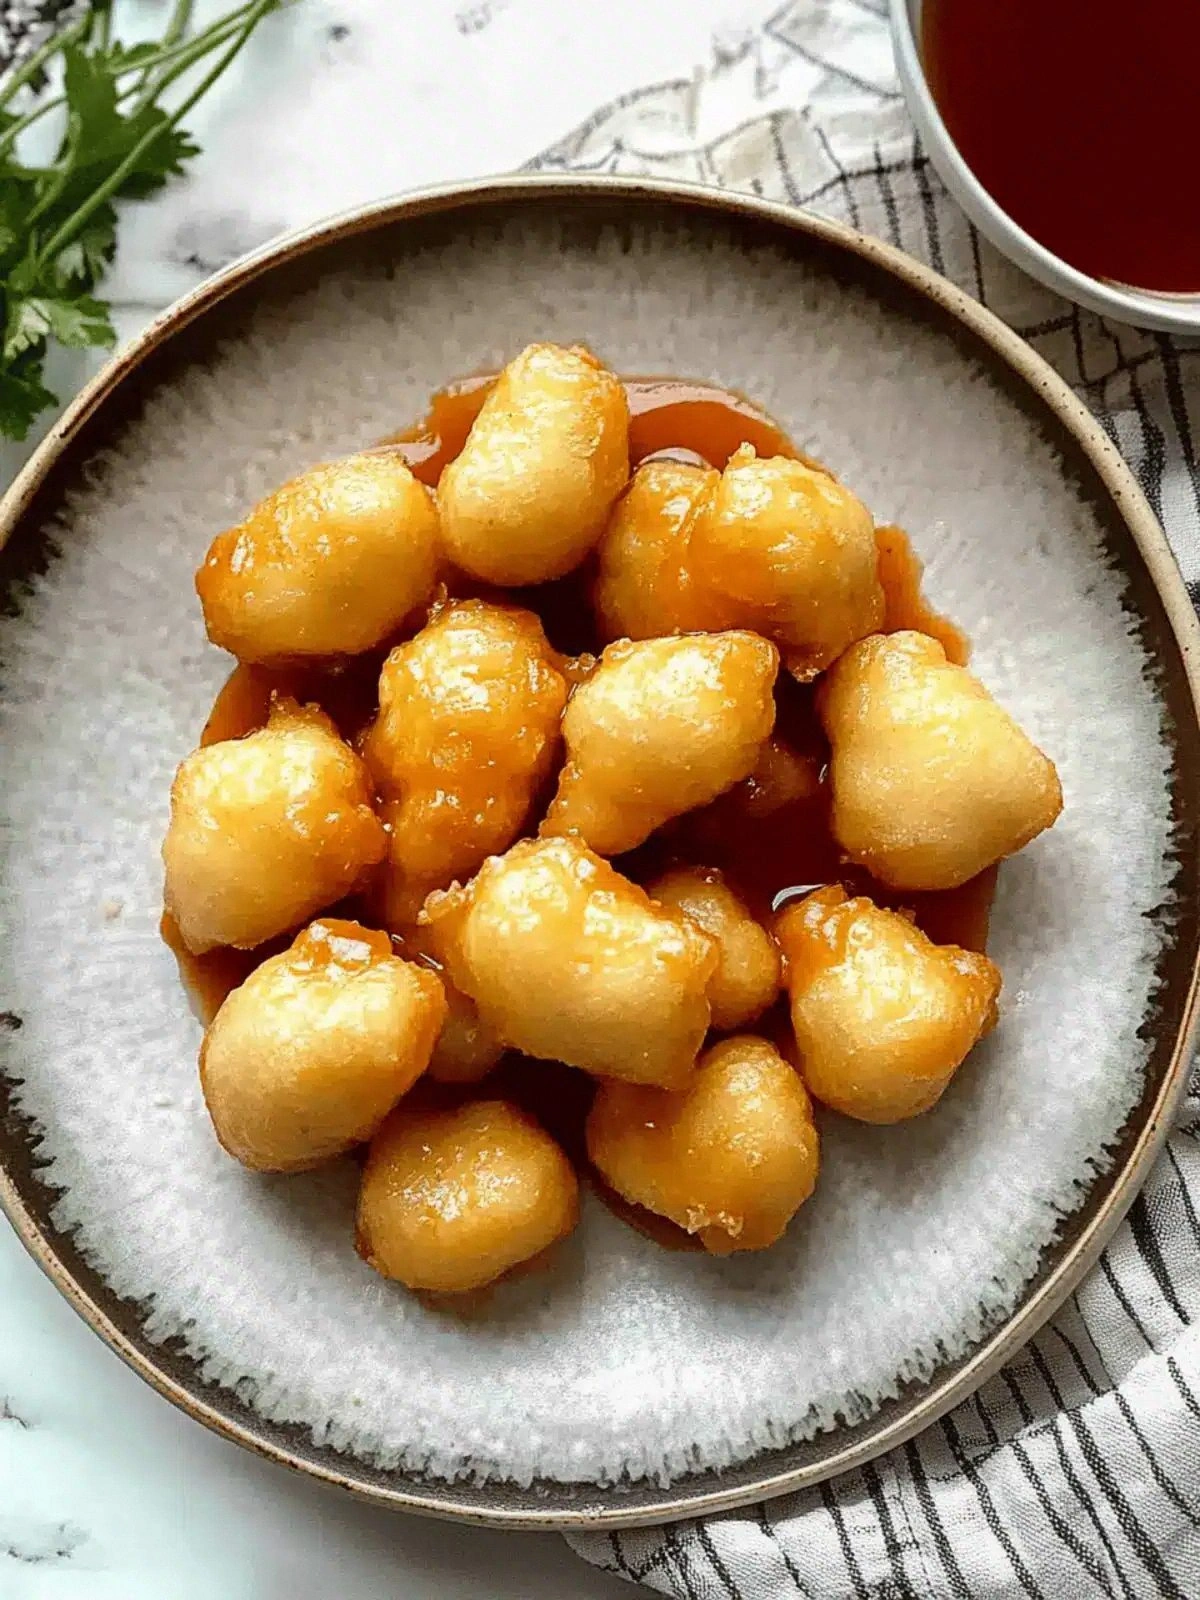
What makes this version stand out is that it balances the classic sweet‑and‑sour profile with a crisp texture that’s almost cinematic. I dared you to taste this and not go back for seconds—yet, I confess, I ate half the batch before anyone else even had a chance to try it. Most recipes get this completely wrong by either over‑battering the chicken or using the wrong oil temperature, but I’ve cracked the code to keep the exterior crunchy while the interior stays juicy and tender. The sauce, a harmonious blend of ketchup, brown sugar, and a splash of lemon, coats the balls like a glossy coat of paint, sealing in flavor and moisture.
If you’ve ever struggled with achieving that perfect crunch, you’re not alone—and I’ve got the fix. Picture yourself pulling this out of the pan, the whole kitchen smelling incredible, and a plate of golden, crispy balls waiting to be devoured. Stay with me here—this is worth it. Let me walk you through every single step, and by the end, you’ll wonder how you ever made it any other way.
What Makes This Version Stand Out
- Taste: The sauce strikes a perfect balance between sweet and tangy, thanks to the combination of ketchup, brown sugar, and a splash of vinegar. It coats the chicken balls like a glossy glaze, leaving a lingering aftertaste that keeps you coming back for more.
- Texture: The batter’s crispness is achieved by using a mix of all-purpose flour and cornstarch, which creates a light, airy exterior that shatters like thin ice when you bite into it. Inside, the chicken remains moist and tender, a delightful contrast that elevates the dish.
- Simplicity: With only a handful of pantry staples, you can whip up this dish in under an hour. No need for exotic ingredients or complicated techniques—just a few smart steps and the right temperature.
- Uniqueness: The addition of lemon juice and baking powder gives the batter a subtle lift, while the cornstarch in the sauce thickens it just enough to cling to the balls without becoming gummy.
- Crowd Reaction: Friends always ask for the recipe after the first plate, and I’ve found that people love the way the sauce clings to the crispy coating, making each bite a burst of flavor.
- Ingredient Quality: Using fresh chicken breasts and a high‑quality ketchup ensures that the base flavor is robust and not overly processed. The neutral oil keeps the focus on the sauce.
- Cooking Method: Frying the balls at the right temperature (around 350°F) ensures even cooking and a golden finish, while the sauce is simmered to the perfect thickness.
- Make‑Ahead Potential: Once the batter is prepared, you can keep it in the refrigerator for up to 24 hours, making it a perfect “prep‑and‑cook” option for busy evenings.
Alright, let's break down exactly what goes into this masterpiece…
Inside the Ingredient List
The Flavor Base
The sauce is the heart of these chicken balls. Ketchup provides a deep tomato sweetness, while brown sugar adds a caramelized depth that balances the acidity of vinegar. Lemon juice gives a bright, citrusy lift that cuts through the richness, and a splash of water keeps the sauce from becoming too thick. If you skip any of these, the sauce will taste flat or overly sweet.
Swap options: For a slightly different profile, replace half the ketchup with tomato paste and add a teaspoon of honey. If you’re avoiding refined sugars, use raw honey or maple syrup instead of brown sugar. The vinegar can be replaced with rice vinegar for a milder tang.
The Texture Crew
The batter’s crunch comes from a blend of all-purpose flour and cornstarch. Flour gives structure, while cornstarch creates a light, airy texture that crisp up beautifully. Baking powder is the secret lift that prevents the batter from becoming heavy. If you’re looking for a gluten‑free version, substitute the flour with a gluten‑free blend and keep the cornstarch.
If you skip the baking powder, the batter will be denser and less crisp. You can also add a pinch of salt to enhance the savory notes, but be careful not to over‑salt the batter.
The Unexpected Star
Cornstarch is used twice: once in the batter and once in the sauce to thicken it. The sauce cornstarch keeps the glaze from separating, giving it a glossy finish. If you don’t have cornstarch, arrowroot or potato starch can work, but the consistency may differ slightly.
The neutral oil (such as canola or sunflower) is essential because it allows the batter to crisp without adding flavor. If you use a flavored oil, it will alter the taste profile of the dish.
The Final Flourish
The chicken itself is the star of the show. Fresh chicken breasts are ideal because they stay juicy. If you prefer a more robust flavor, use thighs instead of breasts. The meat should be cut into bite‑size cubes to ensure even cooking.
If you’re in a hurry, pre‑season the chicken with a pinch of salt and pepper before battering. This adds a subtle depth to the final dish without overwhelming the sweet‑and‑sour profile.
Everything's prepped? Good. Let's get into the real action...
The Method — Step by Step
- Prep the Chicken: Cut the chicken breasts into uniform cubes, about 1½ inches each. Pat them dry with paper towels to remove excess moisture; this helps the batter adhere better. Season the cubes lightly with a pinch of salt and pepper, then set them aside on a plate. The key here is to keep the pieces dry—any water will create steam pockets that prevent crisping.
- Make the Batter: In a large bowl, whisk together 1 cup all‑purpose flour, ½ cup cornstarch, 1 tablespoon baking powder, 1 teaspoon coarse kosher salt, and 1 teaspoon sugar. In a separate container, combine 1 cup cold water, 1 tablespoon lemon juice, and a splash of neutral oil. Gradually pour the wet mixture into the dry, whisking until the batter is smooth and free of lumps. The batter should be thick enough to coat the back of a spoon but still pourable. If it’s too thick, add a tablespoon of cold water at a time.
- Prepare the Sauce: In a saucepan, stir together 1 cup ketchup, ½ cup brown sugar, ½ cup vinegar, 2 tablespoons lemon juice, and ½ cup water. Add 2 tablespoons cornstarch and whisk until fully dissolved. Heat over medium‑low, stirring constantly until the mixture thickens into a glossy glaze. Turn off the heat and set aside; the sauce will thicken further as it cools, so keep it warm.
- Heat the Oil: Pour 2 cups neutral oil into a deep skillet or a wok. Use a thermometer to heat the oil to 350°F (175°C). If you don’t have a thermometer, test the oil by dropping a small amount of batter; it should sizzle and rise to the surface within a few seconds. This temperature is critical—too hot and the batter will burn before the chicken cooks through; too cool and the balls will absorb oil and become soggy.
- Coat the Chicken: Dip each chicken cube into the batter, allowing excess to drip off. This ensures a thin, even coating that crisps nicely. Place the coated cubes into the hot oil in batches, making sure not to overcrowd the pan. The batter will puff up slightly and begin to brown immediately.
- Fry to Perfection: Fry the balls for about 3–4 minutes per side, turning gently with tongs. The edges should be a deep golden brown and the interior should be fully cooked, with no pink remaining. If you notice any uneven browning, adjust the heat slightly; a steady 350°F is the sweet spot.
- Drain and Rest: Remove the balls with a slotted spoon and set them on a paper‑towel‑lined plate to drain excess oil. Let them rest for a minute; this allows the interior juices to redistribute and the batter to set firmly.
- Coat with Sauce: Transfer the fried balls to a large bowl and pour the warm glaze over them. Toss gently so each ball is evenly coated. The sauce will cling like a glossy coat, sealing in the savory sweetness.
- Serve Immediately: Plate the balls on a platter, drizzle any remaining sauce on top, and garnish with chopped green onions or sesame seeds if desired. The best experience comes when the balls are still hot, the batter crisp, and the glaze shimmering.
- Enjoy the Moment: Take a bite and let the crunch give way to a burst of sweet‑and‑sour flavor. The sauce’s tanginess cuts through the richness, creating a balanced, satisfying bite. This is the moment where all the meticulous steps pay off—your hard work turns into a dish that feels both indulgent and comforting.
That's it — you did it. But hold on, I've got a few more tricks that'll take this to another level...
Insider Tricks for Flawless Results
The Temperature Rule Nobody Follows
Many cooks think any hot oil will do, but the secret to a perfect crunch lies in maintaining a steady 350°F. If the oil is too hot, the batter will char before the chicken cooks through, leading to a burnt exterior and raw interior. If it’s too cool, the batter will absorb excess oil and become soggy. Use a thermometer or the small batter test to keep the temperature in check.
Why Your Nose Knows Best
Before you start frying, take a deep sniff of the batter. A slightly sweet, lemony aroma indicates that the batter is properly mixed and the lemon hasn’t been over‑diluted. If the batter smells flat, it’s a sign that the cornstarch hasn’t been fully dissolved, which could lead to a gritty sauce later.
The 5‑Minute Rest That Changes Everything
After frying, let the chicken balls rest on a paper‑towel‑lined plate for exactly five minutes. This brief rest allows the interior juices to redistribute, preventing a dry bite. It also lets the batter set into a crisp shell that’s easier to coat with sauce.
Use a Double Boiler for the Sauce
If you’re worried about scorching the sauce, simmer it over a double boiler. The gentle heat prevents the sugar from burning and keeps the glaze smooth and glossy. This step is especially useful if you’re using a higher sugar content.
Add a Dash of Chili for Heat
For a spicy kick, stir in a tablespoon of sriracha or a pinch of red pepper flakes to the sauce. The heat pairs beautifully with the sweetness, creating a complex flavor profile that’s perfect for adventurous eaters.
The Final Coat of Sesame
Finish the dish with a light dusting of toasted sesame seeds. The nutty aroma complements the sweet‑and‑sour glaze, adding an extra layer of depth. If you’re vegan, replace the sesame with crushed nuts for a different crunch.
Creative Twists and Variations
This recipe is a playground. Here are some of my favorite ways to switch things up:
Teriyaki Twist
Swap the ketchup and brown sugar with equal parts teriyaki sauce and honey. Add a splash of soy sauce for depth. The result is a sweet, umami‑rich glaze that pairs well with a sprinkle of sesame seeds.
Spicy Szechuan Flavor
Incorporate a tablespoon of Szechuan peppercorn powder into the batter and add a handful of crushed red pepper flakes to the sauce. The numbing heat of the peppercorns balances the sweetness, creating a bold, memorable dish.
Coconut‑Infused Crunch
Replace half the neutral oil with coconut oil and add 2 tablespoons of shredded coconut to the batter. The coconut flavor pairs beautifully with the sweet glaze, giving the dish a tropical twist.
Garlic‑Herb Enhancement
Add minced garlic and a teaspoon of dried Italian herbs to the batter. The aromatic herbs complement the sweet glaze, creating a savory undertone that elevates the overall flavor profile.
Low‑Carb Version
Use almond flour instead of all-purpose flour and reduce the sugar in the sauce by half. This makes the dish lower in carbs while still delivering the same crunchy, sweet‑and‑sour experience.
Gluten‑Free Option
Swap the all‑purpose flour for a gluten‑free blend and keep the cornstarch. The texture remains crisp, and the gluten‑free version is just as delicious for those with dietary restrictions.
Storing and Bringing It Back to Life
Fridge Storage
Place the cooked chicken balls in an airtight container and refrigerate for up to 3 days. Store them on a paper towel to absorb excess oil, preventing them from becoming soggy. When ready to eat, reheat them in a skillet over medium heat for 2–3 minutes until crisp.
Freezer Friendly
For longer storage, freeze the chicken balls on a parchment‑lined tray until solid, then transfer to a freezer bag. They will keep for up to 2 months. To reheat, bake in a preheated oven at 375°F for 15 minutes or microwave on high for 45 seconds, then crisp in a skillet.
Best Reheating Method
The key to bringing these balls back to life is to reheat them gently so the exterior stays crisp. A quick sauté in a hot pan or a short bake in the oven preserves the crunch. Add a splash of water before reheating to steam the interior and keep the meat juicy.