The kitchen was a battlefield that morning, the oven door slamming open like a rogue door in a horror movie. I had been chasing the elusive “Easter Egg Cheesecake” that my grandma whispered about, and I finally decided to give it a shot. The moment I cracked the first egg, the air filled with a sweet, buttery aroma that made my mouth water and my heart race. I swear that the clink of the mixing spoon sounded like a tiny drumbeat, guiding me through a symphony of flavors. And just when I thought I had it all figured out, a stray chocolate chip slipped off the counter, reminding me that cooking is always a bit of chaos.
Picture this: a bowl of silky cream cheese, a splash of vanilla that smells like fresh rain, and a swirl of pink gel that turns the mixture into a blush‑colored dream. The texture is a paradoxical blend of light and dense, like a cloud that still holds a secret weight. The crust, made from graham crackers and butter, gives that satisfying crackle that feels like a crunchy hug. The whole experience is a sensory rollercoaster—sweet, creamy, and slightly tangy—making every bite feel like a spring surprise. I dare you to taste this and not go back for seconds.
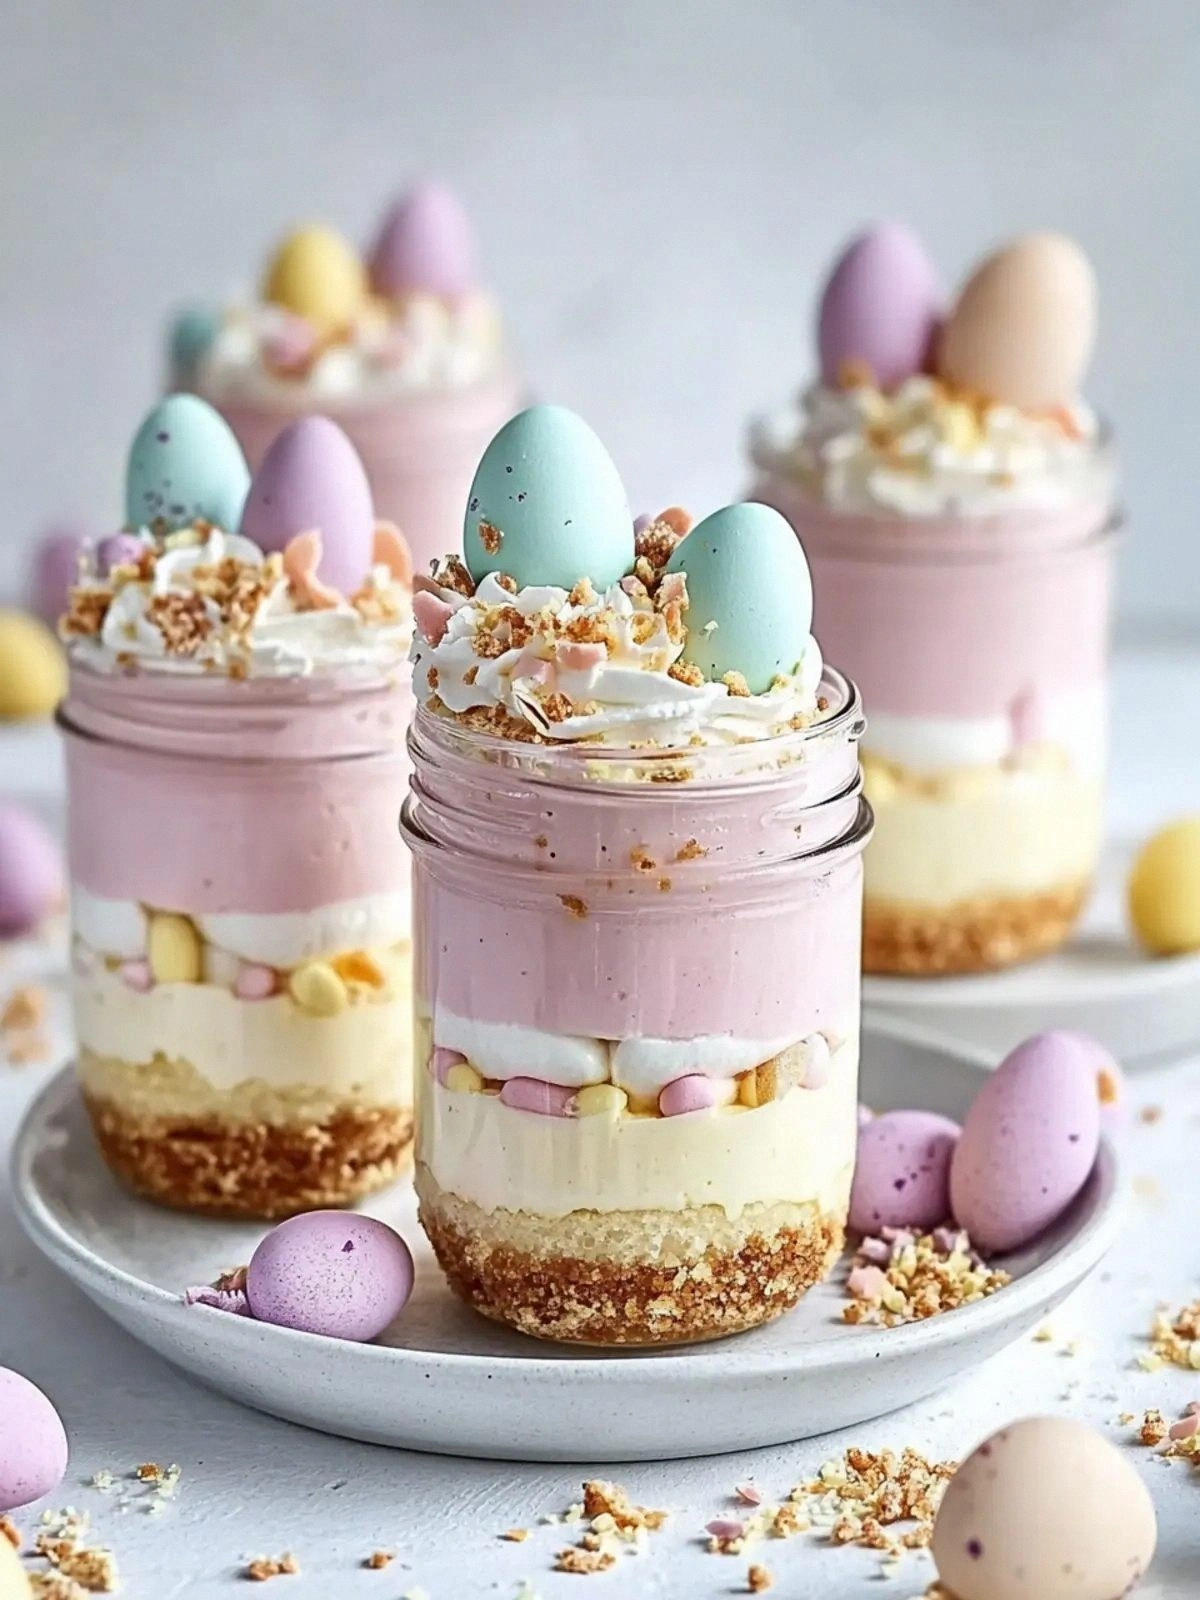
What sets this version apart from the countless others swirling around the internet is that it’s not just a cheesecake; it’s an Easter celebration in a jar. I’ve taken the classic base and infused it with pastel candy eggs and rainbow sprinkles, turning each bite into a confetti of colors. The result is a dessert that feels both nostalgic and brand‑new, a perfect bridge between tradition and trend. The flavors dance on your tongue, while the texture stays silky and not overly heavy, proving that indulgence can still be light. If you’ve ever struggled with a dense cheesecake that feels like a brick, this will change the game.
And the kicker? I’ve included a secret technique that most recipes skip: whipping the cream to stiff peaks before folding it in, which gives the cheesecake a cloud‑like lift without adding extra weight. That’s the subtle trick that keeps this dessert airy and dreamy. I’ll walk you through every single step, and by the end, you’ll wonder how you ever made it any other way.
What Makes This Version Stand Out
- Texture: The whipped cream folded into the filling gives a lightness that defies the heaviness typical of cheesecakes. It feels like a cloud that still holds a hint of richness.
- Flavor: A splash of vanilla and a dash of pink gel create a subtle sweetness that balances the tang of cream cheese, leaving a lingering aftertaste of spring.
- Visual Appeal: The pastel candy eggs and rainbow sprinkles are not just garnish—they’re edible confetti that make each serving look like a celebration.
- Simplicity: No fancy equipment is needed; a stand mixer and a few jars will do. It’s perfect for both seasoned bakers and kitchen newbies.
- Make‑Ahead: The cheesecake sets in the fridge for a few hours, making it ideal for last‑minute gift baskets or party platters.
- Batch Flexibility: The recipe scales smoothly, so you can whip up a single jar for a date night or a dozen for a family gathering.
- Ingredient Quality: Using high‑quality cream cheese and fresh sprinkles ensures that each bite is buttery smooth and bright.
- Kid‑Friendly: The colorful eggs and sprinkles make it a hit with children, turning dessert time into a playful adventure.
Alright, let’s break down exactly what goes into this masterpiece…
Inside the Ingredient List
The Flavor Base
The 8 ounces of cream cheese are the heart of this dessert. When softened properly, they provide a velvety texture that’s both rich and smooth. If you skip this step and use cold cream cheese, the mixture will curdle and the final cheesecake will have a grainy bite. For a smoother finish, let the cream cheese sit at room temperature for at least 30 minutes before mixing.
The 1 teaspoon of vanilla extract brings depth, echoing the warm, comforting scent of freshly baked bread. Vanilla is a flavor enhancer; it amplifies the sweetness without overpowering the tang of the cream cheese. If you prefer a more pronounced vanilla note, consider using vanilla bean paste or a vanilla bean split in the mix.
The optional 1 teaspoon pink gel food coloring or freeze‑dried strawberry powder adds a visual pop and a subtle hint of fruitiness. It’s a clever way to tie the dessert to the Easter theme without compromising flavor. If you’re allergic to gelatin or prefer a natural option, a few drops of natural beet juice will give a similar hue.
The Texture Crew
The 1 cup of heavy cream, whipped to stiff peaks, is the secret to that airy lift. Whipping it separately ensures that the foam stays stable when folded into the batter. If you skip the whipping step, the cheesecake will feel dense and heavy, making it feel like a brick rather than a cloud.
The 1 cup of whipped cream added on top after setting gives a luscious, airy finish that contrasts with the dense base. It also acts as a visual cue that the cheesecake is ready to eat. For a lighter option, you can replace it with a dollop of mascarpone or Greek yogurt.
The 12-18 pastel candy eggs are more than just decoration; they add a burst of sweetness and a playful texture that breaks the monotony of the creamy surface. They’re also a nod to the Easter spirit, making the dessert feel festive and celebratory.
The Unexpected Star
The 1 cup of rainbow or pastel sprinkles isn’t just garnish; they’re the final flourish that adds crunch and a burst of color. Sprinkles also introduce a slight saltiness that balances the overall sweetness, preventing the dessert from becoming cloying. If you’re on a low‑sugar diet, you can opt for sugar‑free sprinkles or a pinch of sea salt to mimic the effect.
The Final Flourish
The 1/2 cup of powdered sugar gives the cheesecake a silky sweetness that’s gentle on the palate. It dissolves quickly, leaving no gritty texture behind. If you prefer a tangier profile, reduce the sugar by half or substitute with a natural sweetener like honey or maple syrup.
The 2 tablespoons of granulated sugar in the crust provide a subtle caramelized edge that contrasts with the buttery base. It also helps the crust set and develop a slight crunch when baked. If you’re vegan, you can use a plant‑based butter and sugar alternative without compromising the crust’s integrity.
The 1 cup graham cracker crumbs are the foundation of the crust. They provide a sweet, nutty flavor that pairs beautifully with the creamy filling. If you’re looking for a gluten‑free version, substitute the crumbs with crushed oat crackers or a gluten‑free graham cracker mix.
The 1/2 cup melted unsalted butter binds the crumbs together, creating a cohesive crust that holds the filling. It also adds a rich, buttery flavor that complements the cream cheese. If you want a lighter crust, replace half the butter with coconut oil.
Everything’s prepped? Good. Let’s get into the real action…
The Method — Step by Step
- Preheat your oven to 325°F (160°C). Line a 9‑inch springform pan with parchment paper. This step ensures a smooth release and prevents the crust from sticking. As the oven warms, the scent of butter and graham crackers will start to mingle, creating an irresistible aroma that will keep you coming back for more.
- In a medium bowl, combine the graham cracker crumbs, granulated sugar, and melted butter. Stir until the mixture resembles wet sand. Press the crumb mixture firmly into the bottom of the prepared pan, forming an even crust. The crust should feel compact yet pliable—think of it like a firm dough that’s ready to hold the filling.
- Bake the crust for 10 minutes, then remove it from the oven and let it cool completely. While the crust cools, you’ll notice the butter’s aroma lingering, hinting at the richness to come. This cooling period is crucial; a warm crust can cause the filling to curdle.
- In a large mixing bowl, beat the softened cream cheese until it’s smooth and free of lumps. Add the powdered sugar and vanilla extract, and continue to blend until the mixture is silky. The goal is a creamy base that’s free of grainy textures—think of a perfect, cloud‑like consistency.
- Fold in the pink gel food coloring or freeze‑dried strawberry powder until the batter is an even blush hue. The color should be vibrant yet subtle, like a gentle blush on a spring morning. If you prefer a more natural look, you can skip the coloring and let the cheesecake shine in its natural ivory tone.
- Whip the heavy cream to stiff peaks in a separate bowl. This step is critical; if the cream isn’t whipped properly, it will collapse when folded into the batter. The stiff peaks should hold their shape, resembling a miniature cloud that can be folded into the mixture without losing volume.
- Gently fold the whipped cream into the cream cheese mixture until fully incorporated. Be careful not to overmix; you want to preserve the air pockets for that airy texture. Imagine a gentle dance where each beat blends into the next without breaking the rhythm.
- Transfer the batter into a piping bag fitted with a large round tip. Pipe the filling onto the cooled crust in a circular motion, creating a smooth, even surface. The piping ensures that each jar will have a consistent layer, making it easier to portion later.
- Place the filled pan in the oven and bake for 25 minutes. The cheesecake should have a slight wobble in the center when you shake the pan gently—this indicates it’s set but still moist. After baking, let it cool to room temperature before refrigerating.
- Once cooled, cover the cheesecake and refrigerate for at least 4 hours, preferably overnight. The chill allows the flavors to meld and the texture to firm up, creating a silky, slice‑ready dessert.
- Before serving, top each jar with a dollop of whipped cream, a handful of pastel candy eggs, and a shower of rainbow sprinkles. The final touch is a visual spectacle that makes each bite feel like a celebration. The contrast of creamy and crunchy textures is the secret sauce that makes this dessert unforgettable.
- Serve chilled, and watch as everyone’s eyes light up at the colorful, fluffy layers. This next part? Pure magic.
That’s it— you did it. But hold on, I’ve got a few more tricks that’ll take this to another level…
Insider Tricks for Flawless Results
The Temperature Rule Nobody Follows
Most bakers bake cheesecakes at 350°F, but lowering the temperature to 325°F prevents cracking and gives a more even bake. The gentle heat allows the center to set without overcooking the edges. I’ve seen countless cheesecakes split apart in the middle, but this trick keeps it intact.
Why Your Nose Knows Best
Trust your nose when the cheesecake is done. A faint buttery aroma indicates the crust is ready, while a sweet, creamy scent signals the filling is set. If you’re uncertain, perform the gentle shake test: a slight wobble means it’s still moist; a firm center means it’s ready to cool.
The 5‑Minute Rest That Changes Everything
After removing the cheesecake from the oven, let it rest on the counter for exactly 5 minutes before cooling. This brief pause allows the internal heat to distribute evenly, preventing a sudden temperature drop that can cause cracks.
The Perfect Chill Cycle
Refrigerate the cheesecake for a minimum of 4 hours, but overnight is best. The extended chill allows the flavors to marry and the texture to set properly. Skipping this step often results in a cheesecake that feels too soft and doesn’t hold its shape.
The Final Finish
Top each jar with a swirl of whipped cream, a handful of candy eggs, and a sprinkle of rainbow sprinkles. The visual contrast and the burst of flavors elevate the dessert from simple to spectacular. The final flourish is what makes it a crowd‑pleaser at any gathering.
Creative Twists and Variations
This recipe is a playground. Here are some of my favorite ways to switch things up:
Chocolate‑Laced Delight
Swap the pink gel with a tablespoon of melted dark chocolate. Add a sprinkle of cocoa powder on top for a richer, bittersweet finish. Chocolate lovers will adore the depth of flavor that pairs perfectly with the creamy base.
Berry Burst Edition
Incorporate fresh blueberries or raspberries into the filling. Fold them gently to preserve their shape. The burst of tartness cuts through the sweetness, creating a balanced profile.
Nutty Crunch Variation
Add chopped toasted almonds or pecans to the crust for an added crunch. The nutty flavor complements the buttery base, while the texture contrast keeps each bite interesting.
Lemon Zest Twist
Introduce a tablespoon of lemon zest into the batter for a bright, citrusy note. The zest adds a refreshing lift that’s perfect for springtime.
Salted Caramel Surprise
Drizzle a thin layer of salted caramel over the top before refrigerating. The caramel’s sweetness and saltiness create a sophisticated flavor profile that’s both indulgent and balanced.
Vegan Version
Replace the cream cheese with vegan cream cheese, use coconut oil for the crust, and sweeten with maple syrup. The result is a plant‑based dessert that still delivers on taste and texture.
Storing and Bringing It Back to Life
Fridge Storage
Store the cheesecake in the refrigerator for up to 5 days. Keep the jars sealed with airtight lids to prevent absorption of odors. If you’re serving the cheesecake the next day, let it sit at room temperature for 15 minutes to soften before topping with whipped cream.
Freezer Friendly
Wrap each jar tightly in plastic wrap and place in a freezer bag. The cheesecake can be frozen for up to 2 months. When ready to serve, thaw in the refrigerator overnight. The texture remains silky, and the flavors stay intact.
Best Reheating Method
If you must warm the cheesecake, do so gently in a microwave at 30% power for 15 seconds. Then let it sit for a minute. Adding a tiny splash of water before reheating steams the cheesecake back to perfection, keeping it moist and creamy.