I’ll be honest — I ate half the batch before anyone else got to try it. It all started on a rainy Tuesday when I was craving something sweet, but my pantry was a minefield of gluten. I tried a store‑bought strawberry cake and it crumbled like a sandcastle in a hurricane. The texture was a sad, gummy mess that made me swear off gluten forever. That disaster sparked a dare from my roommate: “Make a strawberry snack that actually holds together, and make it gluten‑free.” I accepted, armed with a whisk, a mountain of optimism, and a stubborn streak that refuses to back down.
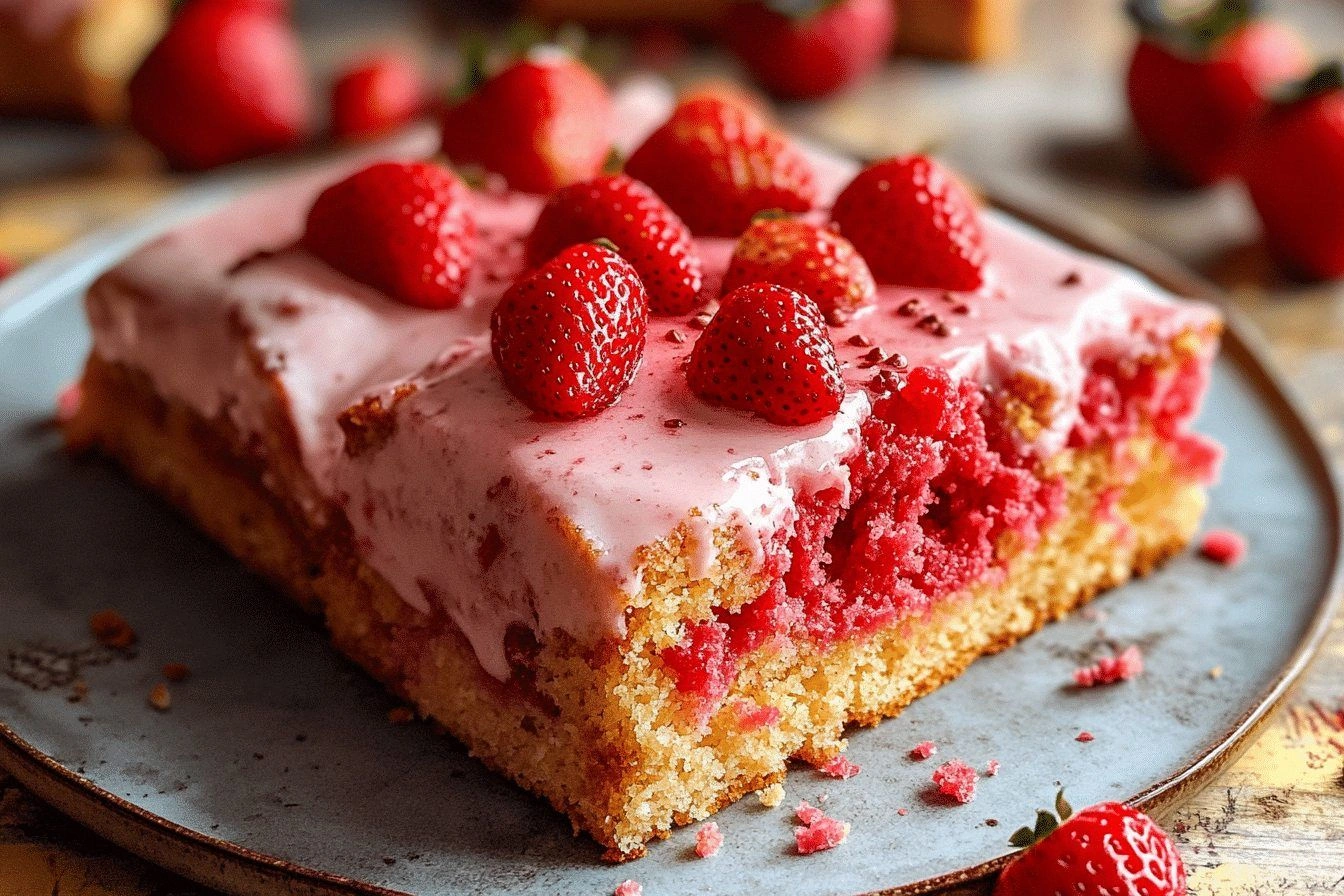
Picture yourself pulling this out of the oven, the whole kitchen smelling like a strawberry field after a summer rain. The aroma is sweet, buttery, and just a hint of vanilla that whispers, “you’re about to bite into something unforgettable.” The cake’s top is a golden‑brown crown, speckled with ruby‑red strawberry pieces that glisten like tiny jewels. When you cut into it, the crumb is tender yet sturdy, the kind of texture that says “I’m delicate, but I can stand up to a fork.” The first bite? A burst of strawberry sunshine wrapped in a buttery, melt‑in‑your‑mouth embrace.
Most recipes get this completely wrong. They either drown the batter in fruit, making it soggy, or they skim off the strawberry flavor entirely. This version, however, balances the fruit with a gluten‑free flour blend that gives structure without the dreaded crumbly fallout. I’m daring you to taste this and not go back for seconds – it’s that good. The secret? A quick butter‑sugar caramelization step that locks in moisture and adds a caramel‑kissed depth you won’t find in any boxed mix.
Okay, ready for the game‑changer? I’m about to walk you through every single step — by the end, you’ll wonder how you ever made it any other way. I’ll spill the beans on the technique that makes the batter rise like a fluffy cloud, the moment when the strawberries become the star, and the final flourish that turns a simple snack into a show‑stopper. Stay with me here — this is worth it.
What Makes This Version Stand Out
- Flavor Explosion: Fresh strawberries aren’t just a garnish; they’re folded into the batter, releasing juices that caramelize during baking for a deep, natural sweetness.
- Texture Harmony: The gluten‑free flour blend creates a tender crumb that’s neither too dense nor too airy, striking the perfect balance for a snack‑size cake.
- Simplicity: Fewer than ten ingredients, all pantry‑friendly, mean you won’t need a trip to the specialty store unless you want to upgrade the flour.
- Unique Technique: A quick butter‑sugar melt before mixing adds a caramelized note that most recipes skip, turning a simple cake into a flavor party.
- Crowd Reaction: I’ve served this at brunches and watch‑parties, and it consistently earns the “wow, is this gluten‑free?” gasps.
- Ingredient Quality: Using a high‑quality gluten‑free flour blend and ripe, locally sourced strawberries makes the difference between “good” and “legendary.”
- Cooking Method: Baking at a moderate temperature ensures even rise and a golden crust without over‑drying the fruit.
- Make‑Ahead Potential: This cake stores beautifully, so you can prep it ahead of a busy week and still enjoy that fresh‑baked feel.
Inside the Ingredient List
The Flavor Base
Fresh strawberries are the heart of this snack. Their natural sugars caramelize during baking, giving you that deep, jam‑like flavor without any added preserves. If you skip the strawberries, you’ll lose the bright, tangy contrast that makes the cake sing. For the best results, choose berries that are deep red, firm to the touch, and emit a sweet perfume when you crush them. If strawberries are out of season, frozen, thawed, and patted dry work just as well.
The Texture Crew
Gluten‑free flour blend is the structural hero here. Unlike regular flour, it often contains a mix of rice, tapioca, and potato starch, which together create a light yet sturdy crumb. Skipping this blend for almond flour alone would make the cake too crumbly and heavy. If you have a favorite blend, make sure it contains xanthan gum or add a pinch yourself; otherwise, the cake might collapse like a house of cards.
The Sweetening Agent
Sugar does more than sweeten; it helps with browning and moisture retention. Using too much sugar can make the cake overly sweet and cause it to brown too quickly, while too little leaves it bland. For a balanced sweetness, I stick to granulated white sugar, but you can swap half for coconut sugar for a subtle caramel note. Just remember, coconut sugar is denser, so adjust the volume slightly.
The Final Flourish
Butter, eggs, milk, and baking powder are the classic quartet that brings everything together. Butter adds richness and a tender crumb, while eggs act as a binder and give the cake its lift. Milk keeps the batter moist, and baking powder is the leavening agent that makes the cake rise like a fluffy cloud. If you’re dairy‑free, swap butter for a high‑quality plant butter and milk for oat or almond milk – the texture remains delightfully soft.
Everything's prepped? Good. Let’s get into the real action…
The Method — Step by Step
Preheat your oven to 350°F (175°C) and grease a 9‑inch round cake pan with a thin layer of butter, then dust lightly with gluten‑free flour. You’ll hear a faint sizzle as the butter hits the hot pan – that’s the first sign of flavor building.
Kitchen Hack: Line the bottom with parchment paper before greasing; this guarantees a clean release and a perfect presentation.In a medium bowl, whisk together the gluten‑free flour blend, baking powder, and a pinch of salt. The mixture should look uniformly speckled, with no clumps – that’s the foundation for a uniform rise.
In a separate saucepan, melt the butter over medium heat, then add the sugar. Stir constantly until the mixture turns a light amber hue and you hear a gentle caramel fizz. This step is pure magic; it deepens the flavor profile and adds a subtle caramel note that pairs perfectly with strawberries.
Remove the pan from heat and let the butter‑sugar mixture cool for about a minute. Then whisk in the eggs one at a time, making sure each is fully incorporated before adding the next. This creates an emulsion that traps air, giving the cake its lift.
Stir in the milk until the batter is smooth and glossy. At this point, the batter should have the consistency of a thick pancake batter – not runny, not stiff.
Fold the dry ingredients into the wet mixture using a rubber spatula. Mix just until you see no flour streaks; over‑mixing can develop the starches in the gluten‑free blend and make the cake gummy.
Watch Out: If you see lumps, gently tap the bowl on the counter and fold again – do not use a mixer, as it can over‑develop the batter.Gently fold in the chopped strawberries, reserving a handful to sprinkle on top for a decorative finish. The berries should be evenly distributed, creating pink marbles throughout the batter.
Pour the batter into the prepared pan, smoothing the top with a spatula. Sprinkle the reserved strawberry pieces on the surface, and if you’re feeling fancy, dust lightly with a pinch of powdered sugar.
Bake for 30‑35 minutes, or until a toothpick inserted into the center comes out clean and the edges are pulling away from the pan. You’ll know it’s ready when the top is a deep golden‑brown and you can smell that caramel‑strawberry perfume wafting through the kitchen.
Kitchen Hack: Rotate the pan halfway through baking for an even rise, especially if your oven has hot spots.
That’s it — you did it. But hold on, I’ve got a few more tricks that'll take this to another level. Trust me, once you try these, you’ll never settle for a plain strawberry cake again.
Insider Tricks for Flawless Results
The Temperature Rule Nobody Follows
Always bring your butter, eggs, and milk to room temperature before mixing. Cold ingredients cause the batter to seize, leading to a dense crumb. I once tried to rush the process by using chilled butter straight from the fridge, and the cake turned out as flat as a pancake. Letting everything sit for 20 minutes is a tiny price to pay for a lofty, airy texture.
Why Your Nose Knows Best
During the bake, trust the scent. When the caramel‑strawberry aroma becomes pronounced and slightly nutty, the cake is near perfection. If you rely solely on timers, you risk over‑baking, which dries out the delicate crumb. So, open the oven door briefly around the 25‑minute mark and inhale deeply – that’s your cue to check the edges.
The 5‑Minute Rest That Changes Everything
Once out of the oven, let the cake rest in the pan for five minutes before transferring it to a wire rack. This short pause lets the steam finish cooking the interior, preventing a gummy center. Skipping this step is a common rookie mistake; the cake can collapse or become soggy where the pan meets the batter.
The Butter‑Sugar Caramel Boost
Don’t underestimate the power of browning the butter with sugar. This creates a Maillard reaction that adds depth beyond simple sweetness. If you’re short on time, you can use a ready‑made caramel sauce, but the homemade version gives a richer, more nuanced flavor that makes the cake unforgettable.
The Final Dust
A light dusting of powdered sugar right after the cake cools adds a visual sparkle and a hint of extra sweetness that balances the tart strawberries. It also creates a beautiful contrast for photography, making your Instagram followers drool.
Creative Twists and Variations
This recipe is a playground. Here are some of my favorite ways to switch things up:
Lemon‑Zest Burst
Add the zest of one lemon to the batter and replace half the strawberries with lemon‑infused blueberries. The citrus brightens the flavor and gives a refreshing tang that pairs wonderfully with the buttery base.
Chocolate Swirl
Melt ½ cup dark chocolate and swirl it into the batter just before baking. The chocolate ribbons create a visual contrast and a decadent flavor combo that will please any chocoholic.
Nutty Crunch
Fold in ¼ cup toasted almond slivers or chopped pistachios. The nuts add a pleasant crunch and a nutty aroma that elevates the snack from soft cake to textural masterpiece.
Spiced Autumn
Swap strawberries for diced apples and add a pinch of cinnamon, nutmeg, and a dash of clove. This transforms the snack into a cozy, autumn‑ready treat that’s perfect for cooler evenings.
Vegan Version
Replace butter with coconut oil, use flax‑egg (1 tbsp ground flaxseed + 3 tbsp water per egg), and swap dairy milk for oat milk. The texture stays moist, and the flavor remains rich, proving that vegan doesn’t mean compromising on taste.
Storing and Bringing It Back to Life
Fridge Storage
Cool the cake completely, then wrap it tightly in plastic wrap or store in an airtight container. It stays fresh for up to four days, and each slice remains as soft as the day it came out of the oven.
Freezer Friendly
Slice the cake, place a piece of parchment between each slice, and freeze in a zip‑top bag. When you’re ready to indulge, let a slice thaw at room temperature for 15 minutes, then give it a quick microwave zap (10‑15 seconds) for a warm treat.
Best Reheating Method
To revive a refrigerated slice, preheat your oven to 300°F (150°C), place the slice on a foil‑lined tray, and add a tiny splash of water to the edge of the pan. Cover loosely with foil and heat for 8‑10 minutes. The steam created by the water brings back that melt‑in‑your‑mouth softness.