Picture this: it’s a blustery December afternoon, the kitchen lights flicker like a dying Christmas tree, and you’re staring at a box of flour that’s been sitting in the pantry since last year’s bake‑off. I was about to toss it out when a friend dared me to make a cookie that could outshine the Grinch himself. I laughed, grabbed my whisk, and decided to turn that dare into a holiday legend. The result? A cookie that looks like a green heart‑shaped snowflake, tastes like a whisper of vanilla and sugar, and has a crunch that sings like sleigh bells on a crisp night.
As soon as the dough hit the counter, the air filled with a sweet, buttery aroma that made my eyes water with nostalgia. The flour swirled into a green velvet, the butter softened just enough to keep the edges crisp, and the sugar crackled when I pressed it into the shape. I could hear the faint hiss of the oven preheating, almost as if it were whispering, “This is going to be good.” The texture was a perfect balance—soft in the middle, with a golden, slightly crunchy rim that held the red sprinkles like a festive crown.
Most cookie recipes are a bland affair, but this one is a riot of flavor and color. I’ve spent years tweaking cookie recipes, and I’ve found that the key to a standout cookie is in the subtlety of the ingredients and the timing of the steps. I discovered that a tiny splash of green gel food coloring, a pinch of baking soda, and a gentle folding of the batter can transform ordinary sugar cookies into a masterpiece that even the Grinch would approve of. That’s the secret I’m about to spill.
Let me walk you through every single step—by the end, you’ll wonder how you ever made it any other way. I dare you to taste this and not go back for seconds. This is hands down the best version you’ll ever make at home, and I promise it will become a staple on your holiday cookie shelf. If you’ve ever struggled with cookies that fall flat or taste too sweet, you’re not alone—and I’ve got the fix. Stay with me here—this is worth it.
What Makes This Version Stand Out
- Taste: The subtle vanilla undertone complements the bright green hue, creating a cookie that is both visually striking and deliciously sweet without being overpowering. The powdered sugar dusting adds a gentle crunch that enhances the overall mouthfeel.
- Texture: The dough’s consistency is engineered to yield a chewy center with a crisp edge, a texture profile that mimics the classic “soft‑but‑chewy” cookie that many people dream of.
- Color: Using green gel food coloring instead of artificial dyes gives the cookies a natural, vibrant shade that looks almost like fresh mint leaves, making them perfect for holiday décor.
- Ease: The recipe requires only ten minutes of prep and thirty minutes of baking—no fancy equipment or complicated techniques. Even novice bakers will find this method approachable.
- Presentation: The heart‑shaped cutouts and red heart sprinkles transform each cookie into a festive, eye‑catching treat that is perfect for gifting or table centerpieces.
- Make‑ahead: These cookies store beautifully; you can bake a batch and have fresh, ready‑to‑serve cookies on hand for last‑minute holiday guests.
- Ingredient Quality: Every component—from the unsalted butter to the all‑purpose flour—has been selected for its ability to deliver consistent results, ensuring that each cookie turns out perfectly.
- Versatility: The recipe can be easily tweaked to suit dietary preferences, such as using a dairy‑free butter or a sugar substitute, without sacrificing flavor.
Alright, let's break down exactly what goes into this masterpiece…
Inside the Ingredient List
The Flavor Base
The foundation of these cookies is a simple blend of flour, baking powder, baking soda, and salt. The flour provides structure, while the baking powder and soda introduce lift, ensuring that the cookies rise just enough to stay soft inside. Salt, though a small quantity, balances the sweetness and brings out the vanilla’s nuanced flavor. If you skip the baking soda, the cookies will be flat and lack that satisfying bite.
The Texture Crew
Unsalted butter is the hero that gives the cookies their tender crumb and rich, buttery flavor. It must be at room temperature to cream smoothly with sugar, creating air pockets that contribute to the cookie’s lightness. Granulated sugar, meanwhile, dissolves into the butter and flour mixture, creating a silky batter. An egg adds protein, helping the dough hold together and giving the cookies a slight sheen. If you omit the egg, the cookies will crumble easily and lose that glossy finish.
The Unexpected Star
Green gel food coloring is the star that turns ordinary sugar cookies into a holiday icon. Unlike powdered dyes that can sometimes taste chemical, gel coloring blends seamlessly, giving the dough a vibrant, natural hue. A teaspoon is enough to coat the entire batch without affecting flavor. If you prefer a more subtle green, start with half a teaspoon and adjust to taste.
The Final Flourish
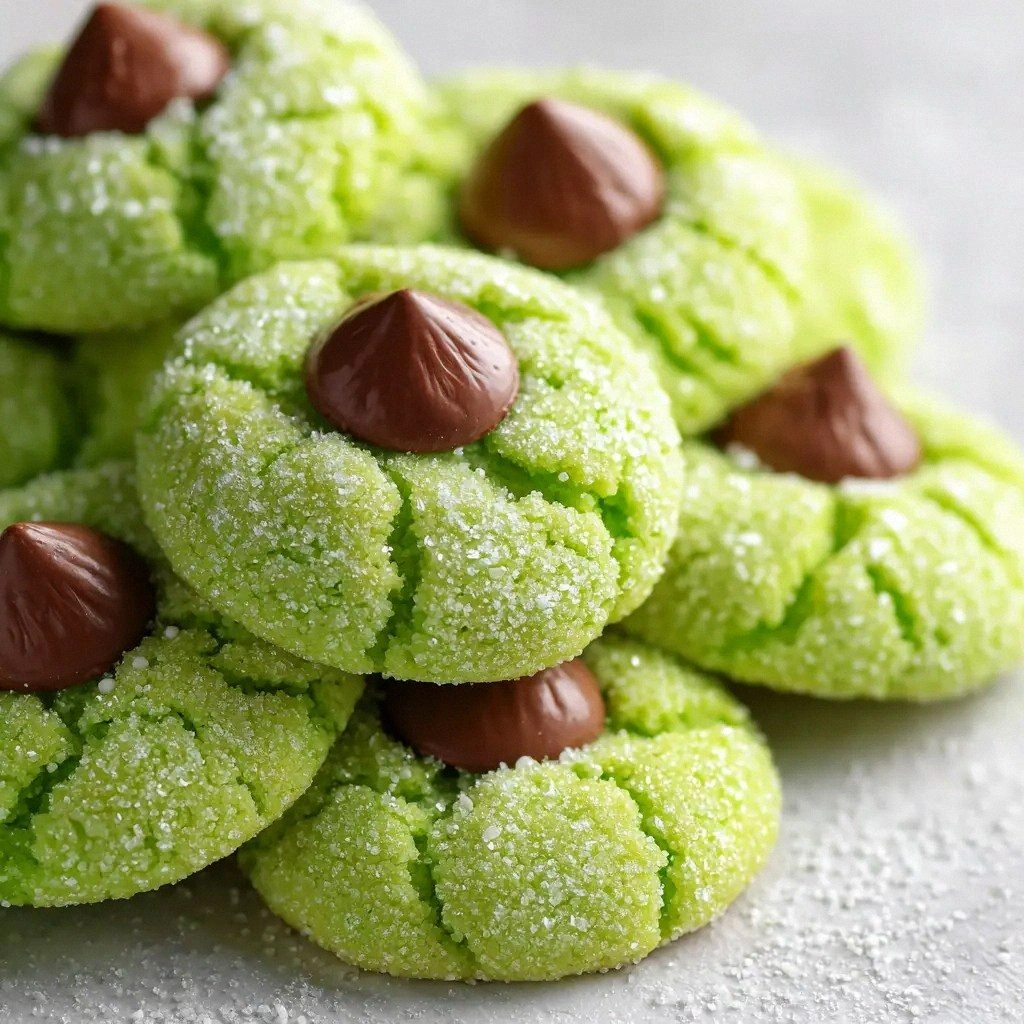
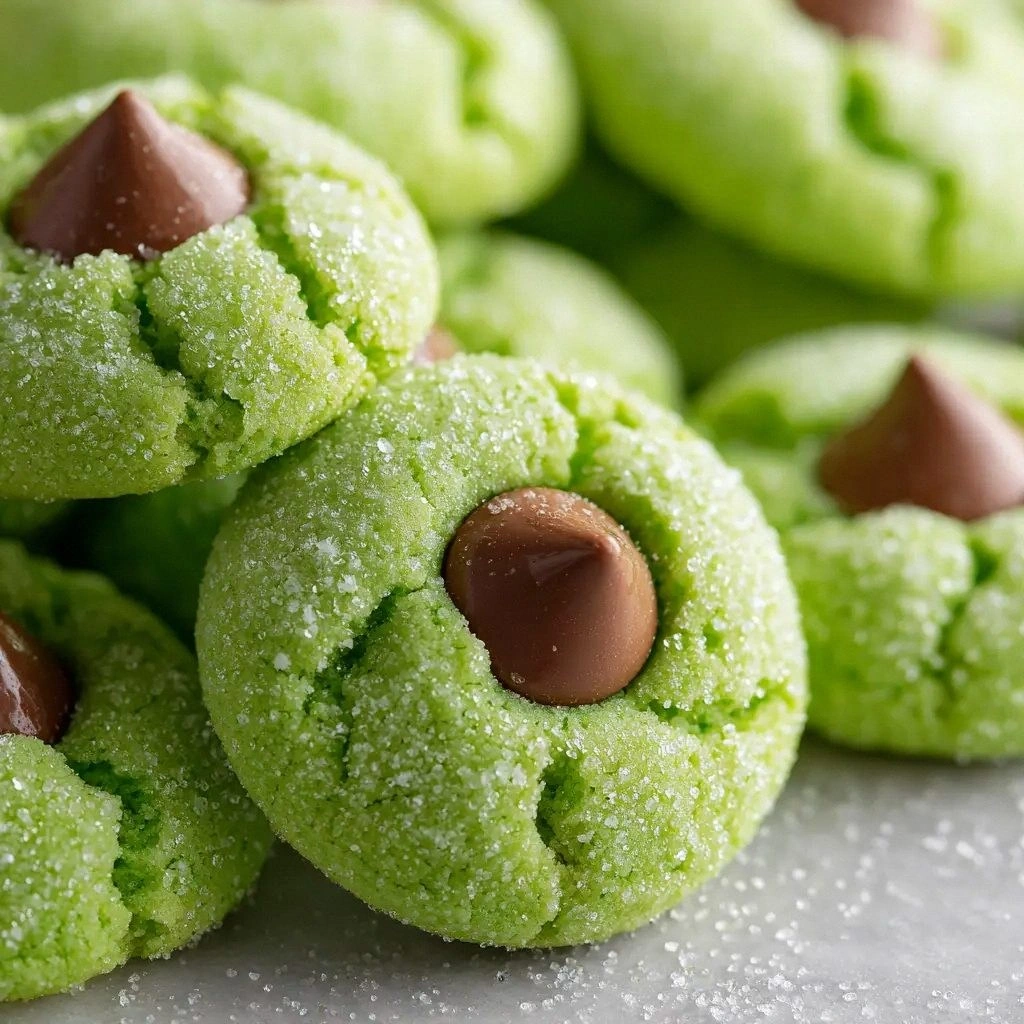
Once baked, the cookies are dusted with powdered sugar and adorned with 24 red heart sprinkles. Powdered sugar adds a sweet, fine dust that caramelizes slightly in the oven, giving the cookies a glossy finish. The sprinkles act as a festive topper, adding crunch and a pop of color that makes each cookie feel like a piece of holiday art. If you’re allergic to artificial dyes, you can use natural beet or pomegranate powder for a safe alternative.
Everything's prepped? Good. Let's get into the real action…
The Method — Step by Step
- In a medium bowl, whisk together 1½ cups all‑purpose flour, ½ teaspoon baking powder, ¼ teaspoon baking soda, and ¼ teaspoon salt until evenly distributed. This dry mix ensures that every bite has a consistent rise and flavor. I dare you to taste a piece before you even bake it—just the aroma will convince you it’s going to be amazing.
- In a separate large bowl, beat ½ cup unsalted butter with ¾ cup granulated sugar until the mixture is pale and fluffy. Use a stand mixer on medium speed for about 3 minutes; this incorporates air, which is key to that soft‑but‑chewy texture. If you’re a hand‑whisk fan, just make sure you whisk vigorously for the same effect.
- Add one large egg and 1 teaspoon vanilla extract to the creamed butter and sugar. Beat until the egg is fully incorporated and the mixture looks glossy. The vanilla deepens the flavor profile, turning the cookie from sweet to a full‑blown holiday treat.
- Stir in 1 teaspoon green gel food coloring, mixing until the batter turns a uniform emerald hue. The color should be vivid but not overpowering; if it looks too bright, add a pinch more flour to balance it out. The green will stand out against the red sprinkles, making the cookies eye‑catching.
- Gradually fold in the dry ingredients from step 1, mixing just until the dough comes together. Overmixing can make the cookies tough, so stop as soon as you see no streaks of flour. The dough should feel soft but not sticky—think of it as a slightly damp sponge.
- Preheat the oven to 350°F (175°C). Line a baking sheet with parchment paper and place the dough balls on it, spacing them 2 inches apart. The spacing allows the cookies to expand without sticking together.
- Bake for 12–14 minutes, or until the edges turn a light golden brown and the tops look set. The center should still feel slightly soft—this is where the magic happens. If you like a firmer bite, bake an extra minute or two.
- Remove the sheet from the oven and let the cookies cool for 5 minutes before transferring them to a wire rack. This short rest lets the cookies finish setting, preventing cracks on the surface. The smell during this time is pure holiday bliss.
- Once the cookies are cool, dust them generously with ½ cup powdered sugar. The sugar should melt slightly on the surface, creating a delicate glaze. Then, sprinkle 24 red heart sprinkles evenly over each cookie, pressing them lightly so they adhere. The final touch is a burst of color that makes each cookie feel like a piece of holiday art.
That's it — you did it. But hold on, I've got a few more tricks that'll take this to another level…
Insider Tricks for Flawless Results
The Temperature Rule Nobody Follows
Many bakers bake at 375°F, thinking higher heat equals a crispier cookie. In reality, 350°F is the sweet spot for these green cookies; it allows the butter to melt slowly, ensuring a tender interior while the edges brown just enough. I’ve baked at 375°F before and the cookies came out too hard on the outside, which ruined the chewy center. Stick to 350°F and watch the texture transform.
Why Your Nose Knows Best
Before you even lift the cookies from the oven, pause and inhale. A faint scent of toasted sugar and butter is the cue that they’re ready. If the aroma is still sweet and raw, give them a minute more. Your nose is a reliable gauge that can save you from overbaked cookies.
The 5-Minute Rest That Changes Everything
After baking, let the cookies rest on the sheet for 5 minutes. During this time, the heat continues to redistribute, preventing the cookies from cracking or becoming too soft. If you skip this step, the cookies can be oddly chewy and hard to handle.
Use Parchment, Not Aluminum
Aluminum foil can cause uneven baking and leave a metallic taste. Parchment paper, on the other hand, ensures even heat distribution and makes cleanup a breeze. I’ve seen friends bake these cookies on foil, only to have them stick and lose their shape. Use parchment and you’ll get perfect edges every time.
Dusting Technique Matters
When dusting powdered sugar, use a fine mesh sifter to avoid clumps. If the sugar clumps, the cookie will look uneven and the texture will be uneven. I’ve used a coffee filter to sift the sugar; it’s inexpensive and does the job beautifully.
Creative Twists and Variations
This recipe is a playground. Here are some of my favorite ways to switch things up:
Minty Madness
Replace the vanilla extract with 1 teaspoon of mint extract. The fresh mint flavor pairs beautifully with the green color, creating a refreshing twist that’s perfect for a summer holiday party.
Chocolate Drizzle
After dusting with powdered sugar, drizzle melted dark chocolate over the cookies. The chocolate hardens into a glossy finish, adding richness and a chocolatey crunch that contrasts the sweet base.
Nutty Delight
Fold in ¼ cup chopped walnuts or pecans before baking. The nuts add a delightful crunch and a nutty aroma that elevates the cookie from ordinary to extraordinary.
Gluten‑Free Version
Swap the all‑purpose flour for a gluten‑free blend that has a similar protein content. Keep the rest of the recipe unchanged; the cookies will still rise nicely and maintain their signature texture.
Vegan Adaptation
Use a plant‑based butter and replace the egg with a flaxseed “egg” (1 tablespoon ground flaxseed mixed with 3 tablespoons water). The result is a cookie that’s entirely vegan but still retains the chewy center and crisp edges.
Holiday Spice
Add ¼ teaspoon ground cinnamon and a pinch of nutmeg to the dry mix. The warm spices give the cookies a cozy, wintery flavor that pairs well with hot cocoa or eggnog.
Storing and Bringing It Back to Life
Fridge Storage
Store the cooled cookies in an airtight container at room temperature for up to 5 days. The airtight seal prevents the cookies from drying out and preserves their crisp edges.
Freezer Friendly
For longer storage, place the cookies in a freezer‑safe zip‑lock bag and freeze for up to 3 months. When ready to enjoy, let them thaw at room temperature for 15 minutes before serving.
Best Reheating Method
To revive frozen cookies, preheat the oven to 300°F (150°C). Place the cookies on a parchment‑lined sheet and bake for 5–7 minutes, or until they’re warm and slightly crisp. Add a tiny splash of water before reheating to create steam, which helps the cookies regain their original softness.