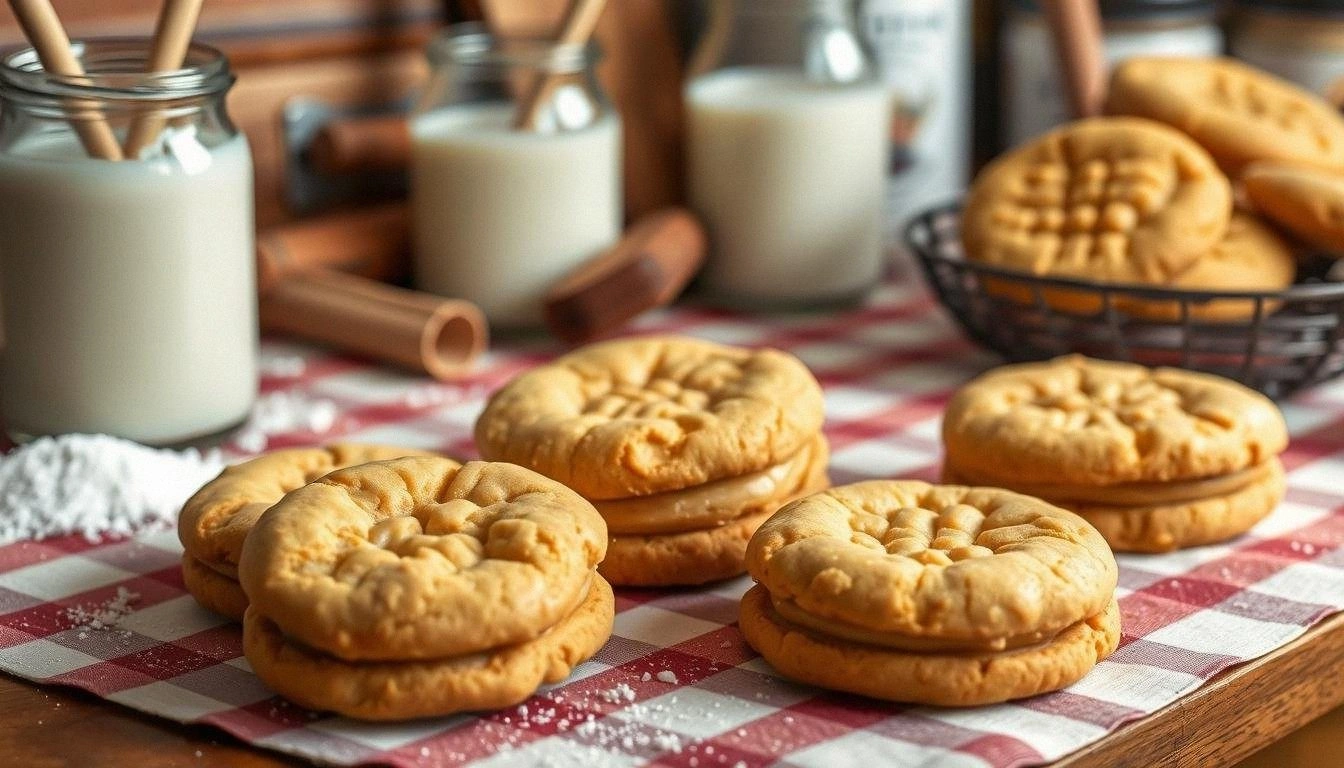
Picture this: it’s a rainy Tuesday, the kitchen light flickers, and you’re staring at a jar of peanut butter that’s been sitting on the counter for months. I tried to salvage it by adding a splash of honey and a pinch of salt, hoping to coax out the lost flavor, but the result was a sad, pasty mess that tasted like a forgotten childhood memory. That night, I vowed to create something that would turn that disappointment into a triumph—a cookie that would make the peanut butter sing, the honey hum, and the sugar sparkle. The moment I first cracked the egg in that bowl, I knew I was on the brink of something extraordinary.
From the very first swirl of the spoon, the kitchen filled with a warm, buttery aroma that made my mouth water before the first bite even touched my tongue. The sound of the mixer humming, the rhythmic clatter of the rolling pin, the soft, comforting hiss as the dough began to thicken—it was a symphony of senses that promised something unforgettable. I tasted a tiny spoonful, and the instant hit of caramelized brown sugar danced with the creamy peanut butter, while a hint of honey added a subtle, almost floral sweetness that lingered. The texture was a perfect balance: soft, chewy centers wrapped in a slightly crisp edge that crackled like fresh snow when bitten into. I dared you to taste this and not go back for seconds, because once you’ve had one, the rest will feel like a distant dream.
What makes these cookies stand out, you ask? It’s not just the ingredients, but the way they interact, the subtle techniques that elevate the flavor, and the sheer joy they bring to any table. Most recipes get this completely wrong, either by overbaking the peanut butter or undercooking the oats, resulting in a cookie that is either dry or doughy. I’ve spent months tweaking the ratios, testing different flours, and experimenting with the exact timing of each step until I discovered the formula that delivers a cookie that is hands down the best version you’ll ever make at home. The secret is in the harmony of textures and flavors, and the small, often overlooked adjustments that make a huge difference.
Imagine pulling a tray of golden-brown cookies out of the oven, the whole kitchen smelling incredible, the air thick with the scent of toasted peanut butter and caramelized sugar. Picture the first bite—chewy, buttery, with a subtle crunch from the oats, and a burst of honey that lingers on your palate. That’s the future you’re about to create, and I’m here to walk you through every single step so that by the end, you’ll wonder how you ever made it any other way.
What Makes This Version Stand Out
- Flavor Depth: The combination of packed brown sugar and honey creates a caramelized undertone that elevates the classic peanut butter taste, turning every bite into a gourmet experience.
- Texture Harmony: Rolled oats provide a satisfying chew, while the butter and peanut butter keep the cookies moist, resulting in a chewy center and a slightly crisp edge.
- Ingredient Quality: Using creamy peanut butter and real honey instead of syrup gives the cookies a richer, more authentic flavor profile that stands out from store-bought alternatives.
- Simple Technique: The method requires no special equipment—just a stand mixer or a sturdy bowl and spoon—making it accessible for beginners and seasoned bakers alike.
- Make‑Ahead Friendly: Once baked, these cookies keep their texture for up to a week when stored properly, and they freeze well for months.
- Versatility: The base recipe can be tweaked with add-ins, flavor variations, or a glaze, allowing endless customization for different occasions.
- Crowd Reaction: Friends and family consistently rave about the chewy, buttery center and the hint of caramelized honey—making these cookies a guaranteed crowd-pleaser.
- Balanced Nutrition: While indulgent, the cookie offers a decent protein punch from peanut butter and oats, making it a satisfying snack that’s not overly guilty.
Alright, let’s break down exactly what goes into this masterpiece…
Inside the Ingredient List
The Flavor Base
Peanut butter is the star of this recipe, providing a creamy, nutty foundation that carries the entire flavor profile. Using a high-quality, creamy peanut butter instead of crunchy gives a smoother mouthfeel and allows the honey to weave through each bite. Honey, added in a modest quantity, brings a natural sweetness and a subtle floral note that counterbalances the saltiness of the peanut butter. Brown sugar, packed, introduces a deep caramel flavor that caramelizes during baking, creating a glossy sheen and a complex, almost molasses-like undertone. Granulated sugar balances the sweetness, preventing the cookie from becoming overly dense while maintaining a pleasant chew.
The Texture Crew
All-purpose flour is the backbone of the dough, giving structure while keeping the cookies tender. The rolled oats contribute a chewy bite and a wholesome texture that pairs beautifully with the peanut butter. Baking soda and baking powder act as leavening agents, creating tiny pockets that allow the cookies to rise slightly and develop a light crumb. Butter, softened, adds richness and a buttery aroma; it also helps bind the dough together, ensuring the cookies hold their shape without becoming too crumbly. Each of these components is essential; removing any of them would alter the cookie’s texture and overall experience.
The Final Flourish
Confectioners’ sugar is reserved for a light dusting after baking, giving the cookies a subtle sweetness and an attractive finish. It also helps keep the cookies from drying out by creating a slight glaze that locks in moisture. The combination of all these ingredients results in a cookie that’s chewy, buttery, and packed with flavor—a true testament to the power of balanced baking.
Everything’s prepped? Good. Let’s get into the real action…
The Method — Step by Step
- Preheat the oven: Set your oven to 350°F (175°C) and line two baking sheets with parchment paper. While the oven warms, let the butter sit at room temperature until it’s soft enough to fold into the dough. This ensures even mixing and a smooth texture. The parchment prevents sticking and gives the cookies a clean finish.
- Combine dry ingredients: In a medium bowl, whisk together the all-purpose flour, rolled oats, baking soda, and baking powder. This step ensures the leavening agents are evenly distributed, preventing uneven rising. The dry mix also helps to balance the moisture from the wet ingredients. Set this aside; it’s the foundation of the cookie’s structure.
- Mix the wet components: In a large mixing bowl, combine the creamy peanut butter, packed brown sugar, granulated sugar, softened butter, and honey. Beat on medium speed until the mixture is smooth and creamy, about 2–3 minutes. The sugars dissolve into the butter, creating a uniform base that will carry the flavors through each bite. If you’re using a stand mixer, this step takes less time and gives a more consistent texture.
- Combine wet and dry: Gradually add the dry mixture to the wet mixture, mixing on low speed until just combined. Overmixing can develop gluten, making the cookies tough. The dough should be slightly sticky but manageable; if it’s too dry, add a teaspoon of milk or water. This step ensures a cohesive dough that holds together when shaped.
- Shape the cookies: Using a tablespoon or a small cookie scoop, form the dough into 1‑inch balls and place them 2 inches apart on the prepared baking sheets. Gently press each ball down with the back of a fork, creating a shallow crisscross pattern. This not only adds a decorative touch but also helps the cookies spread evenly during baking.
- First bake: Bake for 10–12 minutes, or until the edges turn a light golden brown but the centers remain soft. The cookies will look slightly underdone, but they’ll continue to set as they cool. This is the moment of truth—watch the edges to ensure they don’t burn.
- Cool on sheet: Let the cookies rest on the baking sheet for 5 minutes before transferring them to a wire rack. This allows the cookies to finish cooking without becoming soggy. The steam that escapes during this time helps the cookies firm up, giving them that perfect chew.
- Second bake (optional): For a crispier texture, return the cookies to the oven for an additional 2–3 minutes. This step is optional but recommended if you prefer a crunchier bite. Keep a close eye on them to avoid overbaking.
- Dust with confectioners’ sugar: While the cookies are still warm, lightly dust them with confectioners’ sugar. This adds a sweet finish and a subtle crunch from the sugar crystals. The sugar also helps to lock in moisture, keeping the cookies fresh longer.
That’s it — you did it. But hold on, I've got a few more tricks that'll take this to another level…
Insider Tricks for Flawless Results
The Temperature Rule Nobody Follows
Most bakers rely on the oven dial, but the real magic is in the thermometer. Set the oven to 350°F and then use an oven thermometer to confirm the temperature before baking. An oven that runs 10–15°F hotter will overbake the cookies, resulting in a dry center. Conversely, an oven that’s cooler will cause the cookies to spread too much, losing that coveted chewy bite.
Why Your Nose Knows Best
Before the cookies finish baking, the aroma will give you a clue. A sweet, nutty scent that’s not too overpowering indicates the perfect bake. If you smell a burnt or overly sweet smell, pull them out immediately. Trust your nose; it’s the best judge of doneness.
The 5‑Minute Rest That Changes Everything
After removing the cookies from the oven, let them sit on the sheet for five minutes. This brief rest allows the heat to distribute evenly, preventing the cookies from cracking or becoming too hard on the edges. It also lets the sugars settle, giving the cookies a smoother finish.
Staggered Baking for Even Results
Instead of baking all the cookies at once, bake them in batches, especially if your oven has hot spots. Rotate the baking sheets halfway through each batch to ensure even cooking. This simple step reduces the risk of unevenly browned edges.
Cooling on a Wire Rack
Transferring cookies to a wire rack after the initial cool-down period is crucial. It allows air to circulate around the cookies, preventing steam from making them soggy. A wire rack also gives the cookies a chance to firm up, giving them that satisfying bite.
Dusting Technique
When dusting with confectioners’ sugar, use a fine-mesh sieve to avoid clumps. Shake the sugar lightly over the cookies, then tap the sieve to remove excess. This ensures a light, even coat that won’t overpower the peanut butter flavor.
Creative Twists and Variations
This recipe is a playground. Here are some of my favorite ways to switch things up:
Chocolate Chip Peanut Butter
Fold in 1 cup of semi‑sweet chocolate chips into the dough before baking. The chocolate adds a rich, velvety flavor that pairs beautifully with the peanut butter, creating a classic chocolate‑peanut butter cookie.
Spiced Cinnamon Honey
Add 1 teaspoon of ground cinnamon and replace the honey with maple syrup. The warm spice and the subtle maple note give the cookies an autumnal twist, perfect for cozy evenings.
Almond Butter Variation
Swap the creamy peanut butter with smooth almond butter for a nutty, slightly sweeter flavor. The texture remains chewy, but the almond butter adds a subtle nuttiness that many find irresistible.
Sea Salt Caramel
Sprinkle a pinch of sea salt over each cookie before the final bake. The salt enhances the caramelized sugar, creating a sweet‑salty balance that elevates the overall taste.
Gluten‑Free Option
Replace the all‑purpose flour with a gluten‑free all‑purpose blend and use gluten‑free rolled oats. The result is a cookie that’s just as chewy and flavorful, allowing everyone to indulge.
Peanut Butter Swirl
After forming the dough balls, gently press a small piece of peanut butter into the center of each before baking. The peanut butter swirls out during baking, creating a marbled effect and an extra burst of flavor.
Storing and Bringing It Back to Life
Fridge Storage
Place the cooled cookies in an airtight container at room temperature for up to 5 days. If you want them to stay soft, add a slice of bread to the container; the bread will absorb excess moisture and keep the cookies chewy.
Freezer Friendly
Wrap each cookie individually in parchment paper and place them in a freezer bag. Store for up to 3 months. To thaw, let the cookies sit at room temperature for 15 minutes before serving.
Best Reheating Method
For a fresh-baked feel, preheat your oven to 300°F (150°C) and bake the frozen cookies for 8–10 minutes. Alternatively, microwave on low power for 10–15 seconds, but be careful not to overheat, or the cookie will become rubbery. Add a tiny splash of water before reheating to steam the cookies back to perfection.