I ruined Thanksgiving dessert five years ago. Not in a charming, Pinterest-fail kind of way—I'm talking smoke-alarm-screaming, mother-in-law-silently-staring, kids-crying-because-the-cake-looks-like-a-deflated-football level disaster. I had attempted one of those fancy pumpkin cheesecakes with the maple-caramel swirl and the candied pecan halo. What emerged from my oven resembled a lunar crater. My brother-in-law actually asked if it was a new savory bread bowl. I laughed, but inside I was plotting culinary revenge on every pumpkin dessert that ever dared to humiliate me.
Fast-forward to last October. Same kitchen, same oven, same cheap pans. But this time I had a secret weapon: a brownie batter that hugs pumpkin purée like they've been best friends since kindergarten. The first test batch disappeared in forty-three minutes—my teenage nephew counted because he wanted to prove he wasn't the one who ate half the pan. (He was.) The second batch made it to the neighborhood potluck where a woman I'd never met cornered me by the cider dispenser and demanded the recipe while waving a sticky, chocolate-smeared paper plate like a victory flag. By the third batch, I knew I had cracked the code to the perfect fall dessert: fudgy, spicy, chocolatey, and—plot twist—easier to make than opening a can of store-bought frosting.
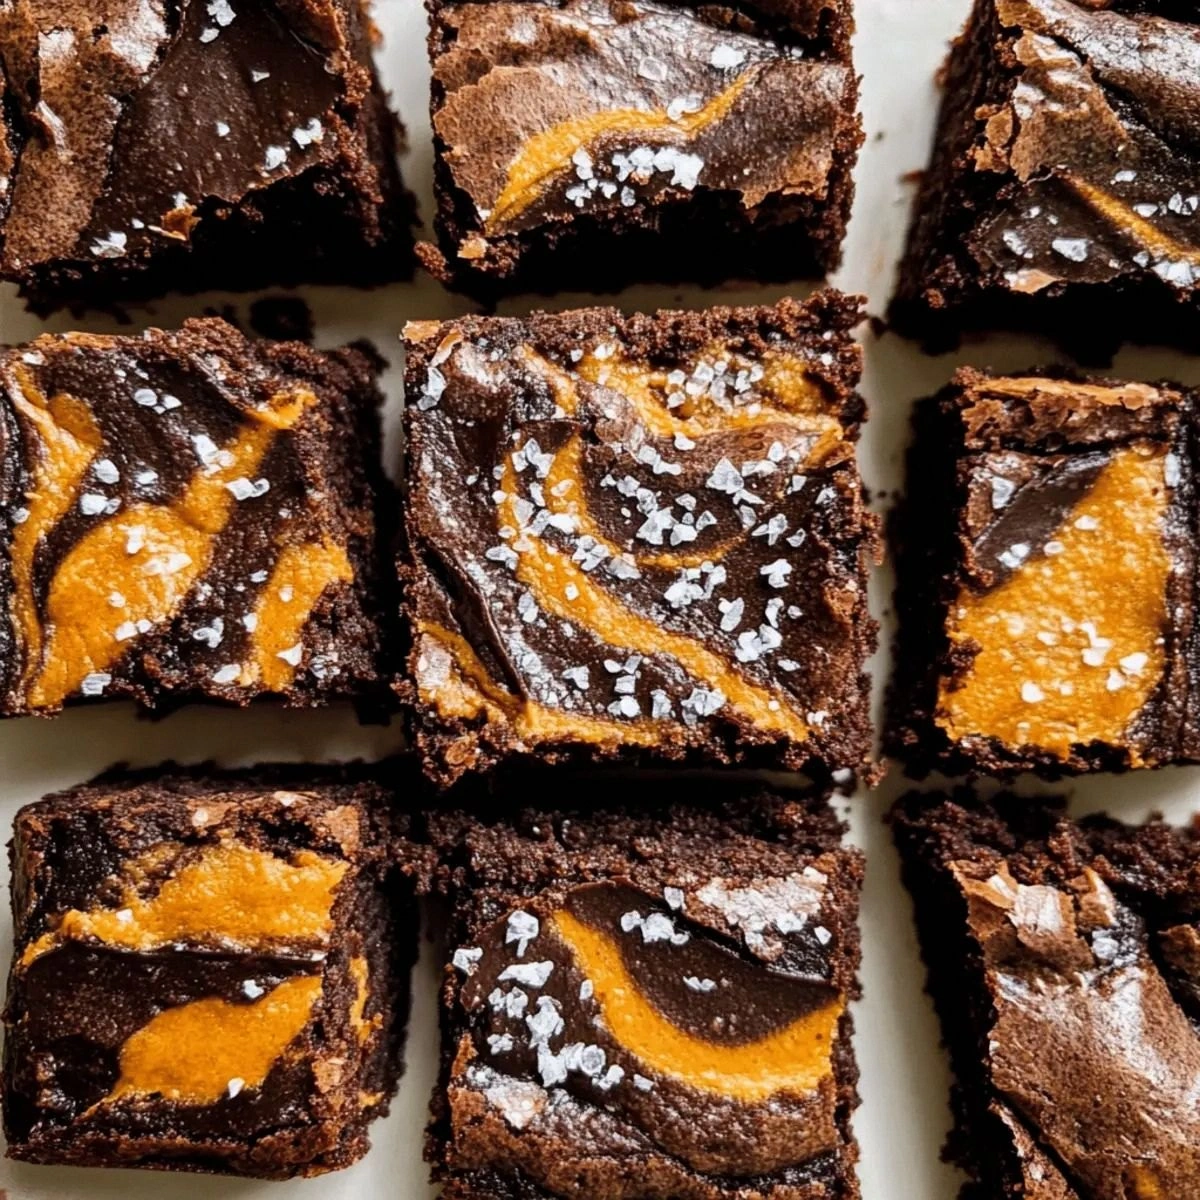
Picture this: It's 3 p.m. on a Sunday. Outside, the sky is doing that moody gray thing that makes you want to cancel plans and wear socks with owls on them. Inside, your kitchen smells like someone lit a candle called "October Hug"—warm cinnamon, bitter cocoa, and that earthy sweetness that only pumpkin can give. You pull a pan from the oven and the top is glossy like brownie royalty. The edges have pulled away just enough to whisper "cut me, I'm ready," but the center still jiggles like it's keeping a secret. That secret is the molten vein of pumpkin that keeps these bars impossibly moist for days, assuming they survive the night.
I dare you to taste one warm and not go back for seconds before the pan even cools. These aren't the cakey pumpkin squares your aunt brings to book club; these are the dark, mysterious cousins who wear leather jackets and ride motorcycles. They're brownies first, pumpkin second, and boring never. Stay with me here—this is worth it. Let me walk you through every single step—by the end, you'll wonder how you ever made it any other way.
What Makes This Version Stand Out
Fudgy Factor: Most pumpkin brownies fail because they bake up like orange-spiced sheet cake. Not these bad boys. We keep the flour low, the oil generous, and the chocolate aggressive so the crumb stays dense and truffle-like. The pumpkin doesn't water things down; it sneaks in moisture the way a best friend sneaks in a flask at a bad wedding—quietly and with maximum impact.
One-Bowl Brilliance: No separating eggs, no melting chocolate over a double boiler like you're auditioning for the Great British Bake Off. You whisk everything in one bowl in under five minutes, pour it into the pan, and you're done. If you've ever struggled with pumpkin desserts that require more equipment than a space shuttle, you're not alone—and I've got the fix.
Spice Without Overkill: Too many recipes turn pumpkin desserts into a cinnamon bomb that obliterates every other flavor. We use just enough ginger and nutmeg to whisper "autumn" without shouting over the chocolate. Think cozy sweater, not potpourri explosion.
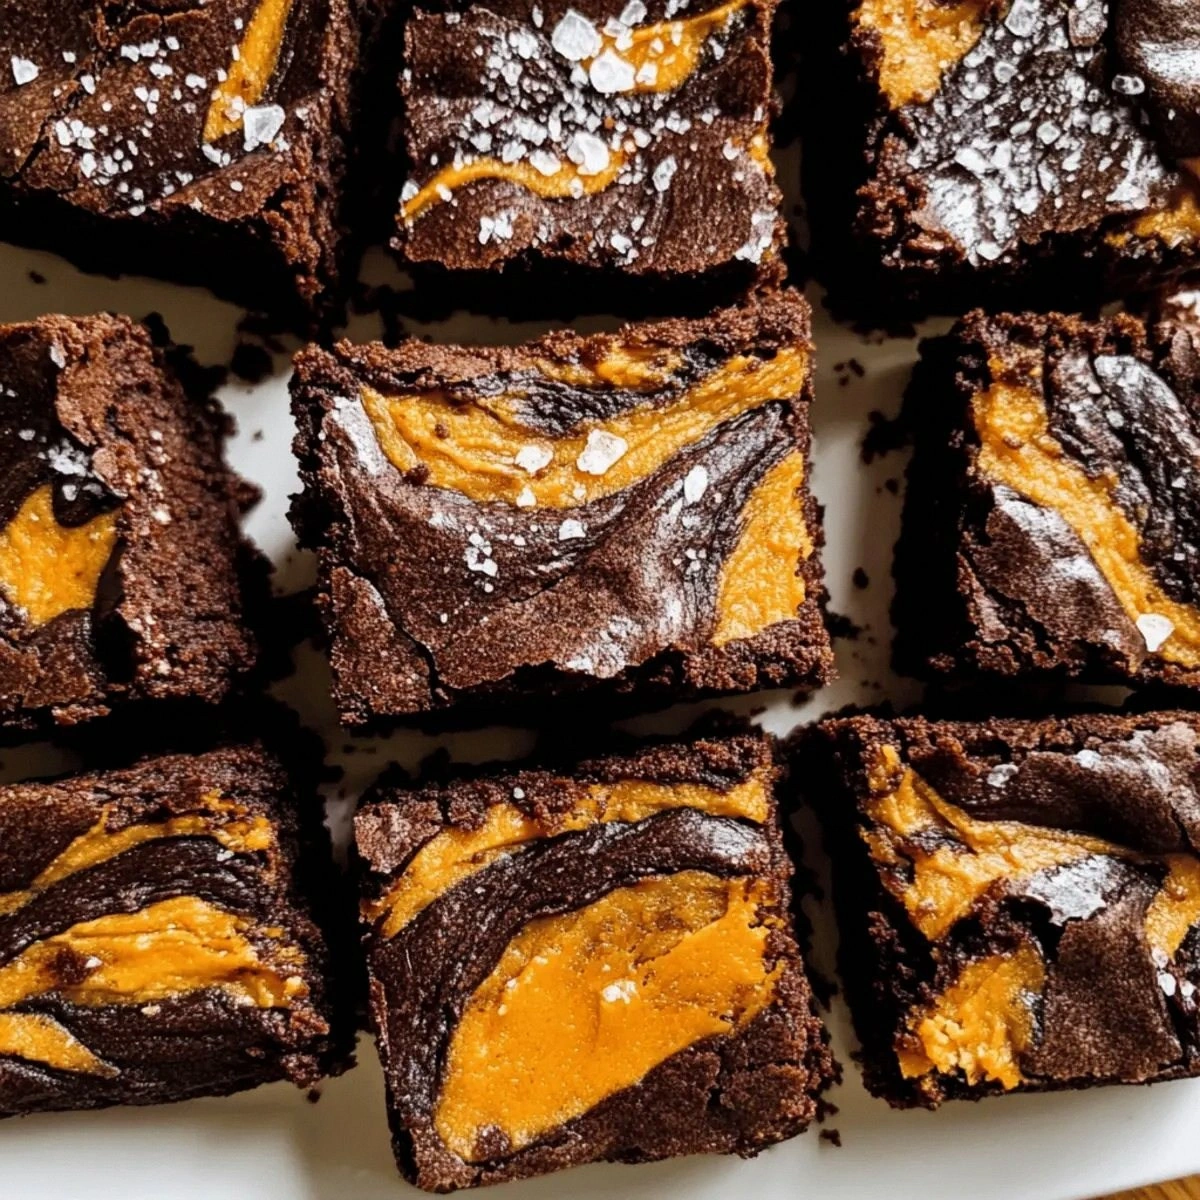
Texture Tango: Every bite gives you three distinct layers: the shiny, crackly brownie top, the silky pumpkin ribbon, and the toothsome nuggets of chopped chocolate that refuse to melt completely. It's like getting three desserts in one square, which means you can technically sample three times and still call it portion control.
Crowd Confusion: Serve these at a party and watch the reactions. People take a bite, pause, narrow their eyes, and say, "Wait, is that pumpkin?" It's the dessert equivalent of a plot twist in a thriller—familiar enough to love, surprising enough to talk about. I've seen self-proclaimed pumpkin haters go back for thirds after being dared to try one bite.
Make-Ahead Magic: These bars actually improve after a night wrapped tight on the counter. The spices bloom, the chocolate settles, the pumpkin becomes more mysterious. Bake on Sunday, bring to the office on Monday, become a legend by Tuesday. Future pacing: picture yourself pulling these out of your bag at the staff meeting while everyone else clutches sad grocery-store cookies.
Alright, let's break down exactly what goes into this masterpiece...
Inside the Ingredient List
The Flavor Base
All-purpose flour is the quiet kid in the back row who actually runs the whole show. We use only one cup—just enough to give the brownies structure without turning them into chocolate bricks. Skimp here and you'll have pumpkin soup with chocolate croutons; add more and you'll build yourself a chewy doorstop. Spoon and level the flour instead of scooping straight from the bag, unless you enjoy brownies that could double as workout weights.
Granulated sugar does double duty: it sweetens obviously, but it also creates that glossy, tissue-thin crust on top that shatters like thin ice when you cut it. I tested brown sugar versions and they tasted like pumpkin mud. White sugar keeps things crisp and lets the chocolate stay in the spotlight where it belongs. If you must reduce sugar, don't go below three-quarters cup or the whole structure sulks.
The Texture Crew
Unsweetened cocoa powder is the moody artist of the ingredient list. Go Dutch-processed for a smoother, Oreo-like vibe, or natural for a fruitier edge that plays well with pumpkin. Either way, make sure it's fresh; old cocoa tastes like regret and pencil shavings. Whisk it through a sieve if it's clumpy, because nobody wants to bite into a bitter cocoa boulder when they're expecting fudgy perfection.
Baking soda sounds boring until you realize it's the reason these brownies don't bake up like chocolate cement. It reacts with the acidic pumpkin and cocoa, creating tiny bubbles that lift the batter just enough to keep things tender. Skip it and you'll need a chainsaw to portion the pan. Use too much and your brownies taste like a science experiment gone wrong—precise measurement matters here.
The Unexpected Star
Pumpkin purée is the undercover agent that makes everything indecently moist without announcing itself. Make sure you grab plain purée, not the spiced pie filling, unless you want your brownies to taste like a candle shop. The canned stuff works beautifully, but if you're feeling extra and want to roast your own sugar pumpkin, I salute you—just drain off any excess water or you'll dilute the chocolate. One cup is the sweet spot; more and you risk gummy centers, less and you lose that autumnal whisper.
The Final Flourish
Vegetable oil keeps the crumb luxuriously tender long after the pan cools. Butter tastes great but firms up when cold, giving you that disappointing brick effect the next day. Oil stays loose and playful, ensuring your brownies stay fudgy even straight from the fridge. If you're out, melted coconut oil works, but expect a subtle coconut perfume that some find delightful and others compare to sunscreen.
Semisweet chocolate chopped into rustic chunks creates pockets of molten delight that refuse to fully melt during baking. Chocolate chips are engineered to hold their shape; we want chaos. Grab a good bar—something you'd happily eat on its own—and hack it with a chef's knife. The irregular shards melt into rivers and puddles, so every bite has a different chocolate experience. It's like a box of chocolates, but better because you actually know what you're getting.
Everything's prepped? Good. Let's get into the real action...
The Method — Step by Step
- Preheat your oven to 350°F (175°C) and line an 8-inch square pan with parchment paper, leaving wings on two sides so you can lift the whole slab out later. Don't skip the wings; they're the difference between Instagram-worthy squares and a pile of sad, broken brownie rubble. While the oven is heating, take a moment to appreciate the quiet before the storm—soon your kitchen will smell like Willy Wonka's vacation home. If your oven runs hot (and many do), drop the temp to 325°F or the edges will scorch before the center figures out what it's doing.
- In a large bowl, whisk together the flour, sugar, cocoa powder, baking soda, and salt until the mixture looks like fancy hot cocoa mix. Break up any cocoa lumps with your fingers; think of it as a mini stress ball that smells like dessert. This dry mix step prevents streaks of white flour in the final brownies, which is the culinary equivalent of wearing socks with sandals—technically functional but visually tragic. The contrast between snowy sugar and midnight cocoa is your visual cue that everything is evenly distributed.
- Add the oil, vanilla, and pumpkin purée to the dry ingredients. Switch to a silicone spatula and fold everything together with slow, confident strokes. The batter will start out thick and stubborn, then relax into a glossy chocolate lava that coats the spatula like velvet. Resist the urge to add liquid; trust the pumpkin to hydrate everything gradually. If you've ever struggled with dry brownies, you're not alone—and I've got the fix right here in this sticky, squash-laden batter.
- Fold in the chopped chocolate and nuts until they're speckled throughout like treasure in a dark cave. Take a second to admire how the orange pumpkin streaks marble through the chocolate—it's autumn in abstract art form. Don't overmix or the gluten will get cocky and give you tough brownies. Stop when everything is just combined and the chips look like they're suspended in chocolate quicksand.
- Scrape the batter into your prepared pan and spread it to the corners with an offset spatula or the back of a spoon. It will be thick and reluctant, like it's trying to nap on the couch. Wet your fingertips lightly and press the top gently to even it out; this prevents overbaked peaks and underbaked valleys. Give the pan a few firm taps on the counter to pop any sneaky air bubbles hiding in the depths.
- Bake for 25 to 30 minutes, rotating halfway through for even browning. The edges should rise first and start to look matte, while the center stays slightly jiggly—think brownie lava cake. If you wait until a toothpick comes out clean, you've overshot into cake territory. Pull them when the toothpick comes out with a few moist crumbs clinging like chocolate confetti.
- Cool the pan on a wire rack for at least an hour. I know, this is the hardest part. Your house smells like a chocolate factory had a baby with a pumpkin patch and you're supposed to just... wait? Trust the process. As they cool, the residual heat finishes baking the center gently, creating that coveted fudgy texture. Cut too soon and you'll have brownie soup with chocolate croutons.
- Lift the slab out using the parchment wings and cut into 16 squares with a sharp knife dipped in hot water. Wipe the blade between cuts for bakery-level edges that make you look like a pastry school valedictorian. The first piece is always a sacrifice to the brownie gods—crumbly and imperfect—so chef's treat. Arrange the rest on a platter and watch them vanish faster than your motivation on a Monday morning.
That's it—you did it. But hold on, I've got a few more tricks that'll take this to another level...
Insider Tricks for Flawless Results
The Temperature Rule Nobody Follows
Room-temperature pumpkin mixes more evenly, which means no streaky batter and no surprise pockets of squash. If your can has been chilling in the pantry, scoop what you need into a microwave-safe bowl and zap it for 15 seconds. You're not trying to cook it—just taking the refrigerator edge off so it marries smoothly with the oil. Cold pumpkin can seize the oil into tiny beads, giving your brownies the texture of curdled chocolate. Sounds appetizing, right? Yeah, didn't think so.
Why Your Nose Knows Best
Don't trust the timer blindly; trust your sense of smell. When the cocoa's deep, malty aroma mingles with the warm spices and drifts into the living room, start checking for doneness. If you smell something sharp or burnt, you've probably overshot. That scent shift happens about two minutes before overbaking, giving you just enough time to yank the pan and save Thanksgiving dessert redemption.
The 5-Minute Rest That Changes Everything
After cooling completely, wrap the cut brownies tightly in foil and let them sit overnight at room temperature. I discovered this by accident when I hid a batch from my kids and forgot about them. The next day the flavors had melded into a unified chocolate-pumpkin symphony, and the texture had settled into that perfect chewy-fudgy hybrid. A friend tried skipping this step once—let's just say it didn't end well. Her text the next morning: "They taste good but feel confused." Don't let your brownies feel confused.
The Plastic-Wrap Seal That Stops Stale
Store brownies with a sheet of plastic wrap pressed directly onto the surface. This prevents the dreaded crusty edge that turns into chocolate jerky overnight. You want that glossy top to stay supple, like a freshly iced brownie, even on day three. Yes, day three. I'm optimistic you'll have leftovers; I'm also realistic that you might eat them in the car before you get home. No judgment here.
Creative Twists and Variations
This recipe is a playground. Here are some of my favorite ways to switch things up:
Mocha Pumpkin Mudpuddle
Dissolve 2 teaspoons instant espresso powder in 1 teaspoon hot water and whisk it in with the oil. The coffee amplifies the cocoa so aggressively that people will swear you used fancy 80% dark chocolate. Top with a whisper of flaky salt for that sweet-salty-mocha-pumpkin collision that makes coffee-shop pastries taste like amateur hour.
White Chocolate Cheesecake Swirl
Beat 4 oz softened cream cheese with 2 tablespoons sugar and 1 egg until smooth. Dollop over the batter in the pan and drag a knife through to marble. Scatter white chocolate chips on top. The tangy cream cheese plays off the earthy pumpkin like they're starring in a romantic comedy where opposites attract and live deliciously ever after.
Spicy Maple Bourbon
Swap 2 tablespoons of the oil for bourbon, add 1 tablespoon maple syrup, and spike the batter with a pinch of cayenne. The alcohol bakes off, leaving behind a smoky depth that makes grown-ups close their eyes and sigh. The cayenne warms the back of your throat just enough to remind you you're alive and that dessert can have a sense of humor.
Triple Coconut Escape
Use coconut oil, fold in toasted coconut flakes, and replace half the chopped chocolate with coconut chocolate chips. You'll feel like you're eating brownies on a beach in October, which is confusing in the best possible way. Add a tiny umbrella if you want to confuse your guests even more.
Peanut Butter Cup Mash-Up
Plop rounded teaspoons of peanut butter over the batter and drag a toothpick through to create tiger stripes. Add chopped peanut butter cups instead of nuts. The salty-sweet combo hits the same brain receptors as top-tier Halloween candy, but with adult sophistication—like wearing a tuxedo over your superhero pajamas.
Orange Zest Zing
Microplane the zest of one orange into the batter. The citrus oils brighten the chocolate and make the spices sing like a Broadway encore. It's subtle—people won't pinpoint the flavor—but they'll keep saying, "There's something happy in here." Sometimes happiness is just orange oil wrapped in chocolate.
Storing and Bringing It Back to Life
Fridge Storage
These brownies keep beautifully for up to five days in the refrigerator—if you're the kind of disciplined unicorn who can resist them that long. Wrap the pan tightly in plastic, then again in foil to lock out fridge odors. Cold brownies have a truffle-like density that feels downright fancy. Let them sit at room temp for 20 minutes before serving so the chocolate relaxes and the flavors bloom again.
Freezer Friendly
Cut into squares, layer between parchment in an airtight container, and freeze for up to three months. I always hide a few squares in the back behind the frozen peas—great insurance against last-minute guests or sudden chocolate emergencies. Thaw overnight in the fridge or for 30 minutes on the counter. Pro move: microwave a frozen square for 15 seconds so the center turns into molten pudding while the edges stay chewy.
Best Reheating Method
Add a tiny splash of water to a microwave-safe plate, set a brownie on top, and microwave for 10 seconds. The water creates a gentle steam that restores the glossy top and fudgy center without drying the edges. If you're reheating several, wrap them in foil and warm in a 300°F oven for 8 minutes. They emerge tasting almost as good as fresh—like they just came back from a spa day.