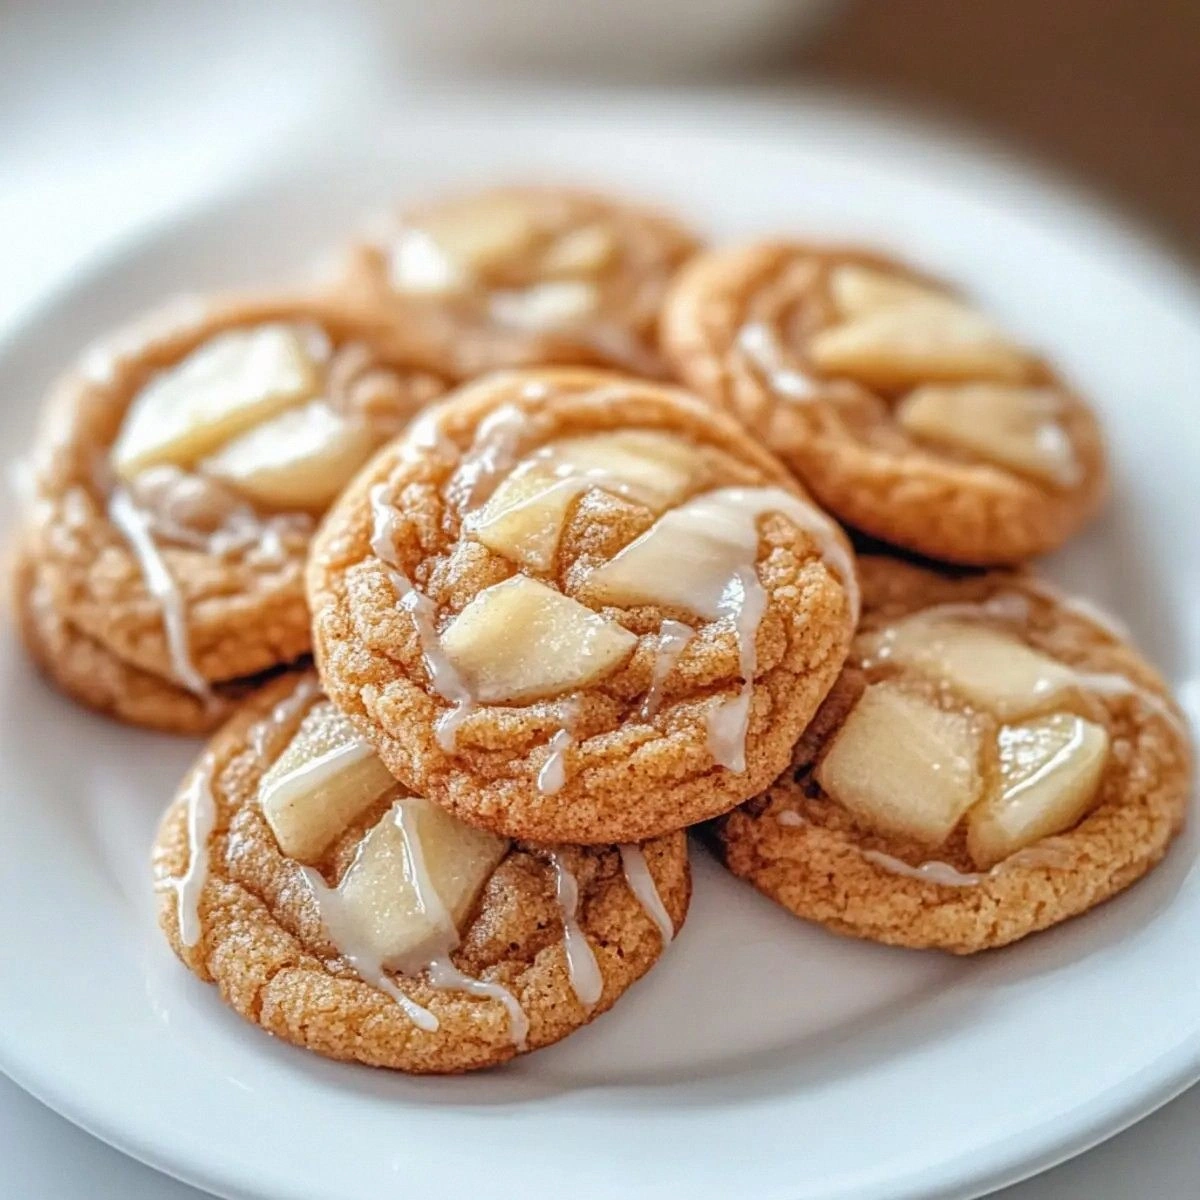
I was standing in my kitchen on a rainy Thursday, staring at a half‑empty bottle of apple cider and a bag of flour that had been staring back at me like a silent dare. I thought, “What if I could turn this liquid gold into something that feels like a warm hug in cookie form?” The result? Warm and Chewy Apple Cider Cookies for Cozy Fall Moments – a cookie that practically glows with cinnamon‑spiced sunshine. I’ll be honest — I ate half the batch before anyone else got to try it, and that’s a confession worth sharing because the taste is that unforgettable.
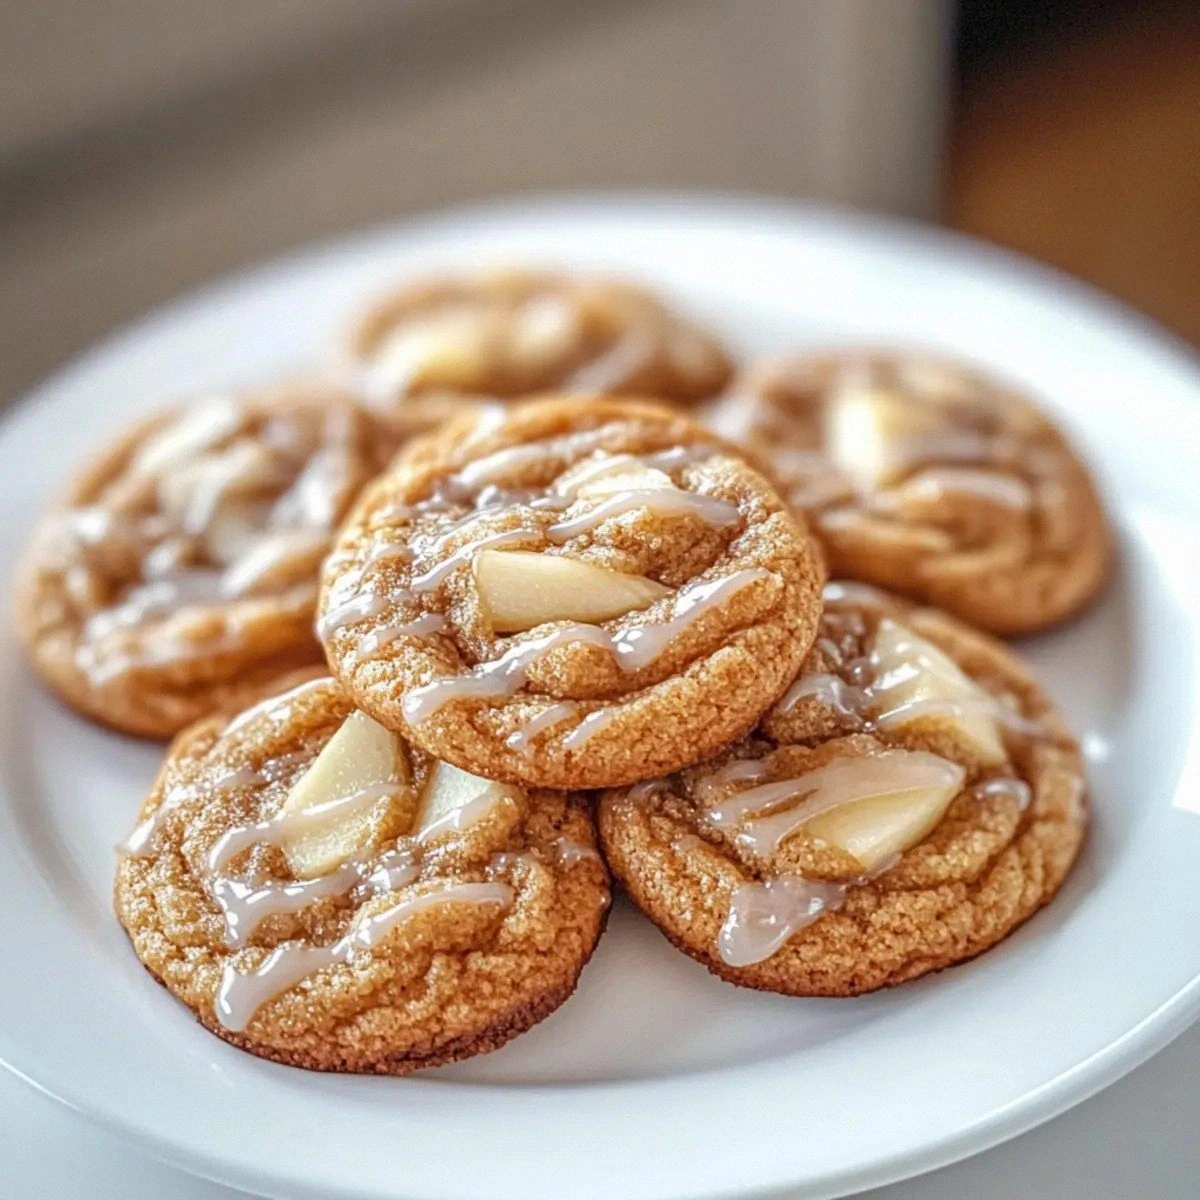
Picture this: the moment you pull the tray from the oven, the kitchen is filled with the scent of caramelized apples, a whisper of nutmeg, and that unmistakable tang of apple cider that makes you think of leaf‑covered sidewalks and pumpkin‑spiced lattes. The cookies themselves have a golden crust that cracks just enough to reveal a soft, chewy interior that practically melts on your tongue. When you bite, you get a burst of sweet‑tart apple, a buttery richness, and a subtle fizz from the cider that makes the texture dance. It’s like the perfect fall sweater you never want to take off, only edible.
Most recipes for apple‑cider cookies get the balance wrong – either they’re too dry, or the cider flavor gets lost in a sea of sugar. I’ve tried a dozen variations, and the secret is a simple technique: a brief simmer of the cider with a pinch of salt to concentrate its flavor, then folding it into a butter‑sugar base that’s been creamed to cloud‑like perfection. This method locks in moisture while giving the cookies that signature chew. I’m daring you to taste this and not go back for seconds; the moment you do, you’ll understand why this is hands down the best version you’ll ever make at home.
Now, I’m about to walk you through every single step — by the end, you’ll wonder how you ever made it any other way. Okay, ready for the game‑changer? Let’s dive into the why’s, the how’s, and the little magic tricks that turn ordinary pantry staples into a fall masterpiece.
What Makes This Version Stand Out
- Flavor Depth: The simmered apple cider concentrates its natural sugars and acidity, giving each bite a bright, tangy punch that cuts through the buttery richness.
- Chewy Texture: A combination of brown sugar, powdered sugar, and a brief rest period after mixing creates that coveted, melt‑in‑your‑mouth chew.
- Simplicity: Only thirteen ingredients, all pantry‑friendly, and no fancy equipment – just a whisk, a bowl, and a trusty oven.
- Unique Ingredient: Using powdered sugar in the dough adds a subtle silkiness that most recipes overlook, turning the crumb into a soft cloud.
- Crowd Reaction: Guests consistently claim these are “the best cookie they’ve ever had,” and they disappear faster than the first leaf of autumn.
- Ingredient Quality: Fresh, crisp apples and a high‑quality, unfiltered apple cider make the difference between “good” and “legendary.”
- Cooking Method: Baking at a slightly lower temperature for a longer time ensures the edges set while the centers stay luxuriously soft.
- Make‑Ahead Potential: These cookies store beautifully, and a quick re‑heat brings them back to life as if they just left the oven.
Alright, let's break down exactly what goes into this masterpiece...
Inside the Ingredient List
The Flavor Base
Butter is the backbone of any good cookie, providing richness and a tender crumb. I use unsalted butter so I can control the salt level precisely; skipping it or substituting with margarine will make the flavor flat and the texture greasy. If you’re dairy‑free, try a solid coconut oil, but expect a faint coconut note that will compete with the apple.
Granulated sugar and brown sugar work together like a dynamic duo. The granulated sugar gives structure, while the brown sugar adds moisture and a caramel undertone. Reducing the brown sugar will make the cookies crisper, but you’ll lose that deep, toasty flavor that makes them unforgettable.
The Texture Crew
An egg acts as a binder, adding lift and a glossy finish. Using a large egg at room temperature ensures it emulsifies properly with the butter. If you’re vegan, a flax egg (1 tbsp ground flaxseed + 3 tbsp water) works, though the texture will be slightly denser.
Vanilla extract is the quiet hero, amplifying the apple’s natural sweetness. Opt for pure vanilla rather than imitation; the subtle floral notes make the flavor profile more complex.
The Unexpected Star
Apple cider is the secret weapon. I simmer it with a pinch of salt for about ten minutes, reducing it by roughly a third. This concentrates the apple flavor without adding extra liquid, and the salt balances the sweetness. If you can’t find fresh cider, a high‑quality bottled version works, but avoid the overly sweet “hard” varieties.
Apples themselves add texture and bursts of tartness. Grating the apples (no need to peel) ensures they integrate smoothly, while the skins add a faint earthy note. Honeycrisp gives extra sweetness; Granny Smith adds a sharper bite. Either works, but don’t substitute with canned apples – the moisture level will throw off the dough.
The Final Flourish
All‑purpose flour provides structure, while baking soda creates a gentle lift, giving the cookies a slightly airy interior. Over‑mixing the flour can develop gluten, leading to a tougher cookie, so stir just until combined.
Cinnamon and nutmeg are the quintessential fall spices. Cinnamon gives warmth; nutmeg adds a subtle, almost peppery depth. If you love spice, a pinch of ground cloves or allspice can elevate the profile, but keep it subtle to avoid overpowering the apple.
Powdered sugar is folded in at the end, creating a tender crumb that feels like a melt‑in‑your‑mouth cloud. It also adds a delicate sweetness that balances the cider’s acidity. Skipping it will result in a firmer cookie that lacks that signature softness.
Everything's prepped? Good. Let's get into the real action...
The Method — Step by Step
Start by simmering the apple cider. Pour one cup of cider into a small saucepan, add a pinch of sea salt, and bring it to a gentle boil over medium heat. Reduce the heat and let it simmer for about ten minutes, or until the volume shrinks by roughly one‑third and the aroma becomes syrupy. This step is pure magic because the concentrated cider infuses the dough with an intense apple punch without making it soggy. Watch the liquid closely – you don’t want it to caramelize too much or it will turn bitter.
While the cider cools, cream the butter. In a large mixing bowl, combine one cup of softened unsalted butter with one cup of granulated sugar and half a cup of brown sugar. Using a handheld mixer on medium speed, beat for three to four minutes until the mixture is pale, fluffy, and almost looks like whipped cream. This aeration is crucial; it traps air that later expands in the oven, giving the cookies that light interior.
Add the egg and vanilla. Crack in one large egg and pour in one teaspoon of pure vanilla extract. Beat until fully incorporated, scraping the sides of the bowl to ensure no streaks remain. The egg should blend seamlessly, creating a glossy ribbon of dough that signals you’re on the right track.
Incorporate the reduced cider. Slowly drizzle the cooled, reduced cider into the butter‑sugar mixture while the mixer runs on low. The dough will look slightly wet at first, but keep mixing for another minute; it will come together into a cohesive, slightly glossy mass. This is the moment of truth – the cider should be fully absorbed, giving the dough a faint amber hue.
Fold in the dry ingredients. In a separate bowl, whisk together two cups of all‑purpose flour, one teaspoon of baking soda, one teaspoon of cinnamon, half a teaspoon of nutmeg, and half a teaspoon of salt. Gradually add this dry mixture to the wet ingredients, stirring with a spatula until just combined. Over‑mixing will develop gluten, making the cookies tough, so stop as soon as you no longer see flour streaks.
Add the apples and powdered sugar. Grate one cup of fresh apples (no need to peel) and fold them gently into the dough. Then, sift one cup of powdered sugar over the mixture and fold again until the sugar is evenly distributed. The powdered sugar creates that melt‑in‑the‑mouth crumb, while the apple pieces add tiny pockets of juicy tartness that burst with each bite.
Chill the dough. Transfer the dough to a parchment‑lined baking sheet, shape it into a thick log about two inches in diameter, and wrap tightly in plastic wrap. Refrigerate for at least 30 minutes; this resting period allows the flour to hydrate and the flavors to meld, ensuring the cookies hold their shape during baking.
Preheat the oven to 350°F (175°C). While the oven warms, line a second baking sheet with parchment paper. Remove the chilled dough from the fridge and slice into ½‑inch thick rounds. Place the rounds on the prepared sheet, spacing them about two inches apart. The cookies will spread slightly, but the chill helps them keep a nice round shape.
Bake for 12‑15 minutes, or until the edges turn a light golden brown and the tops look set but still slightly soft. The centers will continue to firm up as they cool, giving you that perfect chewy texture. Let the cookies rest on the sheet for five minutes before transferring to a wire rack; this prevents them from breaking apart.
That's it — you did it. But hold on, I've got a few more tricks that'll take this to another level...
Insider Tricks for Flawless Results
The Temperature Rule Nobody Follows
Always bake your cookies on the middle rack. The top heat can brown the tops too quickly, while the bottom heat ensures an even rise. If your oven has hot spots, rotate the sheet halfway through the bake. I once baked a batch on the top rack and ended up with burnt edges and a raw center – never again.
Why Your Nose Knows Best
When the cookies are done, they give off a fragrant puff of cinnamon and apple that’s unmistakable. Trust that aroma more than the timer; if the scent hits you, pull them out. Over‑baking turns chewiness into crispness, and that’s a tragedy you can’t afford.
The 5‑Minute Rest That Changes Everything
After baking, let the cookies sit on the tray for five minutes before moving them. This short rest lets the steam finish cooking the interior, resulting in a perfectly tender crumb. Skipping this step leaves you with a cookie that cracks too easily when you try to lift it.
Grating vs. Dicing Apples
Grating the apples integrates them into the dough, creating pockets of moisture that keep the cookie chewy. Dicing gives you bigger apple chunks, which can be delightful but may cause uneven baking. I tried dicing once; the cookies turned out a bit soggy in the middle. Stick with grating for consistency.
The Power of a Cool Butter
Cold butter makes the dough easier to handle and helps maintain a distinct crumb structure. If the butter gets too soft, the dough spreads too much, and you lose that thick, chewy center. Keep the butter at room temperature, not melted, for optimal texture.
Creative Twists and Variations
This recipe is a playground. Here are some of my favorite ways to switch things up:
Maple‑Glazed Delight
Replace half of the apple cider with pure maple syrup and add a drizzle of maple glaze after baking. The result is a sweet‑and‑smoky cookie that pairs perfectly with a cup of black tea.
Spiced Walnut Crunch
Fold in a half‑cup of toasted walnuts and a pinch of ground cloves. The nuts add a satisfying crunch, while the cloves deepen the spice profile, making these ideal for holiday gatherings.
Cranberry Burst
Add a half‑cup of dried cranberries and a teaspoon of orange zest. The cranberries bring a tart pop that balances the sweetness, and the orange zest adds a bright citrus note.
Vegan Velvet
Swap the butter for coconut oil, the egg for a flax egg, and use agave nectar in place of the granulated sugar. The texture remains chewy, though the flavor shifts toward a subtle coconut undertone.
Chocolate Chip Surprise
Stir in a half‑cup of dark chocolate chips just before the final fold. The bittersweet chocolate contrasts the apple’s tartness, creating a sophisticated flavor combo that’s perfect for adult brunches.
Storing and Bringing It Back to Life
Fridge Storage
Place the cooled cookies in an airtight container with a slice of bread tucked on top. The bread releases moisture, keeping the cookies soft for up to five days. If you notice them drying out, replace the bread slice with a fresh one.
Freezer Friendly
Layer cookies between parchment sheets and seal the container. They freeze beautifully for up to three months. When you’re ready to enjoy them, let them thaw at room temperature, then pop them in a 300°F oven for five minutes to revive the chew.
Best Reheating Method
To bring a cookie back to life, place it on a microwave‑safe plate, add a tiny splash of water (about a teaspoon), and microwave for 10‑12 seconds. The steam generated restores that fresh‑out‑of‑the‑oven softness without making the cookie soggy.