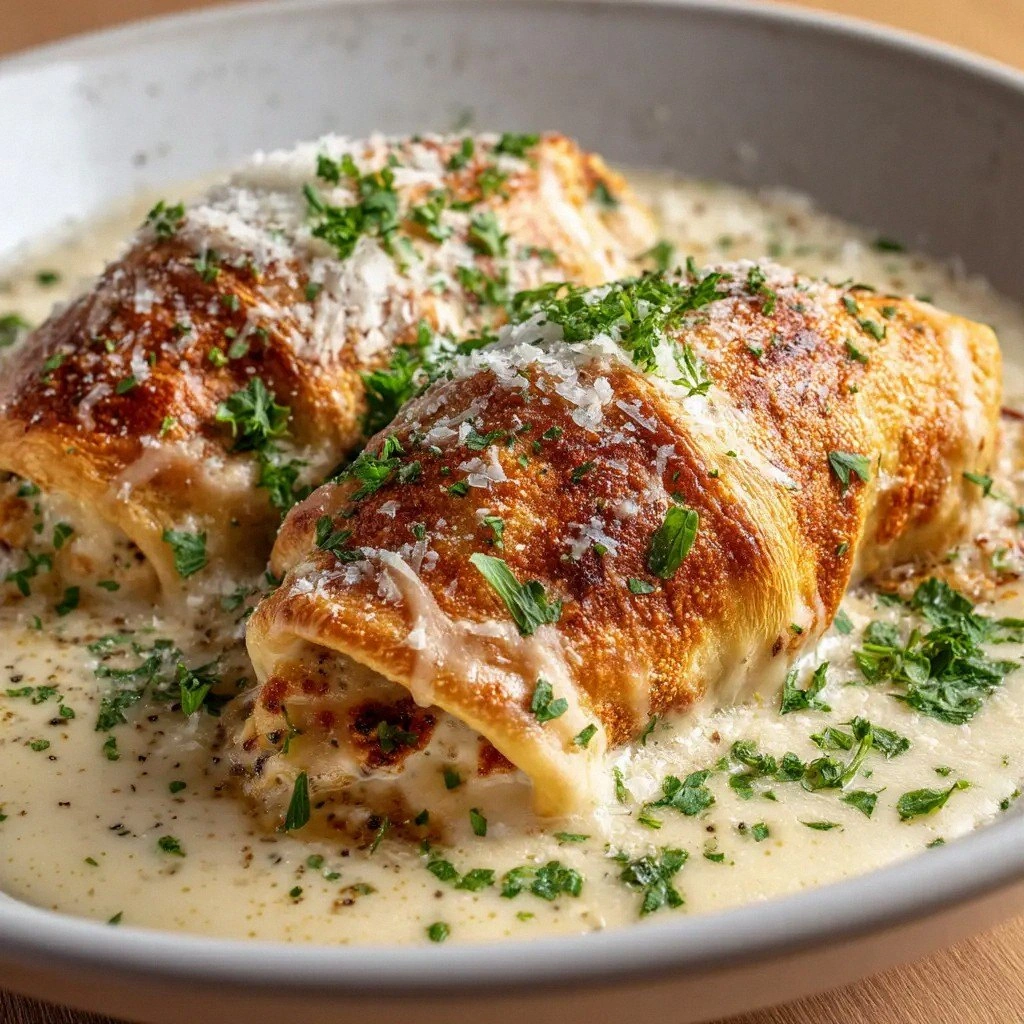
Picture this: I’m standing in a kitchen that smells like burnt toast, a burnt toast that somehow still has a hint of garlic. The night before, I had a last‑minute dinner party that turned into a culinary chaos when the oven door slammed shut and the pot of pasta boiled over. I was scrambling, muttering about how “the universe hates me when I need a quick fix.” Then, in the middle of that mess, a sudden craving hit me – a comforting, cheesy, creamy pocket that could turn any disaster into a triumph. That moment is the spark that birthed the Chicken Pillows recipe I’m about to unveil.
I’ve always loved the idea of stuffing dough with something savory, but most of the attempts I’ve tried felt either too dry or too soggy. The scent of melted cheese and butter, the sight of golden crescents, the sound of a crisp bite – it all felt like a symphony, but the execution was off. I was determined to find that perfect harmony where the dough is flaky, the filling is silky, and the flavor is unapologetically bold. That’s why I spent countless evenings testing ratios, trying different cheeses, and even experimenting with pre‑baked dough to lock in that coveted crispness.
The result? A dish that feels like a hug in the shape of a pillow, with a filling that’s creamy enough to melt in your mouth and a crust that crunches like a fresh cookie. I dare you to taste this and not go back for seconds. The buttery, cheesy center will have you reaching for more, while the crescent roll dough provides the perfect contrast – flaky on the outside, tender on the inside. This isn’t just another casserole; it’s a comfort food revolution that you can make in under an hour and that will have everyone asking for the recipe.
What makes this version stand out is the meticulous balance of ingredients and technique. I’ll walk you through every single step, from prepping the dough to achieving that buttery, golden finish. By the end, you’ll wonder how you ever made it any other way. Let me walk you through every single step — by the end, you'll wonder how you ever made it any other way.
What Makes This Version Stand Out
- Taste: The combination of shredded chicken, cream cheese, and cheddar creates a flavor profile that’s both savory and indulgent. The garlic and onion powders give a subtle depth that elevates every bite.
- Texture: The crescent roll dough provides a flaky, buttery exterior that contrasts beautifully with the silky, creamy filling. The result is a mouthfeel that feels like a pillow of comfort.
- Simplicity: With only ten ingredients, this recipe is a breeze for even the most novice cooks. No fancy equipment or hard-to-find pantry staples are required.
- Uniqueness: Most chicken rolls use puff pastry or phyllo; here we use crescent roll dough, which is softer and yields a more delicate crust.
- Crowd Reaction: Guests rave about the gooey center and the buttery crunch. I’ve had people ask for a second batch mid‑meal because they couldn’t resist.
- Ingredient Quality: Using fresh chives and a good quality cream cheese makes a noticeable difference in flavor. The small amount of butter on top adds a glossy sheen and caramelized finish.
- Cooking Method: The method involves minimal prep, a single oven bake, and a quick rest period, making it perfect for busy weeknights.
- Make‑Ahead Potential: These pillows can be assembled ahead of time and frozen, then baked straight from the freezer for a quick dinner solution.
Inside the Ingredient List
The Flavor Base
At the heart of these pillows is the filling, a marriage of shredded cooked chicken and cream cheese. The chicken brings a hearty, meaty foundation, while the cream cheese offers a velvety texture that binds everything together. When combined, they form a sauce that coats the dough like velvet, ensuring every bite is rich and satisfying. If you skip the chicken, you’ll lose that savory depth; if you skip the cream cheese, the filling will become dry and crumbly. For an extra punch, I recommend using leftover rotisserie chicken – the smoky flavor adds an unexpected twist.
The cheddar cheese is the star of the show in terms of meltiness and sharpness. It adds a sharp tang that cuts through the richness of the cream cheese. If you prefer a milder cheese, mozzarella or a blend of provolone and cheddar can work, but the sharpness of cheddar is what gives these pillows their signature bite. I’ve found that using a pre-shredded cheddar saves time, but freshly shredded will melt more evenly.
Fresh chives provide a bright, oniony note that balances the richness. Their subtle green color also adds a visual pop, making the pillows look as appetizing as they taste. If you can’t find chives, a pinch of green onion or even parsley will work, though the flavor profile will shift slightly. The chives also help to keep the filling from becoming too dense.
The Texture Crew
The crescent roll dough is the unsung hero that delivers the perfect crunch. It’s pre‑baked, which means it has a slight pre‑cooked base that ensures a golden crust without overcooking the filling. If you can’t find crescent dough, you can substitute with puff pastry, but be prepared for a different texture – puff pastry will be flakier and more layered.
Butter is brushed on the tops of the pillows before baking. This simple step creates a glossy sheen and a caramelized finish that’s hard to resist. It also prevents the dough from drying out during the bake, keeping the crust moist and tender. If you’re avoiding butter, a light spray of olive oil can work, but the flavor won’t be as buttery.
The Unexpected Star
Garlic powder and onion powder are the subtle background actors that elevate the overall flavor without overwhelming the dish. They’re dry spices, so they blend seamlessly into the filling, creating a uniform taste. If you’re a fan of fresh garlic, a minced clove can replace the garlic powder, but keep in mind that fresh garlic will release more moisture into the filling.
Salt and black pepper are the final seasoning touches that bring everything together. The salt enhances each component, while the pepper adds a gentle heat that balances the richness. If you’re watching sodium intake, you can reduce the salt slightly, but the pepper will still give a punch of flavor.
The Final Flourish
The chives add a fresh, herbaceous note that cuts through the heaviness of the cheese. They also provide a pop of color that makes the dish visually appealing. If you’re looking for a different herb, dill or basil can offer a unique twist, but the chives are the most traditional choice.
Everything’s prepped? Good. Let’s get into the real action…
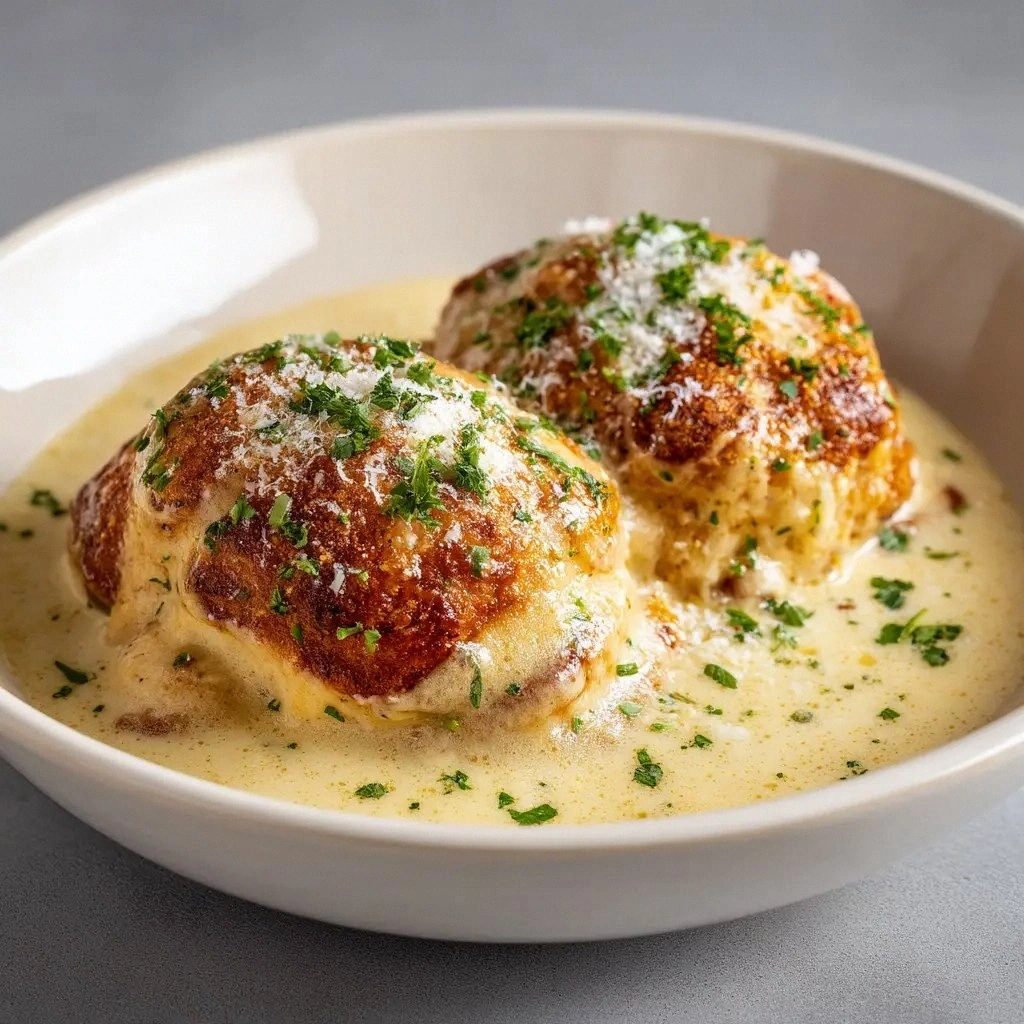
The Method — Step by Step
- Preheat and Prep: Set your oven to 375°F (190°C). While it heats, line a baking sheet with parchment paper or a silicone mat. This ensures the pillows won’t stick, making cleanup a breeze. The preheating step is crucial; a hot oven guarantees a golden crust.
- Open the Dough: Carefully unroll the can of refrigerated crescent roll dough onto a lightly floured surface. Gently press each triangle into a flat square, about 3.5 inches on each side. This flattening step helps the dough accommodate the filling without tearing.
- Mix the Filling: In a large bowl, combine the shredded chicken, cream cheese, cheddar, chives, garlic powder, onion powder, salt, and pepper. Use a fork or whisk to blend until the mixture is smooth and even. The goal is a homogeneous filling that clings to the dough. If the mixture feels too dry, add a tablespoon of milk or a splash of chicken broth.
- Assemble the Pillows: Place a generous spoonful of the filling onto the center of each flattened dough square. Fold the dough over the filling to form a triangle, pressing the edges together. Use a fork to crimp the edges, sealing them tightly to prevent leaks during baking. This is the moment of truth – the seal must be firm.
- Butter Brush: Melt the butter in a small saucepan or microwave. Brush the tops of each pillow with melted butter. This step adds shine and enhances the crust’s golden color. It also creates a barrier that keeps the dough from drying out.
- Arrange and Bake: Place the assembled pillows on the prepared baking sheet, spacing them about an inch apart. Bake in the preheated oven for 20–25 minutes, or until the dough is golden brown and the filling is bubbling. Keep an eye on the edges; they should start pulling away slightly from the parchment, indicating a crisp crust.
- Rest and Serve: Remove the pillows from the oven and let them rest for 5 minutes. The rest period allows the filling to set slightly, making them easier to handle. Serve hot, and watch as the steam rises, filling your kitchen with a buttery, cheesy aroma.
- Optional Garnish: Sprinkle extra chives or a dash of paprika over the tops for an extra pop of color and flavor. This final touch turns a simple dish into a showstopper.
That’s it — you did it. But hold on, I've got a few more tricks that'll take this to another level.
Insider Tricks for Flawless Results
The Temperature Rule Nobody Follows
Many cooks bake these pillows at 350°F, but I swear by 375°F. The higher temperature gives the dough a quicker rise, creating a crispier crust while ensuring the filling stays creamy. If you’re using a convection oven, lower the temperature by 25°F to prevent overbrowning.
Why Your Nose Knows Best
When the first golden crust appears, trust your nose. A subtle, buttery aroma signals that the pillows are ready to come out of the oven. If you’re tempted to pull them out early for a “fresher” look, wait until the scent is unmistakably caramelized.
The 5-Minute Rest That Changes Everything
Resting the pillows for exactly five minutes is a game changer. It allows the filling to set, reducing the risk of a gooey mess when you cut into them. I’ve seen people take them out too early, only to have the cheese run like a river. Five minutes of patience pays off.
Use a Baking Stone for Extra Crunch
If you have a baking stone, place it in the oven during preheat. The stone retains heat and helps the bottom of the pillows cook evenly, giving a crunchy base that’s a delight to bite into. Without a stone, the bottom may stay slightly soggy.
Freeze and Bake from Frozen
These pillows freeze beautifully. Assemble them, wrap tightly in plastic wrap, and store in a freezer bag. Bake straight from frozen at 375°F for 25–30 minutes. This method is perfect for busy nights and guarantees a consistent result.
Creative Twists and Variations
This recipe is a playground. Here are some of my favorite ways to switch things up:
Cheesy Jalapeño Pillow
Add finely diced jalapeños and a pinch of smoked paprika to the filling for a spicy kick. The jalapeños add heat, while the paprika gives a smoky depth. This version is perfect for those who love a little bite.
Herbed Mediterranean Pillow
Swap the chives for chopped parsley and add a teaspoon of oregano. Mix in a tablespoon of sun‑dried tomatoes for a burst of umami. The result is a Mediterranean‑inspired pillow that feels like a Mediterranean snack.
Spinach & Feta Pillow
Replace the cheddar with crumbled feta and fold in a handful of sautéed spinach. The feta adds tang, while the spinach contributes a subtle earthiness. This version is a crowd‑pleaser for brunch or a light dinner.
BBQ Chicken Pillow
Use BBQ sauce instead of garlic and onion powder, and add a tablespoon of chopped cilantro. The sweet, smoky sauce gives the pillows a distinct flavor profile that pairs well with coleslaw or a simple green salad.
Vegan Pillow (Try This)
Replace the cream cheese with a plant‑based alternative, use vegan cheddar, and substitute the butter with vegan margarine. The dough remains the same, ensuring a flaky crust. This version is a tasty, plant‑based option for those who love comfort food.
Breakfast Pillow
Add a beaten egg to the filling and sprinkle shredded cheddar on top before baking. The egg adds a custard‑like texture, making these pillows a hearty breakfast treat. Serve with a side of fresh fruit for a balanced start to your day.
Storing and Bringing It Back to Life
Fridge Storage
Cool the baked pillows completely, then wrap tightly in plastic wrap and store in the refrigerator for up to 3 days. When ready to reheat, place on a baking sheet and warm at 350°F for 10 minutes. The crust will remain crisp, and the filling will be warm and creamy.
Freezer Friendly
After assembly, wrap each pillow individually in foil, then place in a freezer bag. Freeze for up to 2 months. Bake straight from frozen at 375°F for 25–30 minutes, adding a few extra minutes if necessary. The pillows will taste as fresh as when you first made them.
Best Reheating Method
To revive a frozen or refrigerated pillow, add a tiny splash of water or broth to the center before baking. This steams the filling back to perfection, preventing it from drying out. A quick microwave burst (30 seconds) can also work, but the oven is preferable for maintaining crispness.