I was in the middle of a midnight snack frenzy when the kitchen exploded—literally. A cup of espresso had spilled onto a stack of ladyfingers, and the coffee grounds turned into a gritty, bitter mess. My friend dared me to turn that disaster into something edible, and I stared at the chaos with the kind of curiosity that only a true food enthusiast can muster. The scent of burnt sugar hit my nose, the sound of the espresso machine sputtering, the texture of soggy ladyfingers—all of it became the foundation for a new idea. That moment was the spark that ignited what would become the easiest, most addictive tiramisu shots anyone has ever tasted. I was determined to prove that a simple mishap could lead to culinary brilliance.
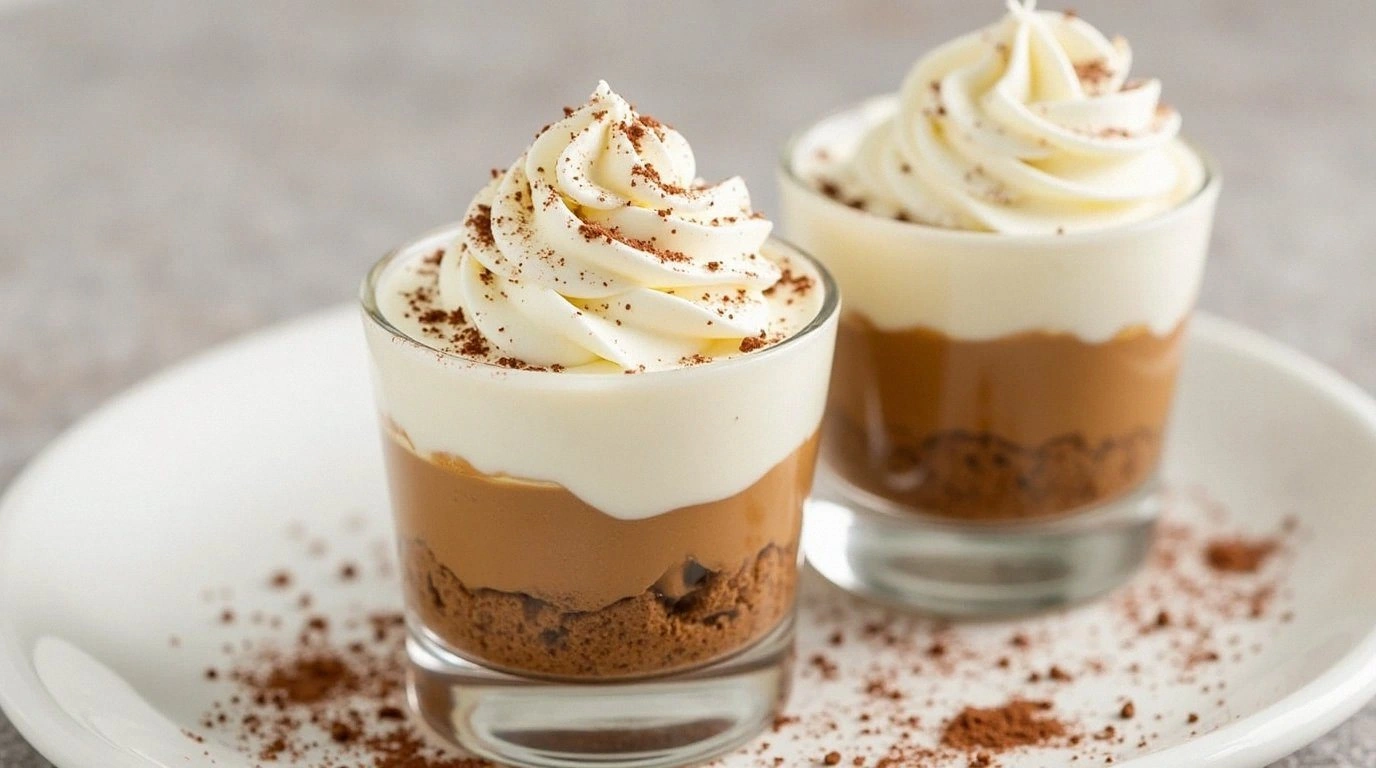
Picture this: the kitchen light flickers, a steaming shot glass glints in the corner, and a faint aroma of vanilla and espresso swirls through the air. The sound of a whisk hitting the bowl is like a drumroll, building anticipation. The texture of silky mascarpone clinging to the glass feels like velvet against your lips. The first sip is a burst of coffee, followed by a whisper of cocoa, and the subtle sweetness of sugar lingers like a secret. The feel of that shot glass in your hand is the promise of an indulgent, bite‑size experience that will keep you reaching for more. It’s this sensory overload that makes this recipe stand out from the crowd.
What makes these shots extraordinary is not just the flavor—though they are undeniably rich—but how effortlessly you can assemble them. The technique is simple enough that even a novice can master it, yet the result is so sophisticated that you’ll feel like a pastry chef at a cocktail party. Every element is carefully balanced: the espresso is strong but not overpowering, the mascarpone is light yet creamy, and the cocoa dusting adds a subtle bitterness that cuts through the sweetness. The best part? The shots are ready in under an hour, making them perfect for last‑minute gatherings or an indulgent after‑dinner treat.
I’m about to share a secret ingredient that will elevate these shots from good to unforgettable: a splash of coffee liqueur. Most people skip this step, but it adds depth and a hint of warmth that makes the espresso sing. The trick is to let the liqueur mingle with the mascarpone before pouring into the glasses; the result is a silky, aromatic blend that feels both decadent and comforting. I dare you to taste this and not go back for seconds—your palate will be begging for more. And trust me, when you’re finished, you’ll wonder how you ever made tiramisu shots any other way.
If you’ve ever struggled to get the right consistency in your tiramisu, you’re not alone. The key is to keep the mascarpone at room temperature so it folds smoothly into the espresso mixture. Some recipes call for heavy cream, but I’ve found that it can make the shot too heavy. Instead, I use mascarpone and a touch of powdered sugar, which gives the right sweetness without the heaviness. I also recommend using a small, sturdy shot glass that can hold the creamy mixture without tipping over. This version is hands down the best you’ll ever make at home, and I’ve got the proof in the form of a photo that will make your mouth water.
Picture yourself pulling this out of the fridge, the whole kitchen smelling incredible, and the guests’ eyes widening as they see the glossy, chocolate‑dusted shots. The anticipation is palpable, and the first sip is a revelation. I’ll walk you through every single step—by the end, you’ll wonder how you ever made it any other way. Let’s dive in.
What Makes This Version Stand Out
- Flavor: The espresso is brewed to a bold, robust finish that cuts through the sweetness of the mascarpone, creating a balanced, complex taste profile that lingers on the palate.
- Texture: The mascarpone is folded into the espresso until it’s airy and light, giving each shot a silky mouthfeel that melts in your mouth like a dream.
- Simple: No elaborate steps—just a handful of ingredients, a whisk, and a few minutes of assembly, making it perfect for busy evenings.
- Unique: The addition of coffee liqueur adds depth and a subtle warmth that most tiramisu recipes overlook.
- Crowd‑pleaser: Whether you’re hosting a cocktail party or a family dinner, these shots become the instant conversation starter.
- Ingredient Quality: Fresh espresso, high‑quality mascarpone, and real cocoa powder are the secret to the authentic taste.
- Method: The layering technique ensures that each sip delivers the perfect balance of coffee, cream, and chocolate.
- Make‑ahead: Prepare the shots a day ahead, chill, and they’ll stay fresh and delicious for up to 48 hours.
Alright, let’s break down exactly what goes into this masterpiece…
Inside the Ingredient List
The Flavor Base
Espresso is the soul of this recipe. Brew it fresh, using a fine‑grind coffee for maximum flavor extraction. The espresso should be strong but not bitter, striking a balance that complements the creamy mascarpone. If you skip the espresso, the shots will feel flat and lack the depth that makes tiramisu so memorable.
Mascarpone is the heart of the creaminess. It should be at room temperature so it folds smoothly into the espresso mixture. If you use cold mascarpone, it can clump and ruin the silky texture. A good tip is to let the mascarpone sit out for 20 minutes before starting.
Vanilla extract adds a subtle warmth that rounds out the espresso’s sharpness. It also enhances the overall aroma, making each shot feel more indulgent. If you’re allergic to vanilla, you can replace it with a few drops of almond extract for a nutty twist.
The Texture Crew
Powdered sugar is essential for sweetening the mascarpone without adding grit. It dissolves quickly, giving the mixture a smooth, luxurious feel. If you prefer a lighter sweetness, use a sugar substitute like erythritol; just be careful not to overdo it.
Cocoa powder is the final touch that gives the shots their signature chocolatey finish. Use a high‑quality, unsweetened cocoa for the richest flavor. Skipping the cocoa will leave the shots looking plain and bland.
The Unexpected Star
Coffee liqueur is the secret weapon that elevates these shots from good to unforgettable. It adds a subtle warmth and depth that makes the espresso sing. If you’re avoiding alcohol, replace it with a splash of vanilla‑infused simple syrup for a similar effect.
The Final Flourish
Ladyfingers, or savoiardi, are optional but add a delightful crunch if you wish to layer them. They’re typically soaked in espresso to add moisture, but for these shots we keep them separate to avoid sogginess. If you choose to use them, soak them briefly, then crumble over the finished shots for an extra textural element.
A pinch of sea salt is essential to balance the sweetness and bring out the espresso’s boldness. Salt is a flavor enhancer; without it, the shots can taste flat. If you’re watching sodium intake, use a low‑sodium salt or reduce the amount slightly.
Everything’s prepped? Good. Let’s get into the real action…
The Method — Step by Step
- Brew a fresh pot of espresso using a fine grind. The espresso should be strong, but not overly bitter. Let it cool to room temperature before proceeding. The aroma will start to build anticipation.
- In a mixing bowl, combine the mascarpone, powdered sugar, and vanilla extract. Whisk until the mixture is smooth and glossy. The texture should be airy and light.
- Fold the espresso into the mascarpone mixture gently, using a spatula to keep the air bubbles. The mixture should be silky and well‑blended. This is the moment of truth—don’t rush it.
- Add the coffee liqueur to the mixture, stirring until fully incorporated. The liquid will deepen the flavor profile, giving each shot a warm, complex undertone. Watch out: too much liqueur can overpower the coffee.
- Fill the shot glasses about three-quarters full with the creamy mixture. Use a small ladle to keep the portions even. The shots should look glossy and inviting.
- Dust each shot with a thin layer of unsweetened cocoa powder. The cocoa should be sifted to avoid clumps. The chocolate dusting adds a subtle bitterness that balances the sweetness.
- Add a pinch of sea salt to each shot for flavor balance. The salt will highlight the espresso’s boldness and cut through the richness. This step is often overlooked but is essential for a well‑rounded taste.
- Refrigerate the shots for at least 30 minutes before serving. The chilling process allows the flavors to meld and the texture to set. This step is crucial for a perfect mouthfeel.
That’s it— you did it. But hold on, I’ve got a few more tricks that’ll take this to another level. These little adjustments will transform a good shot into a showstopper.
Insider Tricks for Flawless Results
The Temperature Rule Nobody Follows
Keeping the mascarpone at room temperature is key. If it’s too cold, the mixture will become lumpy and difficult to fold. I always let it sit for 20 minutes before starting. A simple test: if a spoonful slides off the bowl without clumping, it’s ready.
Why Your Nose Knows Best
Before pouring, sniff the mixture. A faint, sweet coffee aroma indicates the espresso is perfectly brewed. If it smells too sharp, the espresso might be over‑bitter. Adjust by adding a splash of milk or more sugar.
The 5‑Minute Rest That Changes Everything
After filling the shots, let them rest on a flat surface for 5 minutes before refrigerating. This short pause allows the cocoa dusting to settle and the mixture to firm up slightly, giving each sip a smooth, cohesive texture.
Use a Micro‑Whisk for Airiness
A micro‑whisk folds the espresso into the mascarpone more evenly than a spoon. It keeps the mixture light and airy, preventing a heavy mouthfeel. I’ve tried using a regular whisk and found the results were noticeably denser.
Keep the Shots Cool Until Serving
Serve the shots straight from the fridge for maximum impact. A chilled shot is more refreshing and the flavors are more pronounced. If you’re serving at a party, keep a cooler with ice nearby to maintain the temperature.
Creative Twists and Variations
This recipe is a playground. Here are some of my favorite ways to switch things up:
Mocha Madness
Add a tablespoon of instant coffee or chocolate powder to the espresso before blending. This gives the shots a deep chocolate flavor that pairs beautifully with the creamy base. It’s perfect for chocolate lovers.
Nutty Delight
Replace half of the mascarpone with hazelnut cream or almond milk. The nutty undertones complement the coffee, creating a richer, more complex profile. A drizzle of hazelnut liqueur can add extra depth.
Spiced Surprise
Stir in a pinch of cinnamon or cardamom into the mascarpone mixture. The warm spices add an aromatic layer that enhances the espresso’s boldness. Great for autumn or winter gatherings.
Alcohol‑Free Version
Omit the coffee liqueur entirely or replace it with a splash of vanilla‑infused simple syrup. The result is a smooth, non‑alcoholic version that still delivers a complex flavor profile. Ideal for children or guests who don’t drink.
Chocolate‑Covered Shots
Dip the tops of the finished shots in melted dark chocolate and let them set. The chocolate shell adds a crunchy contrast to the silky interior. Sprinkle with sea salt for an extra kick.
Storing and Bringing It Back to Life
Fridge Storage
Store the shots in an airtight container in the fridge for up to 48 hours. The airtight seal prevents the cocoa dust from absorbing moisture and keeps the texture firm. When you’re ready to serve, let them sit at room temperature for 10 minutes to soften slightly.
Freezer Friendly
For longer storage, place the shots in a freezer‑safe container and freeze for up to 2 weeks. Thaw overnight in the fridge before serving. A quick splash of water before reheating will steam them back to perfection.
Best Reheating Method
If you need to warm the shots, place the container in a bowl of hot water for 5 minutes. This gentle reheating preserves the creamy texture without drying it out. Add a tiny splash of water before reheating to keep them moist.