I was halfway through a disastrous pizza night when my friend dared me to turn two plain pita breads into something that would make even the most seasoned food critic weep with joy. The kitchen smelled of burnt garlic and the sound of a blender whirring like a frantic drummer. I stared at the charred edges, feeling the heat radiate from the oven like a sun that refuses to set. The moment I realized that I could salvage the disaster, a spark of culinary rebellion ignited in my chest. This is the moment you should grab a pen and a plate because the next few minutes will change the way you think about pita forever.
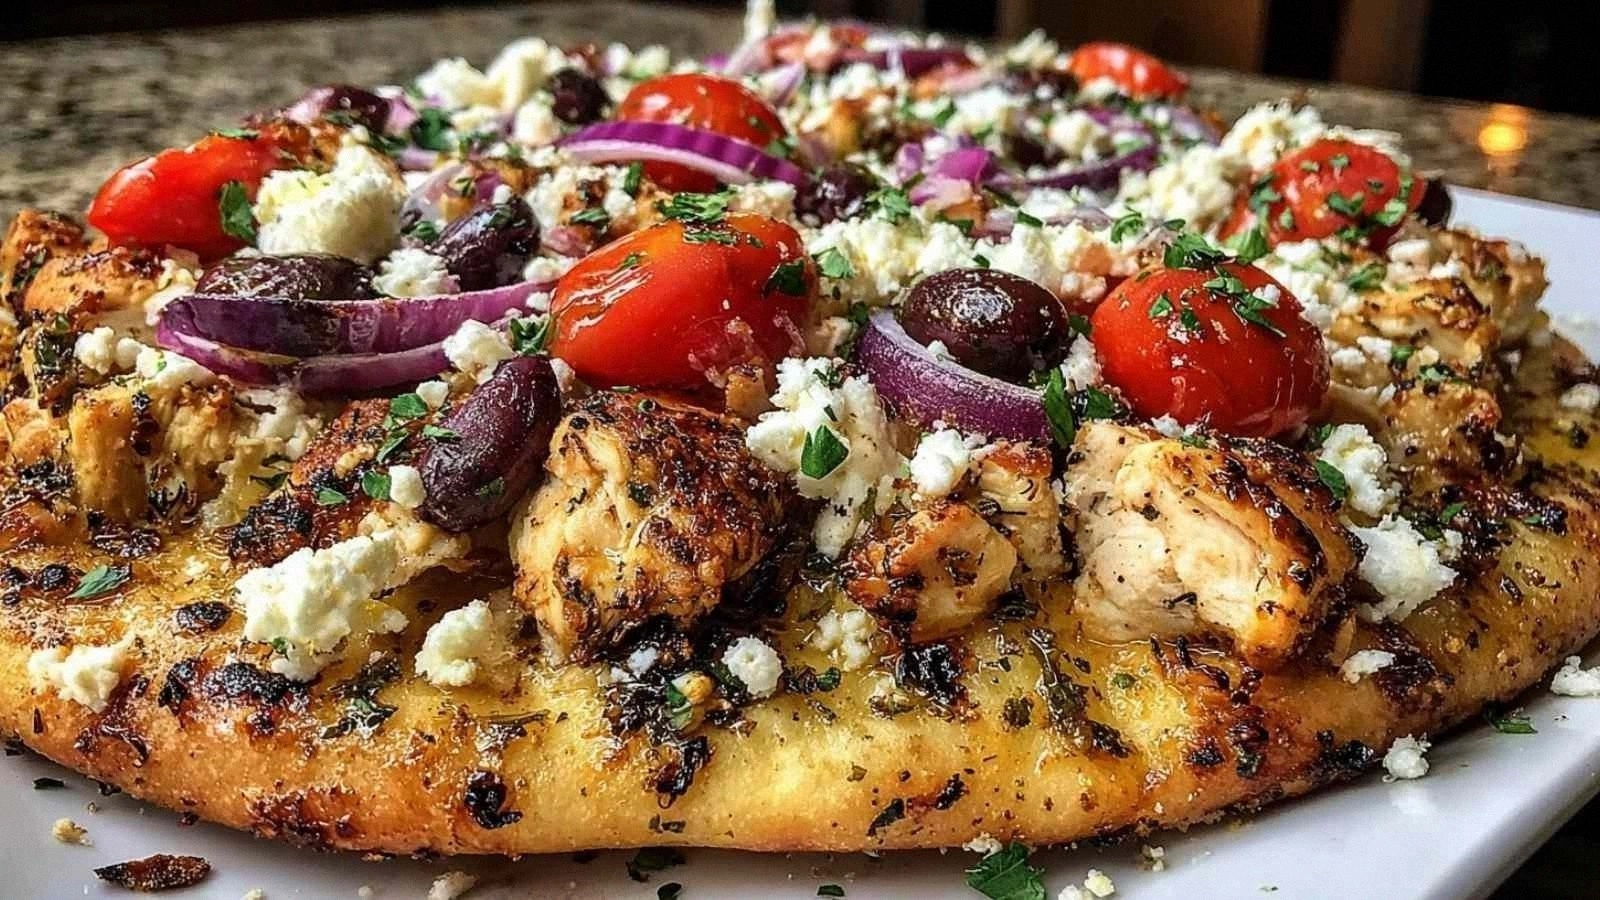
Picture the pita crust, crisp as a freshly cut paper, with a golden halo that glistens under the kitchen lights. Imagine the aroma of oregano dancing with the smoky sweetness of grilled chicken, a scent that makes your mouth water before the first bite even touches your tongue. Feel the slight crunch of cherry tomatoes bursting into juices that splash against the palate, the sharpness of red onion providing a subtle bite that lingers like a whisper. Taste the creamy, tangy feta that melts into every nook, coating the pita with a velvety richness that feels like a hug in edible form. Touch the fresh parsley, a green garnish that adds a refreshing crunch, turning each bite into a layered symphony.
What sets this version apart is not just the ingredients but the meticulous layering that creates a textural crescendo: the pita’s buttery crunch, the tender chicken’s juiciness, the tomatoes’ sweet burst, and the feta’s silky melt. I dared you to taste this and not go back for seconds, because each bite is a revelation that will leave you craving more. The bold claim? This is hands down the best version you'll ever make at home. The secret? A simple, foolproof method that turns a quick snack into a culinary masterpiece. The result? A dish that will have your friends asking for the recipe while you smugly nod, knowing you’ve mastered the art.
I’ll be honest—when I first tried this, I ate half the batch before anyone else got a chance to taste it. That’s the kind of confidence you get when you’re working with a recipe that’s as reliable as it is delicious. The technique I’ll reveal uses a single pan and a few minutes of attention to elevate the pita from ordinary to extraordinary. Picture yourself pulling this out of the oven, the whole kitchen smelling incredible, the steam curling like a fragrant cloud that promises flavor. It’s the kind of moment that turns a regular evening into a culinary celebration.
If you've ever struggled with making a quick pizza that actually tastes good, you're not alone—and I've got the fix. The next section will break down exactly what goes into this masterpiece, from the flavor base to the final flourish. Stay with me, because this next part? Pure magic. The journey to the perfect Greek Chicken Pita Pizza begins right here, right now.
I’ll give you a quick rundown of the key players before we dive into the details. The chicken isn’t just a protein; it’s the heart of the dish, infused with oregano and a splash of olive oil that locks in moisture. The feta cheese brings that salty tang that balances the sweetness of the tomatoes and the sharpness of the onion. The olives add a briny depth that’s essential for a truly Greek experience. Each component works together like a well-rehearsed orchestra, playing off each other to create a harmonious flavor profile. The result is a pizza that’s both comforting and adventurous, a perfect balance of familiar and exotic.
Now, before we get into the nitty-gritty, let me drop a micro‑challenge: I dare you to taste this and not go back for seconds. That’s a bold claim, but it’s true—once you experience the layered flavors and the perfect crisp, you’ll find yourself craving another bite. The next few paragraphs will give you the exact steps, ingredients, and insider tricks that make this recipe stand out from the crowd. Ready to become a pita pizza maestro? Let’s get cooking.
What Makes This Version Stand Out
- Flavor Fusion: The combination of oregano, feta, and Kalamata olives creates a Mediterranean symphony that’s both bold and comforting. The oregano’s earthiness pairs beautifully with the salty feta, while the olives add a briny kick that keeps the palate engaged. This layering of flavors is what sets this pizza apart from the generic, one‑ingredient versions you often find online.
- Crisp Perfection: The pita’s natural crispness is amplified by a quick sear in a hot pan, giving the base a crunch that’s almost buttery in texture. The edges pull away like thin ice, creating a satisfying snap that signals the pizza is ready. This crisp base is the foundation that holds the juicy toppings together.
- Time Efficiency: With a prep time of just 15 minutes and a cook time of 30 minutes, this recipe is a lifesaver for busy weeknights. The ingredients are simple and the steps are streamlined, meaning you can go from prep to plate in under an hour. It’s the kind of recipe that turns a hectic evening into a culinary triumph.
- Ingredient Quality: Using fresh, high‑quality ingredients—especially the feta and olives—makes a noticeable difference in flavor. Freshly grilled chicken adds a smoky depth that canned or pre‑cooked chicken can’t match. The quality of each component elevates the entire dish.
- Make‑Ahead Potential: The components can be prepped ahead of time, and the pizza can be assembled and baked just before serving. This flexibility makes it perfect for entertaining, as you can keep the ingredients ready and only assemble when your guests arrive.
- Versatility: While this recipe is a Greek staple, it can be adapted to suit various dietary preferences or flavor profiles. Swap the pita for a gluten‑free flatbread, or use a different protein for a vegetarian twist. The base recipe is robust enough to accommodate changes without losing its core identity.
Inside the Ingredient List
The Flavor Base
Olive Oil: This isn’t just a cooking fat; it’s the liquid that carries the oregano’s aroma and gives the chicken a silky sheen. A drizzle of high‑quality extra‑virgin olive oil adds a peppery finish that lingers on the tongue. Skipping it would leave the pizza feeling flat and dry, so don’t be tempted to cut corners. Use a light hand—just enough to coat the pan and the toppings without drowning them.
Oregano: Dried oregano is the backbone of this dish, providing that unmistakable Greek scent and a subtle bitterness that balances the sweetness of the tomatoes. If you’re missing oregano, a pinch of thyme or marjoram can work as a stand‑in, but the flavor will shift slightly. Keep it dry; moisture will make the oregano lose its potency.
The Texture Crew
Pita Bread: The pita is the canvas—its thin, airy structure holds the toppings while offering a satisfying crunch. Use fresh pita for the best results; stale pita will become soggy and lose its bite. If you prefer a thicker base, you can use a whole‑wheat pita, but it will change the mouthfeel slightly. Remember, the pita’s texture is critical; it’s the first thing your guests will taste.
Chicken: Grilled chicken provides a smoky depth that’s essential for a Greek flavor profile. The meat should be tender yet firm, with a slight char on the surface. If you’re short on time, a rotisserie chicken works too, but make sure to shred it finely to distribute the flavor evenly. The chicken’s moisture content also keeps the pizza from drying out.
The Unexpected Star
Kalamata Olives: These olives are not just a garnish; they bring a briny punch that cuts through the richness of the feta. The olive’s dark flesh is packed with antioxidants and a unique, slightly sweet flavor that’s unmistakably Mediterranean. If you can’t find Kalamata olives, green olives are an acceptable alternative, but the taste will be less complex.
Cherry Tomatoes: These tiny bursts of sweetness are the perfect counterbalance to the salty feta and olives. They release juices when heated, creating a sauce that coats the pita like velvet. Use ripe, juicy tomatoes for the best flavor; if you’re in a pinch, canned cherry tomatoes can work but drain them well.
The Final Flourish
Feta Cheese: The feta’s creamy tang is the star that unites all the other flavors. It melts into a silky sauce that coats the pita, adding depth and richness. Use a crumbly feta for the best melt; a block of feta will not distribute as evenly. A small pinch of salt can help bring out its natural flavor.
Red Onion: Thinly sliced red onion adds a subtle crunch and a sharpness that lifts the overall dish. It should be sliced thin enough to cook quickly and soften, yet retain a slight bite. If you’re sensitive to raw onion, a quick sauté before adding it to the pizza will mellow its bite.
Fresh Parsley: Parsley is the finishing touch that adds a burst of green freshness. It’s not just decorative; it brings a subtle peppery flavor that brightens the dish. Chop it finely so it distributes evenly across the pizza. If you’re out of parsley, a splash of lemon zest can provide a similar bright note.
Everything’s prepped? Good. Let’s get into the real action. The next section will walk you through each step, from searing the pita to finishing the pizza with a sprinkle of parsley. The method is straightforward, but the timing and attention to detail will make or break the dish. Keep your eyes on the clock, and let’s cook.
The Method — Step by Step
- Preheat the oven: Set your oven to 425°F (220°C). This high heat will give the pita a crisp edge while cooking the toppings evenly. While the oven heats, let the pita rest at room temperature for a few minutes; this prevents it from shrinking during baking.
- Season the chicken: Toss the grilled chicken in olive oil, oregano, salt, and pepper. The oil not only adds flavor but also helps the chicken brown nicely. Make sure each piece is coated evenly so that no bite is bland.
- Sauté the onions: Heat a tablespoon of olive oil in a skillet over medium heat. Add the thinly sliced red onion and sauté until translucent and slightly caramelized. This step brings out the onion’s natural sweetness and prevents a raw bite.
- Assemble the pita: Lay each pita flat on a baking sheet lined with parchment. Spread a thin layer of olive oil over the surface. This will create a barrier that keeps the pita from becoming soggy.
- Layer the toppings: Arrange the seasoned chicken, sautéed onions, cherry tomatoes, olives, and feta over the pita. Spread the toppings evenly so that each bite has a balanced flavor profile. The feta should be crumbled so it melts into a creamy sauce.
- Bake: Slide the sheet into the preheated oven. Bake for 12-15 minutes, or until the edges of the pita turn golden brown and the feta is slightly melted. Watch the pizza closely; the heat should create a crisp, golden crust.
- Finish with parsley: Remove the pizza from the oven and sprinkle fresh parsley over the top. The parsley adds a bright, herbal note that cuts through the richness. Let the pizza rest for a minute so the flavors settle.
- Serve: Slice the pizza into wedges like a classic pizza. Serve immediately while the edges are still crisp and the feta is molten. Pair with a crisp Greek salad or a chilled glass of white wine for a complete meal.
- Enjoy: Take a bite and let the flavors explode—spicy oregano, salty feta, sweet tomatoes, and smoky chicken. Notice how the pita’s crunch contrasts with the soft, juicy toppings. This is the moment of truth, and it’s worth every second of the preparation.
Insider Tricks for Flawless Results
The Temperature Rule Nobody Follows
Why it matters: A consistent oven temperature ensures that the pita crispens evenly and the feta melts just right. Many people lower the heat after the first few minutes, causing uneven cooking. I’ve found that setting the oven to 425°F (220°C) from the start gives the best results. The key is to preheat the oven for at least 10 minutes before baking.
Why Your Nose Knows Best
Listen to the scent: The aroma of the feta melting is your cue that the pizza is ready. The smell should be warm, slightly nutty, and not overpowering. If it’s too strong, the pizza is overcooked; if it’s faint, it needs more time. Trust your nose—it’s a reliable guide.
The 5-Minute Rest That Changes Everything
Why it matters: Letting the pizza rest for 5 minutes after baking allows the juices to redistribute. This rest period also lets the feta set into a silky layer. Skipping it can result in a soggy base. I recommend placing the pizza on a cooling rack during the rest.
Freshness Is King
Ingredient selection: Fresh tomatoes and olives make a noticeable difference. When in doubt, choose locally sourced produce. Fresh ingredients not only taste better but also reduce the need for added salt. I always pick tomatoes that feel slightly firm yet give a bit to the touch.
Avoid Overcrowding the Pan
Why it matters: Overcrowding can cause the toppings to steam rather than bake. This results in soggy pita and uneven cooking. Keep the toppings spread out in a single layer. If you’re making more than two pizzas, bake them in batches.
The Olive Oil Trick
Why it matters: A thin coat of olive oil on the pita creates a barrier that keeps the base crisp. Use a paper towel to blot excess oil from the toppings to avoid a greasy finish. This trick is especially useful if you’re using a thicker, doughier pita.
Creative Twists and Variations
This recipe is a playground. Here are some of my favorite ways to switch things up:
Mediterranean Veggie Pizza
Swap the chicken for grilled halloumi. The cheese’s squeaky texture adds a unique bite. Keep the feta, olives, and tomatoes for that authentic Greek flavor. This version is perfect for vegetarians and adds a protein punch without meat.
Spicy Greek Chicken
Add a pinch of crushed red pepper flakes. The heat will contrast nicely with the sweet tomatoes and salty feta. If you’re sensitive to spice, use a smaller amount or omit it entirely. The result is a pizza that’s both fiery and comforting.
Pesto-Powered Pita Pizza
Spread a thin layer of basil pesto on the pita before adding toppings. The pesto adds a fresh, herbal note that elevates the dish. Keep the rest of the ingredients the same to maintain the Greek flavor. This version is a crowd‑pleaser at parties.
Pita Pizza with Smoked Salmon
Replace the chicken with thin slices of smoked salmon. The smoky flavor pairs beautifully with feta and olives. Add capers for an extra burst of brininess. This twist turns the dish into a brunch‑worthy option.
Gluten-Free Edition
Use a gluten‑free pita or flatbread. The texture may differ slightly, but the flavor remains unchanged. Make sure the gluten‑free bread is fresh to avoid sogginess. This version is ideal for those with celiac disease or gluten sensitivity.
Breakfast Pita Pizza
Swap the feta for scrambled eggs. Add a sprinkle of chives for a fresh finish. The eggs provide a protein boost and a comforting breakfast vibe. Serve with a side of Greek yogurt for a complete meal.
Extra Flavor Boost
Finish with a drizzle of lemon‑yogurt sauce. Mix Greek yogurt with lemon juice, garlic, and dill. Drizzle it over the pizza before serving. The tangy sauce adds a refreshing contrast to the savory toppings.
Storing and Bringing It Back to Life
Fridge Storage
Keep leftovers in an airtight container. Store the pizza in the fridge for up to three days. The pita may soften slightly, but the toppings will stay fresh. When you’re ready to reheat, use a skillet to restore crispness.
Freezer Friendly
Freeze the assembled pizza before baking. Wrap tightly in plastic wrap and place in a freezer bag. It will keep for up to two months. Thaw overnight in the fridge before baking at 425°F (220°C) for 12 minutes.
Best Reheating Method
Reheat in a hot skillet. This method restores the pita’s crispness better than a microwave. Heat a tablespoon of olive oil over medium heat and place the pizza slice in the pan. Flip once, and it’s ready to serve.