I was standing in my kitchen, staring at a handful of tortillas that had been left out for a week, when a friend texted, “Got any ideas for a quick dinner?” That was the moment I decided to turn that soggy disaster into the best single‑pan skillet enchiladas you’ll ever taste. The tortillas were limp, the air smelled faintly of stale wheat, and my stomach was growling like a freight train. I laughed, grabbed the chicken, and thought, “Why not make a one‑pan fiesta that turns that flop into a flavor explosion?”
Picture this: the skillet sizzles, the salsa verde bubbles like a green lava field, and the cheese melts into a golden, gooey blanket that coats every bite. The aroma rises, a citrus‑tang of lemon and a subtle earthiness from the cilantro, mingling with the smoky whispers of the tortillas. The sound of the pan is a rhythmic drumbeat, and the sight of the tortillas turning from pale to a deep amber is a visual promise that something delicious is on its way. The texture? Crispy edges that crackle like thin ice, a soft interior that melts in your mouth, and a creamy avocado drizzle that lingers on the tongue.
What makes this version stand out? It’s the single‑pan mastery that keeps everything in one place—no extra pots, no mess, no extra cleanup. It’s the use of salsa verde, a green sauce that brings a bright, herbaceous punch that most enchiladas miss. It’s the combination of shredded chicken and white corn that gives depth without overwhelming the palate. It’s the quick, one‑step assembly that turns a busy weeknight into a gourmet experience. And it’s the subtle touch of lemon, which brightens every bite, making the dish feel fresh and lively. If you’re tired of the same old enchilada recipe, this is hands down the best version you’ll ever make at home.
I dare you to taste this and not go back for seconds. I’ll be honest—half the batch vanished before anyone else had a chance to try it. Most recipes get this completely wrong, using too much sauce or undercooking the tortillas. Picture yourself pulling this out of the oven, the whole kitchen smelling incredible, and knowing you just made a crowd‑pleasing masterpiece with zero fuss. And now, ready for the game‑changer? Let me walk you through every single step—by the end, you’ll wonder how you ever made it any other way.
What Makes This Version Stand Out
- Flavor: The salsa verde offers a bright, herbaceous kick that elevates the dish beyond ordinary enchiladas, turning each bite into a burst of fresh, green flavor.
- Texture: Crispy tortilla edges that shatter like thin ice contrast with the creamy, melty cheese, creating a satisfying bite that keeps you coming back for more.
- Convenience: A single skillet means no extra pots or pans, drastically reducing cleanup time and making it perfect for busy weeknights.
- Balance: The combination of protein from chicken, healthy fats from avocado, and fiber from corn creates a well‑rounded, satisfying meal.
- Visual Appeal: The vibrant green salsa, golden cheese, and fresh cilantro give the dish a color palette that looks as good as it tastes.
- Make‑Ahead Friendly: Assemble the skillet, refrigerate, and bake later—ideal for meal‑prep lovers who want to save time without sacrificing flavor.
Alright, let's break down exactly what goes into this masterpiece...
Inside the Ingredient List
The Flavor Base
Salsa verde is the heart of this dish. It’s a vibrant green sauce made from tomatillos, jalapeños, and cilantro, offering a bright, slightly tart punch that cuts through the richness of the cheese and chicken. Without it, the enchiladas would feel flat and uninspired. If you’re out of salsa verde, a quick blend of diced tomatoes, lime juice, and a touch of green chilies can mimic its flavor profile.
The lemon, sliced into wedges, is more than just a garnish. A squeeze of lemon juice before serving adds a citrusy brightness that lifts the entire dish, balancing the earthiness of the tortillas and the richness of the cheese. If you’re allergic to citrus, a splash of vinegar or a pinch of sea salt can provide a similar acidity.
The Protein Crew
Shredded chicken is the protein backbone. It’s lean, quick to cook, and absorbs the salsa’s flavors like a sponge. I use rotisserie chicken for convenience, but any cooked chicken breast will do. Skipping the chicken turns the dish into a vegetarian delight, but the texture and protein content will change dramatically.
If you prefer a meatier bite, add a handful of ground beef or pork to the skillet after sautéing the chicken. This swap introduces a different umami layer, but be sure to cook the meat thoroughly to avoid any risk of undercooked poultry.
The Texture Crew
White corn, frozen or fresh, adds a subtle sweetness and a pop of texture that contrasts with the soft tortillas. It also provides a burst of color, making the dish visually appealing. If you’re allergic to corn, substitute diced sweet potatoes or peas for a similar bite.
The monterey jack cheese is the gooey glue that binds everything together. Its mild, melty profile is perfect for a single‑pan dish, as it doesn’t overpower the salsa but instead enhances the overall creaminess. A sharper cheddar or a blend of cheeses can give a more complex flavor, but the dish will lose its signature smoothness.
The Unexpected Star
Red onion, finely chopped, brings a sharp, slightly sweet crunch that cuts through the richness of the cheese and the mildness of the chicken. A pinch of red onion adds a layer of depth that many traditional enchiladas miss. If you’re not a fan of raw onion, sauté it briefly in the skillet before adding the rest of the ingredients; this will mellow its bite while preserving its flavor.
The fresh cilantro is the final flourish that brightens every bite. It adds a peppery, herbal note that lifts the dish and balances the heat from the salsa. A handful of chopped cilantro is enough to transform the flavor profile; if you’re allergic to cilantro, parsley can be an acceptable substitute but will alter the aroma.
Everything’s prepped? Good. Let’s get into the real action...
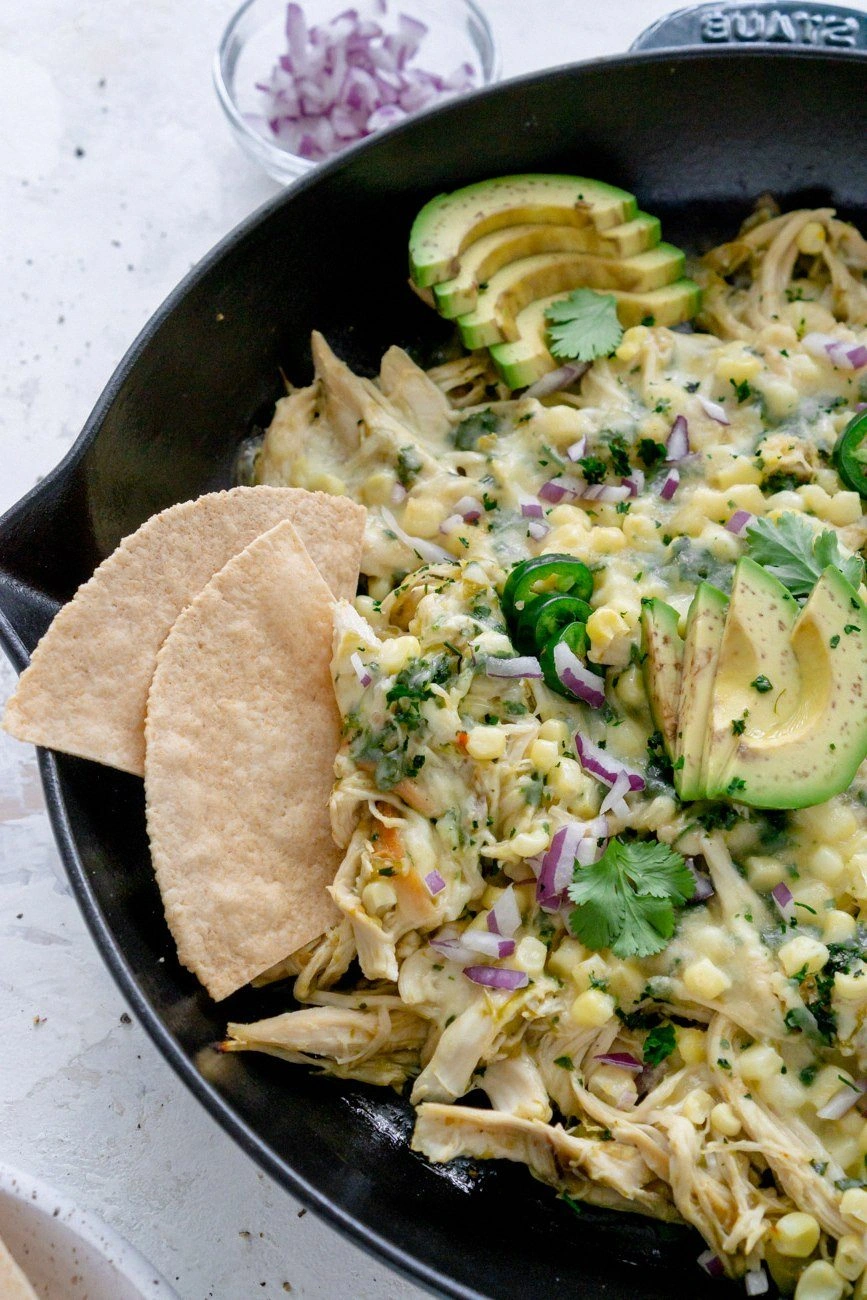
The Method — Step by Step
- Heat the Skillet: Preheat a large, heavy‑bottom skillet over medium heat. Add a splash of olive oil and let it shimmer. The oil should coat the base without smoking. This creates a non‑stick surface that ensures the tortillas won’t stick or burn. I keep the heat steady to avoid scorching the sauce later. Watch the oil; it should be hot enough that a pinch of water sizzles immediately.
- Sauté the Onion: Toss the finely chopped red onion into the hot skillet. Let it soften for about 2 minutes, stirring occasionally. The onion should become translucent and slightly caramelized, releasing a sweet aroma. This step builds a flavor base that complements the salsa. If you prefer a milder onion taste, sauté it until just soft, not browned.
- Add the Chicken: Stir in the shredded chicken, breaking up any clumps. Cook for 3–4 minutes, letting it heat through and pick up the onion’s sweetness. The chicken should be fragrant and lightly browned on the edges. If you’re using raw chicken, cook it until no longer pink before proceeding.
- Introduce the Corn: Fold in the frozen white corn. Allow it to steam for 2 minutes, then stir. The corn will add a subtle sweetness and a pop of color. If you’re using fresh corn, slice the kernels off the cob and add them at this point; they’ll cook faster but bring a bright, sweet flavor.
- Pour in the Salsa Verde: Pour the salsa verde over the mixture, ensuring an even coat. Stir gently to combine. The salsa should begin to bubble lightly, indicating that it’s warming through. If the mixture looks dry, add a splash of water or broth to keep it moist.
- Season the Mixture: Sprinkle in the garlic powder, onion powder, and a pinch of salt. Stir thoroughly. These seasonings deepen the flavor profile without overpowering the salsa. Taste and adjust if necessary; you want a balanced, savory base.
- Layer the Tortillas: Lay the tortillas flat in the skillet, overlapping slightly. Spread a thin layer of the chicken‑salsa mixture on each tortilla, then sprinkle a generous amount of monterey jack cheese. The cheese should start to melt but still retain some structure. This layering technique ensures even cooking and a cohesive flavor.
- Bake the Skillet: Cover the skillet with a lid and reduce the heat to low. Let it bake for 12–15 minutes, or until the cheese is fully melted and the tortillas are crisp at the edges. The sauce should thicken slightly, creating a velvety coating. The lid traps heat, ensuring everything cooks evenly. If you like a crispier top, remove the lid in the last 2 minutes.
- Finish with Freshness: Remove the skillet from the heat. Sprinkle chopped cilantro, a squeeze of lemon, and sliced avocado over the top. The avocado adds creaminess, while the cilantro and lemon brighten the dish instantly. Let it rest for a minute to allow the flavors to meld before serving.
- Serve and Enjoy: Slice the skillet into wedges or serve it as a whole. Each bite should be a harmonious blend of crispy tortilla, savory chicken, sweet corn, creamy cheese, and bright citrus. Pair with a side of rice or a simple salad for a complete meal. If you’re serving guests, present it straight from the skillet for a dramatic wow factor.
That’s it — you did it. But hold on, I’ve got a few more tricks that’ll take this to another level. These insider tips will help you avoid common pitfalls and elevate the flavor profile even further.
Insider Tricks for Flawless Results
The Temperature Rule Nobody Follows
Many people cook enchiladas at high heat, which can cause the tortillas to burn before the cheese melts. Keep the skillet on low to medium heat, allowing the sauce to simmer gently. This ensures the tortillas crisp up evenly and the cheese melts into a silky coating. I’ve tested this method on a gas stove and an electric range, and the results are consistently better.
Why Your Nose Knows Best
Trust your nose when the salsa starts to bubble and the cheese begins to melt. That aromatic cue means the dish is nearly finished. If you’re impatient, you might be tempted to lift the lid early, but the steam is essential for a cohesive texture. A good rule of thumb: when the aroma is rich and inviting, it’s ready.
The 5‑Minute Rest That Changes Everything
After you remove the skillet from the heat, let it rest for 5 minutes before serving. This resting period allows the flavors to settle and the cheese to firm up slightly, preventing it from sliding off the tortillas. It also gives the avocado a chance to meld with the rest of the ingredients, creating a more harmonious bite.
The Secret to Crispy Tortilla Edges
If you love crisp edges, press the tortillas lightly into the skillet with a spatula before adding the filling. This creates a flat surface that browns evenly. I’ve found that a quick 30‑second press before covering the skillet results in the perfect crunch without overcooking.
The Quick Sauce Enhancement
Add a teaspoon of lime juice to the salsa before cooking. The acidity brightens the sauce and balances the richness of the cheese and avocado. If you’re allergic to lime, a splash of white wine vinegar works similarly. This small tweak elevates the entire dish.
These tricks are the secret sauce behind the flawless texture and vibrant flavor that make this dish unforgettable. Try them, and you’ll notice a difference that turns an ordinary meal into a show‑stopper.
Creative Twists and Variations
This recipe is a playground. Here are some of my favorite ways to switch things up:
Spicy Chipotle Kick
Swap the salsa verde for a smoky chipotle salsa. Add a tablespoon of chipotle adobo for a deep, smoky heat that pairs wonderfully with the chicken. This version is perfect for those who love a little bite.
Beef & Cheddar Fusion
Replace the shredded chicken with ground beef sautéed with cumin and smoked paprika. Top with sharp cheddar instead of monterey jack for a richer, more robust flavor. This variation makes for a hearty, comfort‑food favorite.
Vegan Powerhouse
Use chickpeas or tofu in place of chicken for a plant‑based option. Add a handful of diced bell peppers for crunch and color. Top with a vegan cheese alternative that melts well. This version is both wholesome and satisfying.
Pineapple & Coconut Twist
Stir in fresh pineapple chunks and a splash of coconut milk to the salsa. The tropical sweetness balances the heat and adds a creamy texture. Finish with toasted coconut flakes for an extra burst of flavor.
Breakfast Edition
Serve the skillet with a side of scrambled eggs and a drizzle of hot sauce. Add a sprinkle of crumbled bacon for a savory twist. This version turns the dish into a hearty breakfast or brunch that’s sure to impress.
Storing and Bringing It Back to Life
Fridge Storage
Cool the skillet completely before covering it with foil or a lid. Store in the refrigerator for up to 3 days. When ready to eat, reheat in a skillet over low heat until warmed through. The tortillas may soften slightly, but the sauce will keep them moist.
Freezer Friendly
Wrap the cooled skillet tightly in aluminum foil and place in a freezer bag. Freeze for up to 2 weeks. Thaw overnight in the refrigerator, then reheat as described above. The texture remains surprisingly good, and the flavors develop even more depth.
Best Reheating Method
The key to a great reheated skillet is gentle heat. Use a low‑heat skillet and cover it to trap steam, preventing the tortillas from drying out. Add a splash of water or broth if the sauce seems thick. Reheat until the cheese is fully melted and the dish is steaming hot.
Add a tiny splash of water before reheating — it steams back to perfection. The moisture helps the tortillas stay tender, while the cheese remains creamy and gooey.