Picture this: it’s a rainy Saturday afternoon, the kind that makes you want to stay inside and bake something that feels like a hug. I was in the middle of a kitchen disaster—an over‑baked batch of cookies that came out dry, cracked, and utterly disappointing. My friend, a self‑proclaimed cookie connoisseur, dared me to make the best cookie cup ever, and I swore I’d deliver. The challenge was simple: turn the humble cookie into a bite‑size cup that’s crispy on the edges, chewy inside, and loaded with chocolate chips that melt like a secret promise. I’ve spent hours tweaking the batter, testing temperatures, and refining the muffin tin technique until the final result was nothing short of a revelation. The scent of butter and vanilla wafting through the kitchen was enough to make my heart skip a beat, and the sound of the first bite—crunch, then a soft, chocolate‑laden sigh—was pure bliss. If you’ve ever wondered how to elevate a cookie from ordinary to unforgettable, stick around; I’ll walk you through every single step, and by the end, you’ll wonder how you ever made it any other way.
What Makes This Version Stand Out
- Flavor: The combination of brown and white sugar creates a caramelized base that deepens the chocolate flavor without overpowering it.
- Texture: The batter’s ratio of butter to flour gives the cups a tender crumb that stays soft inside while developing a golden, crackly crust on the outside.
- Ease: No fancy equipment required—just a standard muffin tin and a simple whisk.
- Customization: Swap chocolate chips for white chocolate, add a splash of espresso, or fold in dried fruit for a new twist.
- Crowd‑Pleaser: The bite‑size format is perfect for parties, potlucks, or a midnight snack that feels indulgent.
- Quality: Using high‑quality butter and real vanilla extract ensures a depth of flavor that you can’t fake.
- Make‑ahead: These cups bake in 15 minutes but can be prepared a day ahead and frozen without losing their charm.
- Visual Appeal: The glossy finish and chocolate speckles make them Instagram‑worthy.
Alright, let’s break down exactly what goes into this masterpiece…
Inside the Ingredient List
The Flavor Base
At the heart of every great cookie cup is a balanced sweet base. The 1 cup of granulated sugar provides bright sweetness that caramelizes during baking, while the 1 cup of packed brown sugar adds a subtle molasses undertone. Together, they create a flavor profile that’s both familiar and slightly complex, like a warm hug in cookie form. If you’re a fan of deeper sweetness, you can increase the brown sugar by half a cup, but be careful—too much can make the batter sticky.
The Texture Crew
The texture of these cups hinges on the butter and flour ratio. A full cup of unsalted butter, softened to a spreadable consistency, melts into the dough, giving it a tender crumb. The 2 cups of all‑purpose flour bind everything together, but if you want an extra chewy center, add a tablespoon of cornstarch. Skipping the flour will leave you with a mess of batter that won’t hold its shape; the cookies will spread like pancakes.
The Unexpected Star
Chocolate chips are the obvious star, but the 1 cup of chopped walnuts adds a surprising crunch that contrasts beautifully with the soft interior. If you’re avoiding nuts, substitute with dried cranberries or toasted coconut for a different texture. The walnuts also bring a subtle earthy richness that elevates the chocolate flavor, turning each bite into a multi‑layered experience.
The Final Flourish
The leavening agents—1 tsp baking soda and 1 tsp baking powder—ensure the cups rise just enough to stay airy inside. Salt, though only 1 tsp, balances the sweetness and enhances every other flavor. Finally, 2 tsp of vanilla extract infuses the batter with a fragrant warmth that lingers long after the last bite. If you prefer a hint of spice, add a pinch of cinnamon or nutmeg; the result will be a warm, cozy treat that feels like a hug in every mouthful.
Everything's prepped? Good. Let's get into the real action…
The Method — Step by Step
- Preheat your oven to 350°F (175°C) and line a standard muffin tin with paper liners. This ensures each cup stays separate and gives them a clean, professional look. I always preheat the oven for at least 10 minutes to get a consistent temperature. If you’re using a metal tin, lightly grease it to prevent sticking.
- In a large bowl, cream together 1 cup of softened butter, 1 cup of granulated sugar, and 1 cup of packed brown sugar until the mixture is light and fluffy. The key is to beat until the mixture is pale and airy—this incorporates air that will help the cups rise. If the batter feels too dense, add a tablespoon of milk to loosen it slightly.
- Add the 2 large eggs one at a time, beating well after each addition. The eggs bind the batter and give structure to the cups. Be sure to fully incorporate each egg before adding the next; otherwise, the batter will separate. After the second egg, fold in 2 tsp of vanilla extract for that aromatic kick.
- In a separate bowl, whisk together 2 cups of all‑purpose flour, 1 tsp baking soda, 1 tsp baking powder, and 1 tsp salt. Sifting the dry ingredients is optional but helps remove lumps. Gradually add the dry mixture to the wet batter, mixing until just combined. Over‑mixing can make the cups tough.
- Fold in 1 cup of chocolate chips and 1 cup of chopped walnuts. The chocolate chips should be evenly distributed to avoid pockets of pure chocolate. If you prefer a more uniform texture, pulse the nuts in a food processor before adding.
- Spoon the batter into the prepared muffin tin, filling each cup about ¾ full. This prevents the cups from overflowing during baking and ensures a uniform rise. A small spoon or a piping bag works well for even distribution.
- Bake for 15–18 minutes, or until the edges are golden brown and a toothpick inserted into the center comes out with a few moist crumbs. The cups should feel firm to the touch but still slightly springy. Watch the temperature carefully—overbaking will dry out the centers.
- Let the cups cool in the tin for 5 minutes before transferring them to a wire rack. Cooling them in the tin allows the structure to set, preventing them from cracking. If you’re in a hurry, you can skip this step, but the texture will be slightly less cohesive.
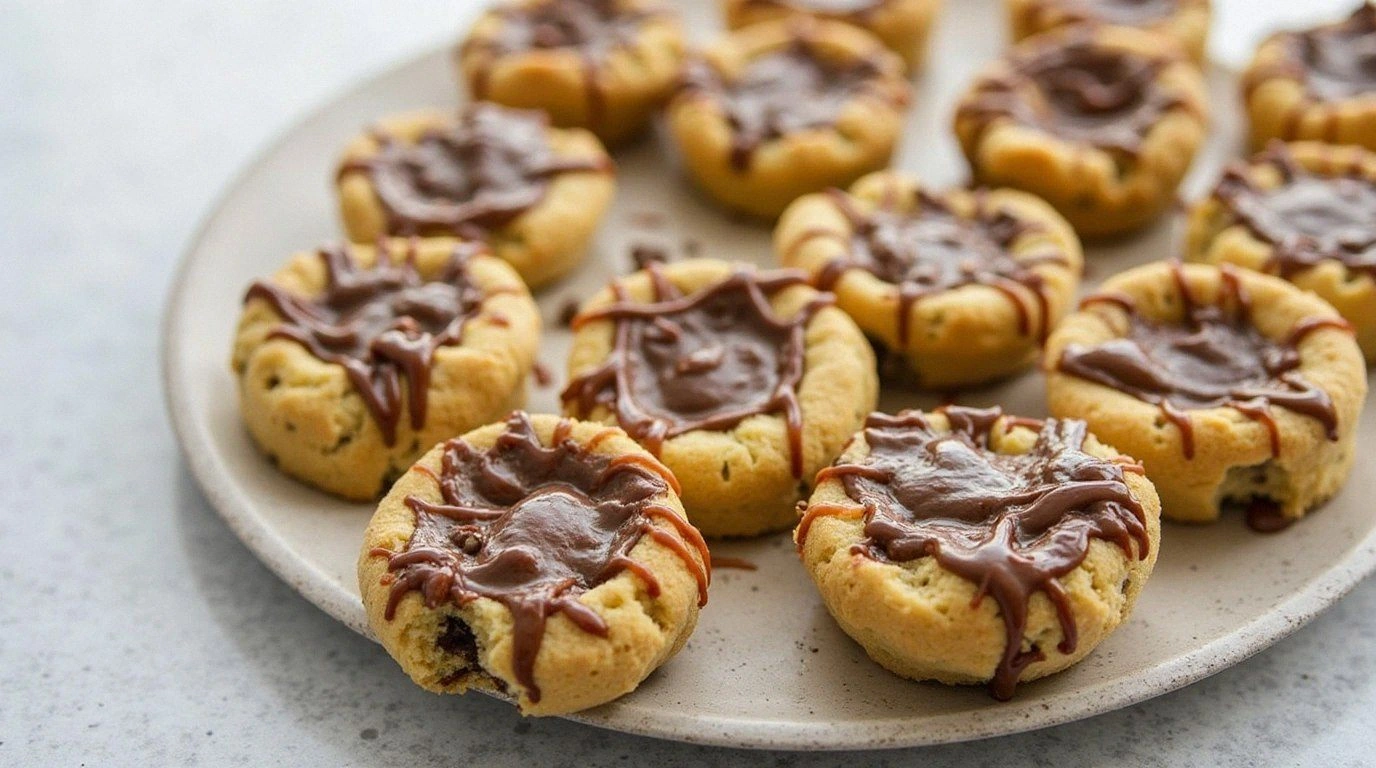
- Optional: For an extra glossy finish, drizzle a thin layer of melted white chocolate over the tops before serving. This adds a touch of luxury and makes the cups look professionally finished.
- Serve warm or at room temperature, and watch the crowd go wild. The aroma alone will draw people in, and the first bite will confirm that you’ve made the best cookie cups ever. Store leftovers in an airtight container to keep them fresh for up to 3 days.
That's it — you did it. But hold on, I've got a few more tricks that'll take this to another level…
Insider Tricks for Flawless Results
The Temperature Rule Nobody Follows
Many bakers bake at 375°F, assuming higher heat is better. In reality, 350°F allows the cups to rise slowly, ensuring the inside stays moist while the edges caramelize. I once baked at 375°F and ended up with hard, over‑browned cups that lacked that coveted chew. Stick to 350°F, and you’ll get the perfect balance every time.
Why Your Nose Knows Best
A simple way to tell if the batter is ready is to listen to the aroma. As the butter melts, a sweet, buttery scent should begin to dominate. If you smell a metallic or raw dough scent, the batter isn’t ready. Trust your nose; it’s the best judge of cookie readiness.
The 5-Minute Rest That Changes Everything
After removing the cups from the oven, let them rest for five minutes in the tin. This rest period allows the internal structure to set, preventing the cups from cracking when you lift them. I used to pull them out immediately, and they would break apart like fragile glass. The five‑minute rest is a game‑changer.
Use a Silicone Liner for a Clean Finish
Paper liners can sometimes absorb moisture, causing the cups to become soggy at the base. Silicone liners, on the other hand, provide a non‑stick surface that keeps the cups crisp. They’re reusable, making them a sustainable choice for frequent bakers.
Add a Splash of Milk for Extra Moisture
If you’re baking in a dry climate, add a tablespoon of milk to the batter. The added liquid keeps the cups moist and prevents them from drying out during baking. I’ve baked these cups in a desert climate and found that the milk addition made a noticeable difference in texture.
The Perfect Crumb
For a lighter crumb, replace half of the all‑purpose flour with cake flour. Cake flour has a lower protein content, which results in a more tender texture. This tweak is subtle but elevates the overall mouthfeel, making the cups feel like a delicate pastry.
Creative Twists and Variations
This recipe is a playground. Here are some of my favorite ways to switch things up:
Nutty Brownie Cups
Swap the chocolate chips for chopped brownies and add a drizzle of caramel sauce. The result is a decadent, fudgy treat that feels like a brownie in a cup.
Citrus Zest Surprise
Add a tablespoon of lemon or orange zest to the batter for a bright, refreshing contrast to the chocolate. The citrus lifts the flavor profile and makes the cups feel lighter.
Espresso Boost
Stir in a teaspoon of instant espresso powder to deepen the chocolate flavor and add a subtle coffee kick. This variation is perfect for coffee lovers and pairs well with a latte.
Sea Salt Caramel
Incorporate a handful of caramel bits and sprinkle a pinch of sea salt on top before baking. The salty caramel enhances the sweetness and gives the cups a gourmet feel.
Vegan Version
Replace butter with coconut oil, use a flaxseed egg instead of a regular egg, and choose dairy‑free chocolate chips. The texture remains similar, and the vegan version is just as indulgent.
Gluten‑Free Adaptation
Use a 1:1 gluten‑free flour blend in place of all‑purpose flour and add a tablespoon of xanthan gum to maintain structure. The cups hold their shape and taste almost identical to the original.
Storing and Bringing It Back to Life
Fridge Storage
Store the cooled cups in an airtight container at room temperature for up to 3 days. If you’re in a humid area, keep them in the fridge to prevent mold growth. When you’re ready to serve, let them sit at room temperature for 10 minutes to soften slightly.
Freezer Friendly
Wrap each cup individually in parchment paper and place them in a freezer bag. They stay fresh for up to 2 months. To thaw, leave them at room temperature for 30 minutes, then warm them in a 300°F oven for 5 minutes for a crisp finish.
Best Reheating Method
Reheat the cups in a preheated 300°F oven for 5–7 minutes. For extra moisture, add a splash of water to the bottom of the pan; this steams the cups back to a soft, chewy center. Avoid microwaving, as it can make the cookies rubbery.