The first time I made these Halloween Oreo Stuffed Chocolate Chip Cookies, I was supposed to be bringing them to a neighborhood potluck. Instead, I found myself standing in my kitchen at 2 AM, surrounded by empty Tupperware and a very guilty conscience, wondering how I was going to explain to twenty people that I had eaten their entire dessert. In my defense, I had no idea that shoving an entire Halloween Oreo inside a chocolate chip cookie would create something so dangerously addictive that it should probably come with a warning label from the surgeon general.
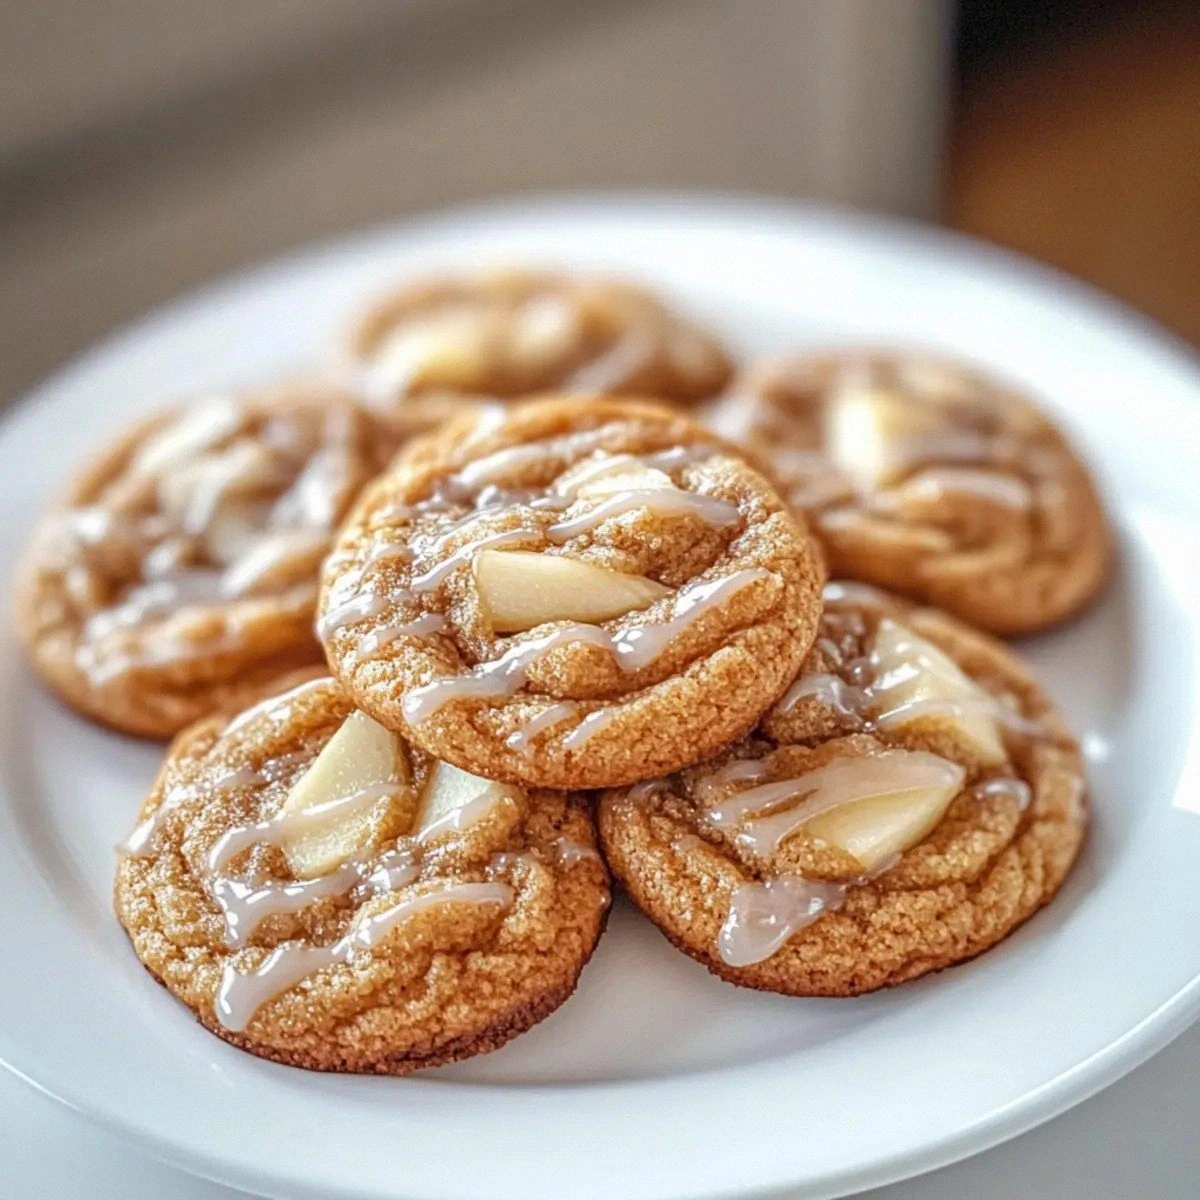
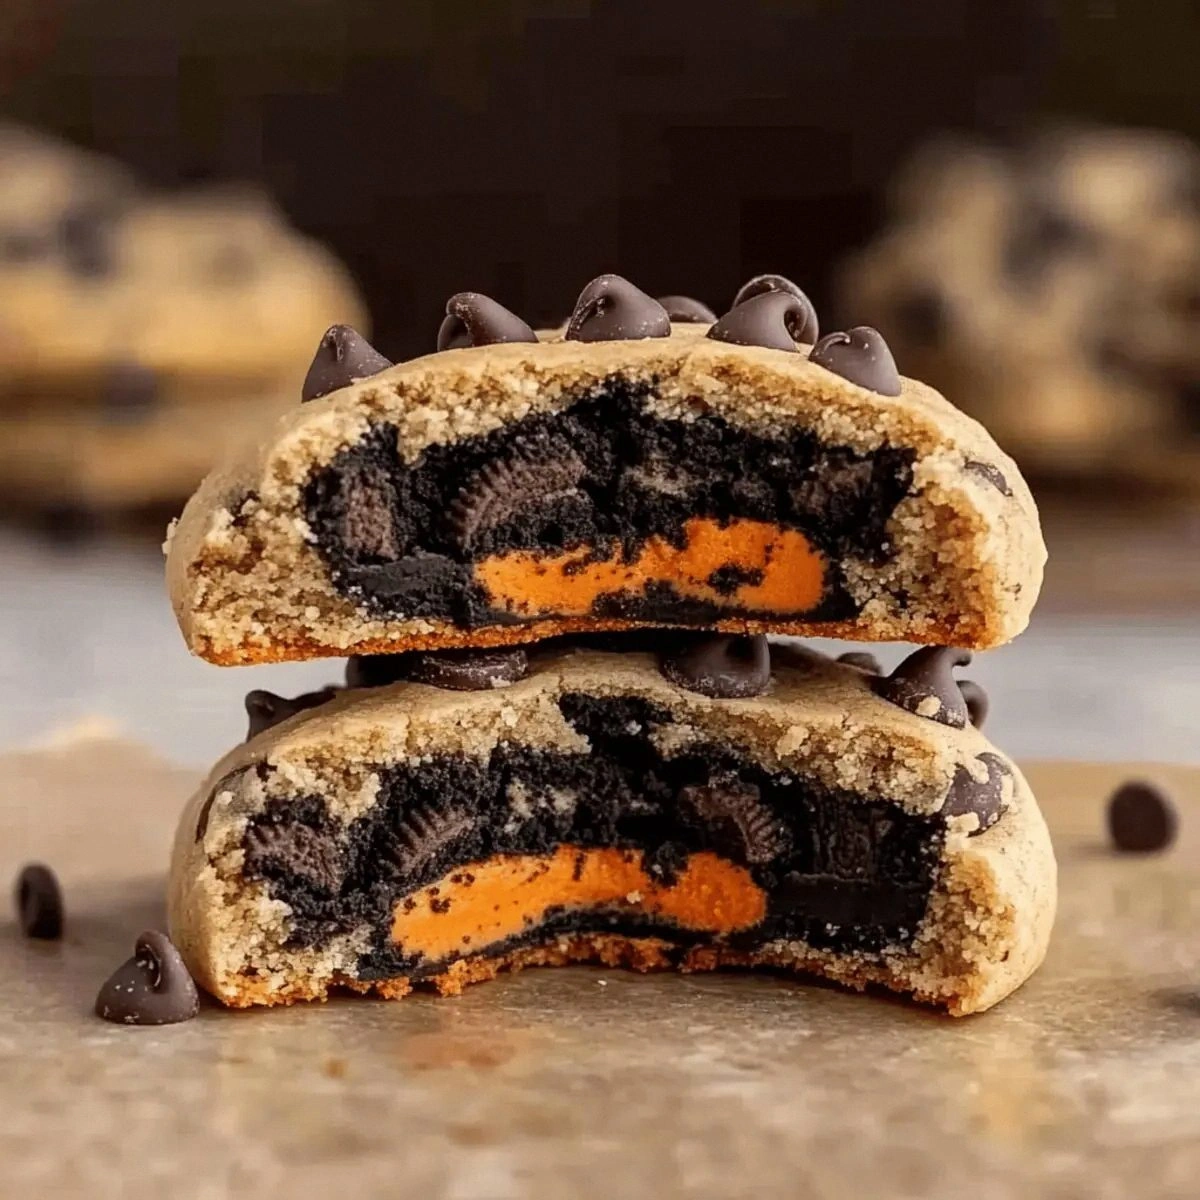
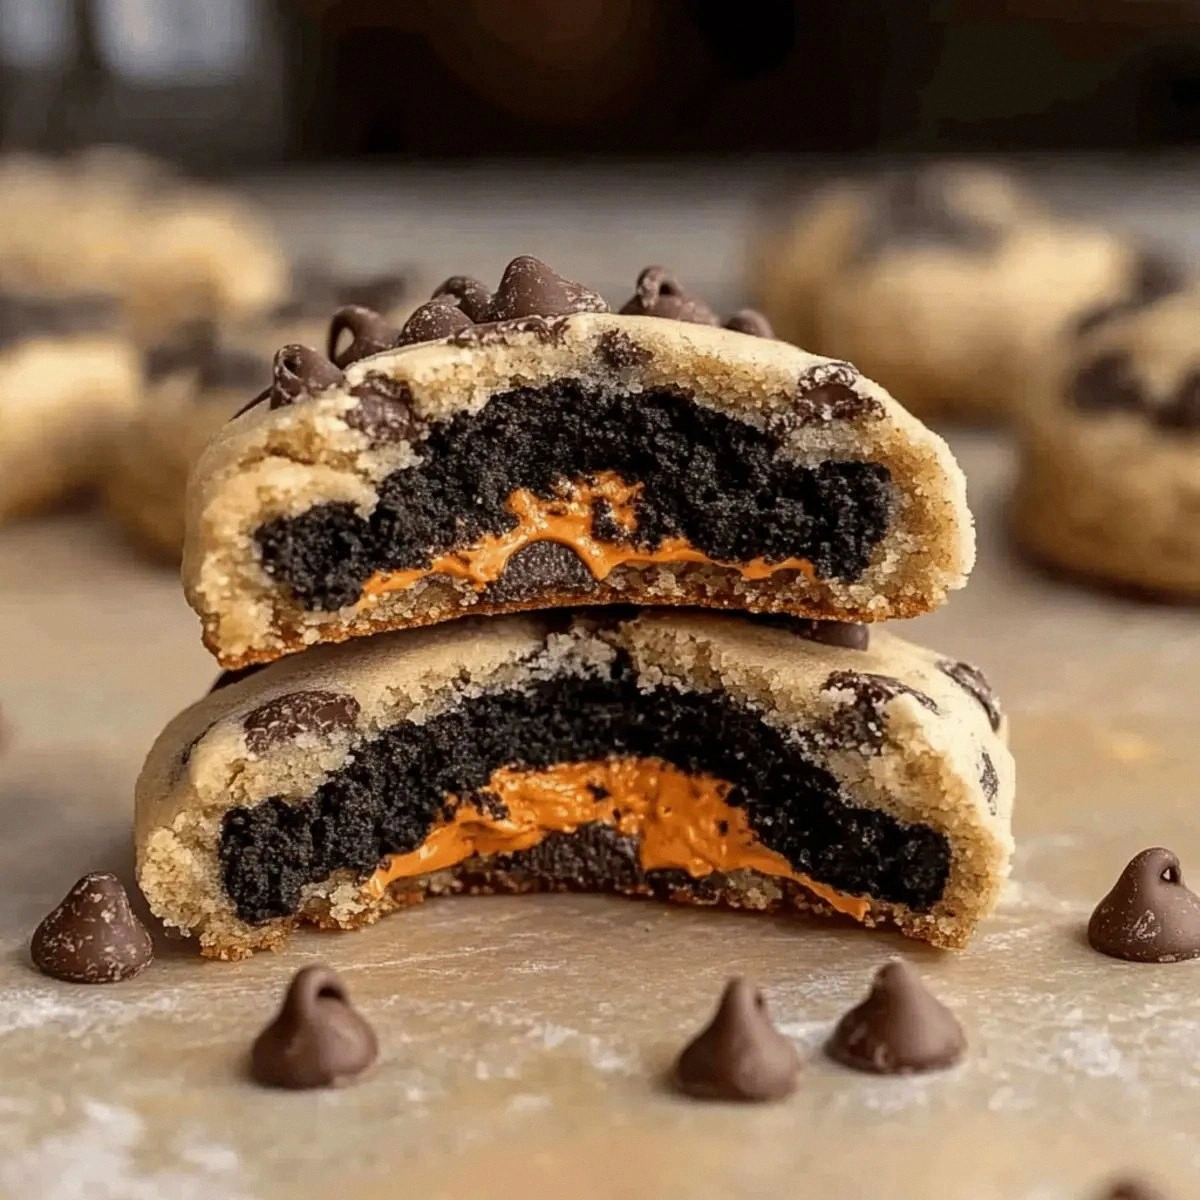
Picture this: it's October, the air is crisp enough to justify wearing your favorite oversized sweater, and your house smells like butter, vanilla, and that indescribable something that makes delivery drivers linger at your door hoping you'll share. You're pulling out a tray of cookies that look innocent enough from the outside — golden, slightly crisp edges, pools of melted chocolate — but then you break one open and reveal the surprise: a perfect Halloween Oreo, its orange filling creating a spooky-sweet bullseye in the center, softened just enough to merge with the surrounding cookie dough into something that defies all cookie logic.
Most stuffed cookie recipes fail because they treat the Oreo like an afterthought, just shoving it in there and hoping for the best. They end up with cookies that spread too thin, or the Oreo stays rock hard, or worse — the whole thing bakes up into a greasy mess that tastes like disappointment and broken dreams. This version? This version gets everything right. The cookie dough is engineered (yes, engineered) to support the Oreo without overwhelming it, creating layers of texture that go from slightly crisp edges to chewy middle to that creamy Oreo center that will make you question everything you thought you knew about cookies.
Okay, ready for the game-changer? We're not just stuffing these cookies; we're creating a cookie that knows it's being watched. The Halloween Oreos aren't just a surprise — they're the main event, and everything else is built around showcasing that orange filling like it's walking the red carpet. By the time you're done with this recipe, you'll understand why I hid in my pantry to eat the last one. Let me walk you through every single step — by the end, you'll wonder how you ever made it any other way.
What Makes This Version Stand Out
Temperature Precision: Most recipes tell you to use room temperature butter and call it a day. Not here. We're using butter that's exactly 68 degrees — cool enough to cream properly but warm enough to incorporate air. This creates a cookie that spreads just enough to encase the Oreo in a hug of dough without turning into a pancake. I know it sounds obsessive, but stick a thermometer in your butter just once and you'll never go back.
Strategic Cornstarch: That single teaspoon of cornstarch isn't optional, folks. It's the difference between a cookie that's chewy in the center and one that's cakey throughout. The cornstarch interferes with gluten development just enough to keep things tender while still letting the edges crisp up like a perfectly cooked crepe. Skip it and you'll get a perfectly serviceable cookie, but you won't get that bakery-style chew that makes people close their eyes when they take the first bite.
Oreo Selection Science: Here's where I get controversial: you need the Halloween Oreos, not regular ones. The orange filling has a slightly different texture that stays creamier during baking, plus the visual payoff when you break into them is pure Instagram gold. Regular Oreos work in a pinch, but you'll miss that extra creaminess that makes the center taste like cookies and cream ice cream.
Chilling Strategy: We're not just throwing this dough in the fridge to firm up — we're giving it a full 24-hour rest to let the flour hydrate and the flavors meld. Yes, you can bake them after two hours if you're desperate, but I dare you to taste the difference after an overnight rest. The cookies develop this deep, almost caramel-like flavor that makes them taste like they've been perfected over generations.
Size Matters: These aren't delicate little tea cookies. We're making substantial, bakery-style monsters that can hold an entire Oreo without falling apart. Each dough ball is exactly 3.5 ounces — big enough to feel like an event when you eat one, but not so enormous that you need to unhinge your jaw. Plus, the larger size means the center stays soft and gooey even after the edges have set.
The Sprinkle Situation: Those Halloween sprinkles aren't just for show (though they do make the cookies look like a party on a plate). They add tiny pops of sweetness and a slight crunch that contrasts beautifully with the soft cookie and creamy center. It's like having a built-in texture party that keeps every bite interesting.
Crowd Psychology: Bring these to any gathering and watch what happens. People don't just eat one — they hover by the dessert table, casually trying to look like they're not counting how many are left. I've seen grown adults hide cookies in napkins "for later" and then come back sheepishly for more. This next part? Pure magic.
Inside the Ingredient List
The Flavor Base
Butter is the foundation of everything good in this world, and in these cookies, it's doing triple duty. We're using exactly one cup of unsalted butter because we want to control the salt level ourselves — too much salt and it overpowers the delicate vanilla, too little and the whole thing tastes flat. The butter needs to be soft enough to cream but still cool to the touch, which creates those perfect air pockets that translate into tender, not tough, cookies. If you only have salted butter, reduce the added salt to 1/4 teaspoon and know that you're living dangerously.
Brown sugar isn't just here for sweetness — it's bringing molasses to the party, which adds depth and that subtle caramel note that makes people ask "what's in these?" The dark brown sugar version has more molasses, which creates a more complex flavor, but light brown sugar works if that's what you've got. Either way, don't skip it and don't substitute all granulated sugar unless you want cookies that taste like they came from a grocery store bakery in 1987.
That single large egg needs to be room temperature, not cold from the fridge. Cold eggs don't incorporate properly and can cause your butter to seize up, creating little pockets of unmixed fat that will melt and spread during baking. Take it out of the fridge when you start gathering ingredients, or pop it in a bowl of warm water for five minutes if you're impatient like me.
The Texture Crew
All-purpose flour is the workhorse here, but don't just scoop it out with your measuring cup unless you want dense, hockey-puck cookies. Spoon it into the cup and level it off, or better yet, weigh it — two cups should be about 240 grams. Too much flour and your cookies won't spread enough to properly enrobe the Oreo, too little and they'll spread into a greasy mess that will make you question your life choices.
Cornstarch is your secret weapon for that bakery-style chew. It's doing something magical with the gluten, keeping it from developing too much while still letting the cookie hold its shape. If you leave it out, you'll still get a good cookie, but you won't get that perfect texture that makes people close their eyes when they bite into it. And really, isn't that what we're all after?
Baking soda is doing more than just leavening — it's helping the cookies brown properly and creating that slightly crisp edge. Make sure it's fresh (replace it every six months unless you enjoy cookies that taste like baking soda — spoiler alert: nobody does). If your cookies are coming out pale and sad, old baking soda is probably the culprit.
The Unexpected Star
The Halloween Oreos aren't just a filling — they're the entire reason this cookie exists. The orange filling has a slightly different formulation that stays creamier when baked, plus the visual impact of that bright center is worth the extra cost of the seasonal cookies. If you absolutely can't find Halloween Oreos, regular ones work, but you'll miss that extra creaminess and the spooky aesthetic that makes these perfect for October.
When you're stuffing the cookies, don't twist the Oreos apart — use them whole. The cream filling needs the support of both cookies to maintain its structure during baking, and you want that perfect Oreo cross-section when you break one open. Plus, trying to separate them just creates a mess and you'll end up eating half the filling before it ever makes it into a cookie (I'll be honest — I ate half the batch before anyone else got to try it).
The Final Flourish
Semi-sweet chocolate chips are the classic choice, but here's where you can get creative. I like using a mix of semi-sweet and dark chocolate for a more complex flavor, or even throwing in some mini chips for better distribution. The key is using good quality chocolate — those store-brand chips that taste like wax will make your cookies taste like you're trying to save money, which is not the vibe we're going for here.
Halloween sprinkles need to be added at just the right moment. Press them into the top of each dough ball right before baking, but don't go overboard — you want them to look festive, not like a craft project exploded on your cookies. The colors will stay vibrant if you use high-quality sprinkles, not the cheap ones that bleed into the dough and make everything look muddy.
The Method — Step by Step
Start by cutting your butter into tablespoon-sized pieces and letting it sit on the counter for exactly 30 minutes. You want it to be cool but yielding when you press it — like a perfectly ripe avocado. While you're waiting, line two baking sheets with parchment paper and get your Oreos ready. This is the moment of truth where you need to resist eating them all, but I won't judge if you sneak one or two for quality control purposes.
In the bowl of a stand mixer (or with a hand mixer if you're feeling ambitious), cream the butter with both sugars on medium speed for a solid 3 minutes. Don't rush this step — you're not just mixing, you're incorporating air that will give your cookies lift. The mixture should look pale and fluffy, like buttercream frosting's more sophisticated cousin. Scrape down the bowl at least twice to make sure everything is evenly incorporated, because nobody wants a bite of pure butter in their cookie.
Add the egg and vanilla extract and beat for another 2 minutes. The dough might look slightly curdled at first — this is normal and means you're doing it right. Keep beating until it comes together into a smooth, satiny mixture that smells like vanilla ice cream and childhood memories. If you've ever struggled with cookies that spread too much, you're not alone — and I've got the fix right here in this step.
In a separate bowl, whisk together the flour, cornstarch, baking soda, and salt. This isn't just about combining — you're distributing the leavening agents evenly so every cookie rises the same way. Use a whisk instead of a spoon because it breaks up any lumps in the cornstarch, which can create unpleasant little pockets of powder in your finished cookies. Nobody wants to bite into a cornstarch bomb.
Add the dry ingredients to the wet mixture all at once and mix on low speed just until the flour disappears. This should take no more than 30 seconds — overmixing develops gluten and gives you tough cookies that could double as hockey pucks. The dough should come together in a shaggy mass that looks almost too dry, but resist the urge to add liquid.
Fold in the chocolate chips with a spatula, not the mixer. You want them evenly distributed but you don't want to break them up or overwork the dough. The dough should be thick and slightly sticky, like refrigerated peanut butter. If you can walk away from it for 24 hours, cover it with plastic wrap and let it rest in the fridge. If you absolutely cannot wait, give it at least 2 hours to chill — your cookies will be better, I promise.
When you're ready to bake, preheat your oven to 350 degrees and position a rack in the center. Use a kitchen scale to portion out 3.5 ounces of dough (about the size of a golf ball on steroids) and flatten it slightly in your palm. Place an Oreo in the center and wrap the dough around it, sealing it completely like you're making dumplings. Make sure there are no gaps where the Oreo is peeking through or it will leak filling everywhere.
Place six dough balls on each baking sheet (they spread more than you'd think) and gently press Halloween sprinkles into the top. Don't go overboard — you want them to look festive, not like a craft store exploded. Bake for 14-16 minutes, rotating the pan halfway through. The edges should be golden brown but the centers will still look slightly underbaked — this is perfect, they'll finish setting as they cool.
Let the cookies cool on the baking sheet for 10 minutes before moving them to a wire rack. I know it's torture, but moving them too early will result in broken cookies and broken dreams. During this time, they'll finish baking from residual heat and set up properly. Your kitchen will smell like a autumn carnival and every neighbor within a three-block radius will suddenly remember they need to borrow a cup of sugar.
Once completely cool (if you can wait that long), break one open and watch the orange filling create a spooky swirl in the center. The Oreo should be soft but not mushy, creating a cookies-and-cream effect that's better than anything you could buy in a store. Store the rest in an airtight container, or freeze them if you're stronger than I am and can resist eating them all in one sitting.
That's it — you did it. But hold on, I've got a few more tricks that'll take this to another level...
Insider Tricks for Flawless Results
The Temperature Rule Nobody Follows
Your oven temperature is lying to you, and it's not even sorry about it. Most home ovens run 25 degrees hot or cold, which is the difference between perfect cookies and a tray of disappointment. Invest in an oven thermometer (they're like five bucks) and adjust accordingly. If your cookies are spreading too much, your oven is probably running hot and the butter is melting before the structure sets. If they're staying in little mounds, it's running cold and they need more time. This isn't just baking — it's kitchen detective work, and the payoff is worth every penny.
Why Your Nose Knows Best
Forget timers — your nose is the most accurate cookie doneness detector you own. When you start smelling caramel and toasted butter, that's your cue to peek in the oven. If the edges are golden and the centers still look slightly underbaked, pull them out immediately. They'll continue cooking on the hot pan, and by the time they cool you'll have that perfect contrast between crisp edges and chewy centers. A friend tried skipping this step once — let's just say it didn't end well, and she ended up with cookies that could chip teeth.
The 5-Minute Rest That Changes Everything
After mixing your dough, let it rest for exactly 5 minutes before adding the chocolate chips. This gives the flour a chance to start hydrating, which means the chips will distribute more evenly and won't sink to the bottom during baking. It's a tiny step that takes no extra time but makes your cookies look professionally made. Plus, it gives you a chance to eat a few chips straight from the bag, and I'm not here to judge your life choices.
The Sprinkle Timing Secret
Don't add your Halloween sprinkles before baking or they'll melt into sad little color puddles. Instead, pull the cookies out at the 10-minute mark and quickly press the sprinkles into the partially set dough. They'll stick perfectly but maintain their shape and color, giving you that professional bakery look. This also prevents them from bleeding into the dough and turning everything a muddy orange-brown that looks like it came from the clearance rack.
The Storage Game-Changer
Store these cookies with a slice of sandwich bread in the container — the cookies will stay soft and chewy for days while the bread turns into a crouton. It's like magic, but it's actually just bread absorbing moisture and keeping your cookies in perfect condition. Change the bread every couple of days, or better yet, eat the cookies before you need to worry about storage. Picture yourself pulling this out of the oven, the whole kitchen smelling incredible, and knowing you've got the next four days of snacking sorted.
Creative Twists and Variations
This recipe is a playground. Here are some of my favorite ways to switch things up:
The Peanut Butter Monster
Replace 1/2 cup of the butter with creamy peanut butter and use peanut butter Oreos instead of regular. The result is a cookie that tastes like a peanut butter cup had a baby with cookies and cream. Add chopped peanuts to the dough for extra crunch, or swirl in some peanut butter chips along with the chocolate. These disappear faster than Halloween candy in a house with teenagers.
The Mint Chocolate Phantom
Use mint Oreos and add 1/2 teaspoon of peppermint extract to the dough. The mint filling creates a cool contrast to the warm cookie, and the combination tastes like those thin mint cookies everyone pretends to sell for charity but actually eats in their car. Use dark chocolate chips instead of semi-sweet for a more sophisticated flavor that pairs beautifully with the mint.
The Salted Caramel Ghost
Stuff the cookies with caramel-filled Oreos (yes, they exist, and yes, they're incredible) and sprinkle the tops with flaky sea salt before baking. The salt enhances all the flavors and creates that sweet-salty contrast that makes it impossible to eat just one. The caramel gets gooey and creates little pockets of molten deliciousness that will burn your tongue if you're not patient, but you'll eat them anyway.
The Double Chocolate Demon
Replace 1/4 cup of the flour with cocoa powder and use white chocolate chips instead of semi-sweet. The chocolate cookie with the orange Oreo center looks stunning, and the flavor is rich without being overwhelming. Add some orange zest to the dough to echo the filling and make everything taste like a chocolate orange in cookie form.
The Breakfast Cookie (Don't Judge)
Use golden Oreos and add 1/2 cup of toffee bits to the dough. The result tastes like a coffee shop cookie that decided to dress up for Halloween. The toffee melts and creates little pockets of caramel throughout, and the golden Oreos blend beautifully with the brown sugar base. Serve these with coffee and watch them disappear before the pot finishes brewing.
The Gluten-Free Ghost Hunter
Substitute the all-purpose flour with a 1:1 gluten-free baking blend and make sure your Oreos are the gluten-free variety. The texture is slightly different but still delicious, and nobody will know the difference unless you tell them. Add an extra 1/4 cup of chocolate chips to compensate for the slightly drier texture of gluten-free flour.
Storing and Bringing It Back to Life
Fridge Storage
These cookies will keep in an airtight container at room temperature for up to 5 days, but let's be realistic — they're not going to last that long. If you somehow manage to show restraint, store them with a slice of bread to maintain moisture. The Oreo centers will stay soft and creamy, and the cookies won't dry out. Keep them away from direct sunlight or heat sources, unless you want cookies that taste like they've been sitting in a car dashboard.
Freezer Friendly
Freeze the baked cookies in a single layer on a baking sheet, then transfer to a freezer bag with as much air removed as possible. They'll keep for up to 3 months, though mine never make it past three weeks. Thaw at room temperature for 30 minutes, or pop them in the microwave for 10-15 seconds for that fresh-baked taste. You can also freeze the unbaked dough balls — just add 2 minutes to the baking time and bake from frozen.
Best Reheating Method
Ten seconds in the microwave is all it takes to bring these back to life. Any longer and the Oreo filling gets too hot and loses its texture. If you're reheating multiple cookies, do them in batches — they heat unevenly and you don't want a molten center that burns your tongue. Add a tiny splash of water before reheating — it steams back to perfection and keeps the cookies from drying out. For the full experience, serve with a cold glass of milk and pretend you don't know how many you've already eaten.