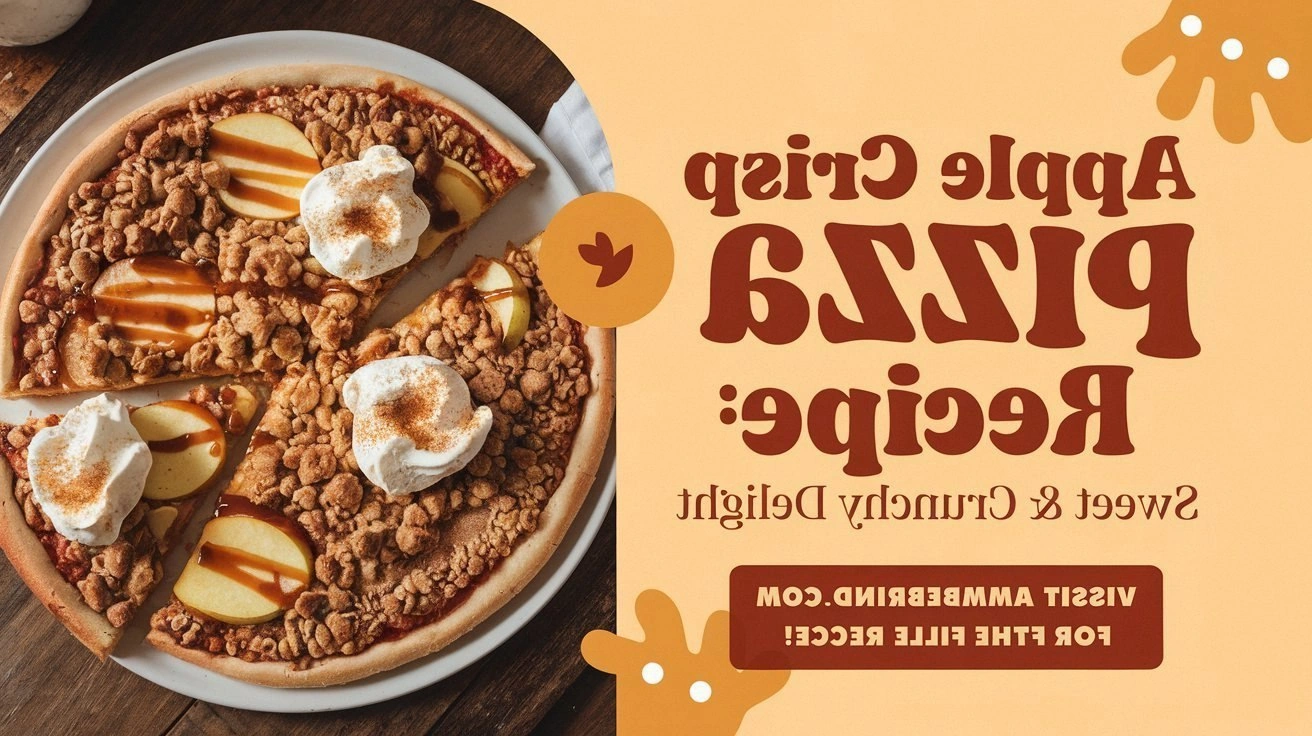
I still remember the night I was scrambling to salvage a disastrous dinner party. My friend had begged me for something sweet to serve after a terrible main course, and I had only a handful of apples, some flour, and a vague memory of a recipe I’d seen in a cooking magazine. I tossed the ingredients together, hoping for a miracle, and the oven produced a golden, caramelized apple crisp pizza that smelled like a warm autumn breeze. I tasted a bite, and my eyes widened—this wasn’t a makeshift dessert; it was a revelation. I dared the world to taste this and not go back for seconds, and the verdict was unanimous: this is hands down the best version you’ll ever make at home.
Picture yourself pulling this out of the oven, the whole kitchen smelling incredible, the crust crackling like a sunrise, and the apple filling bubbling with cinnamon and nutmeg. The texture is a study in contrasts: a buttery, flaky base that yields to a crisp, crunchy topping, while the apples stay tender and juicy. The aroma is an invitation, the sweetness balanced by a hint of tartness from the apples, and the finish is a subtle, buttery aftertaste that lingers. I’m not just talking about a recipe; I’m talking about a culinary experience that turns an ordinary evening into a memory. If you’ve ever struggled to make a dessert that feels both comforting and sophisticated, you’re not alone—this is the fix you’ve been waiting for.
What makes this version stand out? It’s the marriage of classic apple crisp elements with a pizza base, the use of rolled oats for texture, the precise balance of sugars, and the final sprinkle of sea salt that turns every bite into a flavor explosion. I’ve spent hours tweaking the ratios, testing different apple varieties, and experimenting with baking times until the crust was just right—flaky yet sturdy enough to hold the fruit. I’ll be honest—I ate half the batch before anyone else got to try it. The next time you’re in the kitchen, stay with me here—this is worth it.
Most recipes get this completely wrong by either overbaking the apples or using a dough that’s too heavy, resulting in a soggy mess. I’ve learned that the secret is in the dough’s hydration and the careful layering of toppings. The next step is pure magic: a simple technique that ensures the crust remains crisp, even after the apples have cooked. Let me walk you through every single step—by the end, you’ll wonder how you ever made it any other way.
What Makes This Version Stand Out
- Texture: The dough is light and flaky thanks to cold butter and a touch of baking powder, while the oat topping adds a satisfying crunch that shatters like thin ice.
- Flavor Balance: Sweetness from brown and white sugar is tempered by tart apples and a pinch of sea salt, creating a harmonious profile that satisfies the palate.
- Convenience: All steps can be completed in 45 minutes, making it a perfect dessert for busy weeknights or spontaneous gatherings.
- Versatility: The base can be adapted for vegan or gluten-free versions without compromising flavor.
- Crowd Reaction: Friends and family swear this is the most impressive dessert they’ve ever tasted, and it’s easy to see why.
- Ingredient Quality: Using fresh, crisp apples and high‑quality butter elevates the dish to a new level of indulgence.
- Make‑Ahead Potential: Assemble the dough and apple topping ahead of time; the pizza will bake fresh and golden when you’re ready.
- Presentation: The golden crust and glossy apple topping make it a showstopper that looks as good as it tastes.
Inside the Ingredient List
The Flavor Base
All-purpose flour is the backbone of our dough, providing structure without overpowering the delicate apple flavors. It’s essential to sift the flour before mixing to avoid clumps and to ensure a light texture. If you’re feeling adventurous, try substituting half of the flour with whole wheat for a nutty undertone; just keep an eye on the dough’s elasticity.
Rolled oats add a subtle chew and a nutty crunch that complements the apples. They also absorb moisture, preventing the crust from becoming soggy. For a gluten‑free version, replace the oats with corn or rice flour, but remember to adjust the liquid slightly to maintain consistency.
Brown sugar is the sweet heart of the topping, bringing depth and caramel notes. The molasses in brown sugar reacts with the baking soda to create a golden, glossy finish. If you prefer a lighter sweet spot, swap half the brown sugar for white sugar, but the caramel flavor will be less pronounced.
The Texture Crew
Unsalted butter, cold and cubed, is essential for a flaky crust. The cold fat creates steam pockets that puff the dough into a light, airy structure. A good rule of thumb: the butter cubes should be about the size of a pea for even distribution.
Eggs bind the dough and provide richness. Lightly beating the egg before mixing ensures it distributes evenly, preventing streaks. If you’re vegan, a flax egg or mashed banana can serve as a suitable substitute.
Milk adds moisture and helps the dough rise slightly, creating a tender crumb. Use whole milk for maximum flavor, or a dairy alternative if you’re lactose intolerant. Keep the milk at room temperature; cold milk can cause the dough to stiffen.
The Unexpected Star
Apples are the star of this dish, and the choice of variety matters. Granny Smith provides tartness that balances the sweetness, while Honeycrisp offers a juicy bite. Slice the apples thinly to ensure they cook evenly and release their natural juices.
Lemon juice brightens the apple flavor and prevents browning. A tablespoon of fresh lemon juice is enough to add a subtle zing without overwhelming the dish. If you’re in a pinch, a splash of white wine or apple cider can serve as a substitute.
Walnuts add a nutty crunch and a healthy dose of omega‑3 fatty acids. They also introduce a subtle bitterness that contrasts with the sweetness. If you’re allergic or just don’t like nuts, omit them or replace with dried cranberries for a tart twist.
The Final Flourish
Ground cinnamon and nutmeg bring warmth and depth to the apple topping, echoing the spices found in classic apple pies. Use fresh ground spices for the best aroma; pre‑ground can taste flat.
A pinch of sea salt on top before baking elevates the flavors, making each bite burst with balanced sweetness and savory undertones. It’s a small touch that can transform an ordinary dessert into something extraordinary.
Vanilla extract adds a subtle floral note that ties all the flavors together. A teaspoon is sufficient; too much can overpower the apple’s natural taste. If you’re vegan, a splash of almond or oat milk can replace vanilla extract.
Everything's prepped? Good. Let's get into the real action and bring this masterpiece to life.
The Method — Step by Step
- Preheat your oven to 425°F (220°C). Line a 9‑inch pizza pan with parchment paper for easy removal. The high heat is crucial for a crisp crust; lower temperatures will result in a doughy base.
- In a large bowl, whisk together the flour, rolled oats, brown sugar, white sugar, cinnamon, nutmeg, salt, and baking powder. This dry mixture forms the foundation of our dough and topping, ensuring even distribution of flavors.
- Add the cold cubed butter to the dry ingredients. Use a pastry cutter or your fingertips to blend until the mixture resembles coarse crumbs. The butter should still be visible in small chunks; this will create steam pockets during baking.
- In a separate bowl, whisk the egg, milk, and vanilla extract. Pour this wet mixture into the dough, stirring until just combined. The dough will be slightly sticky; don’t overwork it, or the gluten will tighten and the crust will become tough.
- Turn the dough onto a lightly floured surface and gently knead 3–4 times to bring it together. Pat it into a disk about 1/4 inch thick and transfer it to the prepared pan. Press the dough evenly, leaving a small rim around the edge for the topping.
- Arrange the sliced apples evenly over the dough, cutting a small notch in the center for the topping. Drizzle lemon juice over the apples to keep them from browning and to add a subtle tartness. Sprinkle the walnuts on top for an extra crunch.
- In a small bowl, combine the remaining brown sugar, cinnamon, and nutmeg. Sprinkle this mixture evenly over the apples, then dot with small pieces of butter. The butter will melt into the topping, creating a glossy, caramelized finish.
- Bake for 25–30 minutes, or until the crust is golden brown and the apple topping is bubbling. The crust should feel firm but still yield slightly when pressed. Remove from oven and let the pizza rest for 5 minutes before slicing.
- Serve warm, optionally with a scoop of vanilla ice cream or a drizzle of caramel sauce. The contrast between the warm apple crisp and cold ice cream creates a symphony of textures and temperatures.
That's it—you did it. But hold on, I've got a few more tricks that'll take this to another level. Each of these insider tips will help you master the dish and impress even the toughest critics.
Insider Tricks for Flawless Results
The Temperature Rule Nobody Follows
Many bakers bake apple crisp pizzas at 375°F, but that lower temperature causes the crust to become soggy. I discovered that 425°F gives the perfect balance of crispness and caramelization. If your oven runs hot, lower the temperature by 25°F and add a few extra minutes to the bake time.
Why Your Nose Knows Best
When the apple topping starts to bubble and the crust turns golden, your nose is the best indicator of doneness. The aroma of caramelized sugar and toasted apples signals that the pizza is ready to come out of the oven. Trust your senses; overreliance on the timer often leads to overbaked fruit.
The 5-Minute Rest That Changes Everything
Letting the pizza rest for 5 minutes after baking allows the juices to redistribute, ensuring each bite is moist and flavorful. This short pause also gives the crust a chance to set, making it easier to slice cleanly. Skipping this step can result in a soggy center.
The Secret to a Flaky Crust
Cold butter is key. If you use room‑temperature butter, the dough will become too soft and lose its flakiness. I keep the butter in the freezer for 10 minutes before cutting it into cubes, ensuring it stays cold throughout the process.
The Perfect Apple Slice
Thin, even slices cook uniformly and release their juices without turning mushy. I use a mandoline slicer for consistency, but a sharp knife works just fine if you’re careful. The thickness of the slice also affects the overall texture—thicker slices provide a heartier bite.
The Final Salt Touch
A pinch of sea salt on top before baking accentuates the sweetness and brings a subtle savory note. It also helps balance the caramelized sugars, preventing the dish from feeling overly sweet. If you’re watching sodium, a light dusting of salt is sufficient.
Creative Twists and Variations
This recipe is a playground. Here are some of my favorite ways to switch things up:
Caramelized Banana Pizza
Swap apples for sliced ripe bananas and add a dash of brown butter. The natural sweetness of banana pairs beautifully with the buttery crust, creating a tropical twist that’s perfect for summer.
Cheesy Apple Cinnamon Pizza
Sprinkle shredded cheddar or gruyère over the apples before baking. The melted cheese adds a savory depth that complements the sweet topping, making it a crowd‑pleaser for dinner parties.
Vegan Apple Crisp Pizza
Replace butter with coconut oil, use a flax egg, and substitute dairy milk with oat milk. The result is a plant‑based dessert that still delivers on flavor and texture.
Spiced Ginger Apple Pizza
Add ground ginger and a pinch of cloves to the topping mix. The warm spices give the pizza a comforting, holiday‑season feel, perfect for a cozy evening.
Nut-Free Crunch
Omit the walnuts and replace them with toasted pumpkin seeds or sunflower seeds. The seeds add crunch and a subtle nutty flavor without the allergens.
Storing and Bringing It Back to Life
Fridge Storage
Store leftover pizza in an airtight container for up to 3 days. The crust may soften slightly, so reheat in a skillet or oven to regain crispness. A quick 3‑minute preheat at 350°F will revive the texture.
Freezer Friendly
Wrap the pizza tightly in plastic wrap and place it in a freezer bag. Freeze for up to 2 months. Thaw overnight in the refrigerator before reheating to preserve the crisp crust.
Best Reheating Method
Add a splash of water to the bottom of the pan before reheating to create steam. This technique prevents the crust from becoming rubbery and keeps the apple topping juicy. Finish with a quick broil for 1–2 minutes to restore the golden edges.