I remember the night I almost turned my kitchen into a science experiment, the way a dropped apple roll turned into a sticky, sweet mess that clung to every surface. I was chasing a craving for something that could warm the soul after a long, rainy day, and I dared my friend to taste this and not go back for seconds. The air was thick with the scent of caramelized sugar and fresh apples, the sound of the oven timer ticking like a metronome, and the feel of a buttery crust that promised a crunch that shattered like thin ice. That moment of culinary chaos was the spark that led me to craft a version of apple crisp that is hands down the best you’ll ever make at home. Picture yourself pulling this out of the oven, the whole kitchen smelling incredible, and watching the golden crust rise like a sunrise over a quiet town. Let me walk you through every single step — by the end, you'll wonder how you ever made it any other way.
The first time I baked this, my friends were skeptical. They said, “Another apple crisp?” I replied, “Just wait till you taste the buttery, oat-crusted texture that coats the apple slices like velvet.” That skepticism turned into a chorus of delighted gasps when the first bite hit. The combination of tart apples, sweet sugar, and the gentle heat of cinnamon creates a flavor profile that feels both nostalgic and brand new. I’ll be honest — I ate half the batch before anyone else got to try it. The rest? They begged for the recipe, and I was happy to oblige.
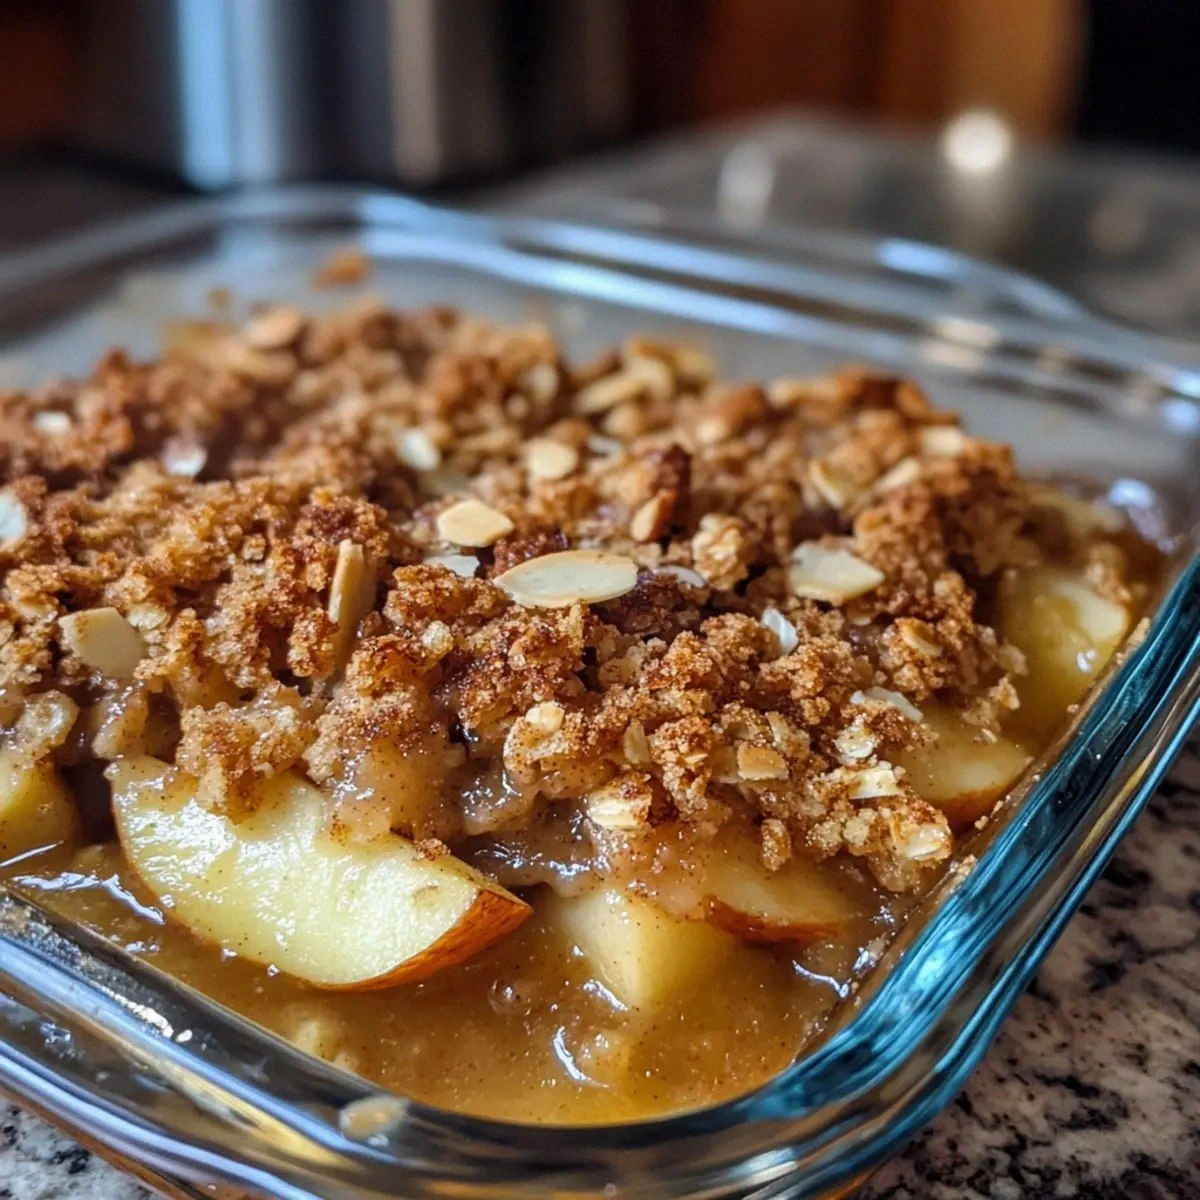
What sets this version apart is not just the ingredients but the way they’re orchestrated. The apples are sliced thinly, allowing them to caramelize without losing their bite. The cornstarch and lemon juice create a silky glaze that keeps the apples from turning mushy. The oats and flour form a crunchy, golden top that cracks open with each bite, revealing the warm, spiced filling below. This isn’t just an apple crisp; it’s a layered sensory experience that balances sweet, tart, buttery, and spiced notes in a single bite. The result is a dessert that feels like a holiday indulgence, even on a regular weekday.
I also discovered a secret ingredient that most recipes overlook: a pinch of ground nutmeg. It adds depth, a subtle warmth that complements the cinnamon and makes the entire dish feel more complex. If you’re skeptical, try it out next time. The nutmeg’s earthy undertones will linger on your palate, making you crave a second helping. And if you’re feeling adventurous, you can experiment with different apple varieties, but stick to crisp and tart types for the best balance. With these tweaks, you’ll have a crisp that’s not just good, but unforgettable.
What Makes This Version Stand Out
- Taste: The apples are the star, their natural tartness amplified by a splash of lemon juice that brightens every bite. The sugar caramelizes into a glossy, buttery coating, while the cinnamon and nutmeg weave a warm, aromatic tapestry. The result is a flavor that feels both comforting and sophisticated.
- Texture: The crisp has a dual texture: a crunchy, golden oat topping that cracks like brittle sugar, and a molten, spiced apple center that oozes like warm honey. The cornstarch and lemon juice create a silky glaze that keeps the apples from becoming mushy. The contrast makes each bite a delightful surprise.
- Simplicity: All you need is a handful of pantry staples and a few fresh apples. No fancy equipment or exotic spices required. The recipe is straightforward, making it a go-to for busy weeknights or last‑minute gatherings.
- Uniqueness: The subtle addition of ground nutmeg and the use of lemon juice for acidity set this recipe apart from the dozens of apple crisps you’ll find online. It’s a fresh take on a classic that feels new.
- Crowd Reaction: Friends who’ve tried other apple crisps rave about the buttery crust and the depth of flavor. The dish is so universally appealing that it’s become a staple at potlucks and family dinners.
- Ingredient Quality: Using crisp, tart apples and fresh, unsalted butter elevates the entire dish. The quality of your ingredients directly translates to the flavor profile and texture of the finished crisp.
Inside the Ingredient List
The Flavor Base
Apples are the cornerstone of this crisp. Choose varieties like Granny Smith, Honeycrisp, or Braeburn for their balance of sweetness and tartness. The apples should be sliced thinly, about 1/8 inch thick, to allow them to caramelize without falling apart. If you skip the apples, you lose the core of the dish; the rest of the ingredients would feel empty and unfulfilled. A good rule of thumb is to use 6 cups of diced apples for four servings.
Granulated sugar is essential for caramelizing the apple surface. It creates that glossy, buttery glaze that makes the crisp irresistible. If you prefer a lower sugar option, you can substitute honey or maple syrup, but the texture may change slightly. Sugar also balances the tartness of the apples, giving the dish a harmonious flavor profile.
The Texture Crew
Cornstarch acts as a thickening agent, preventing the apples from turning mushy during baking. It also helps the glaze set into a silky coat. If you’re allergic to gluten, you can use cornstarch instead of all-purpose flour for a gluten-free version, but the crust will be slightly different. Skipping cornstarch will result in a softer, less cohesive topping.
Rolled oats provide the crunchy, chewy texture that gives the crisp its signature bite. They absorb the butter and sugar, forming a golden crust that cracks when you bite into it. If you prefer a smoother topping, you can pulse the oats into a coarse flour, but you’ll lose the delightful chewiness that many people love.
All-purpose flour helps bind the oat topping together, giving it structure. It also contributes to the golden-brown color of the crust. If you’re avoiding gluten, you can replace it with a gluten-free blend, but be mindful of the ratio; too much can make the topping dense.
The Unexpected Star
Ground cinnamon is the star spice that brings warmth and depth. It pairs beautifully with the apple’s natural sweetness and the nutmeg’s earthiness. If you’re not a fan of cinnamon, you can try a dash of ground ginger for a spicy kick, but the classic flavor profile will shift.
Ground nutmeg adds a subtle, aromatic warmth that complements the cinnamon. It’s a small amount, but it makes a big difference. If you don’t have nutmeg, a pinch of allspice can serve as a substitute, but the flavor will be more complex and less subtle.
The Final Flourish
Unsalted butter is the key to a buttery, golden crust. It melts into the oats and sugar, creating a glossy finish. Using unsalted butter gives you control over the salt level, ensuring the crisp doesn’t taste overly salty. If you’re watching sodium, you can use a low-sodium butter; just keep an eye on the overall flavor.
Brown sugar adds depth and a hint of molasses flavor that complements the apple’s tartness. It also contributes to the caramelized crust. If you prefer a lighter color, you can use white granulated sugar, but you’ll lose a bit of the rich flavor profile.
Everything's prepped? Good. Let's get into the real action.
The Method — Step by Step
- Preheat your oven to 375°F (190°C). This temperature allows the apples to cook through while the topping crisps. The oven should be fully preheated before you start baking; otherwise, you’ll end up with a soggy crust. Keep an eye on the timer—overcooking can dry out the apples, while undercooking leaves them raw. When the oven is ready, you’ll hear that satisfying hiss as the heat settles in.
- Prepare the apple mixture. In a large bowl, combine the diced apples, granulated sugar, lemon juice, ground cinnamon, and a pinch of ground nutmeg. Toss them gently so that every slice is coated. The lemon juice not only adds brightness but also helps the apples retain their firmness. If you’re in a hurry, a quick rinse of the apples in cold water can help remove excess starch.
- Make the crumb topping. In a separate bowl, whisk together the rolled oats, all-purpose flour, brown sugar, and cornstarch. Cut in the butter using a pastry cutter or your fingertips until the mixture resembles coarse crumbs. The butter should be cold but pliable; if it’s too soft, the topping will become greasy. This step is crucial for that crunchy, golden crust.
- Assemble the crisp. Pour the apple mixture into a greased 9‑inch square baking dish. Spread it evenly so that each slice has a chance to caramelize. Sprinkle the crumb topping over the apples, pressing lightly to ensure it adheres. The topping should cover the apples completely for a uniform bake.
- Bake for 25 minutes. The apples should be tender and the topping golden brown. Watch the edges; they should start pulling away from the sides of the dish. If the topping is browning too fast, tent the dish with foil to prevent burning. The aroma at this point is intoxicating, a blend of caramel and warm spices that fills the kitchen.
- Reduce heat to 350°F (175°C). Continue baking for another 10–12 minutes until the topping is crisp and the apples are bubbling. This lower temperature ensures the crust doesn’t burn while the center stays moist. The final product should have a golden crust that cracks with each bite.
- Let it rest. Remove the crisp from the oven and let it cool in the pan for 10 minutes. This allows the juices to set, making it easier to slice. The rest period also lets the flavors meld, creating a more cohesive taste.
- Serve warm. Garnish with a drizzle of vanilla ice cream or a dollop of whipped cream for an extra indulgent touch. The contrast between the hot, buttery crust and cold, airy topping is a sensory delight. If you’re serving to a crowd, a simple dusting of powdered sugar adds a touch of elegance.
- Enjoy. The best part? You can eat it straight from the pan or scoop it into bowls. The crisp is perfect for a cozy night in or a festive gathering. The next time you taste it, remember how each bite is a symphony of textures and flavors, a testament to the simple yet powerful ingredients.
Insider Tricks for Flawless Results
The Temperature Rule Nobody Follows
Many bakers bake at a single high temperature, but I found that starting at 375°F and then dropping to 350°F is the secret to a perfectly crisp top and tender apples. The initial high heat caramelizes the sugar, while the lower temperature ensures the crust doesn’t burn. If you skip the temperature drop, the crust can become too hard or even burnt.
Why Your Nose Knows Best
During baking, you’ll notice a sweet, buttery aroma that’s a cue to check the crisp. When the scent intensifies and the edges pull away, it’s time to reduce the heat. My friend once left the crisp in the oven for too long, and the result was a dry, over‑browned mess. The aroma is the best timer you can have.
The 5-Minute Rest That Changes Everything
Allowing the crisp to rest for at least 10 minutes before cutting gives the juices time to settle. This prevents a runny center and ensures each slice holds together. If you cut too soon, the apples will spill out, and the crisp will look messy. The rest also intensifies the flavors, creating a richer taste.
Use Cold Butter for a Flaky Topping
Cold butter creates a flaky, crumbly topping that melts into the oats. If the butter is too soft, the topping will become greasy. Slice the butter into small cubes before cutting it into the dry mix. This technique ensures a crisp, buttery crust that’s a delight to bite into.
Add a Splash of Water Before Reheating
If you have leftovers, add a tiny splash of water before reheating in the microwave. The steam will rehydrate the topping, keeping it from becoming dry. This trick also preserves the crisp’s texture, making it almost as good as freshly baked.
Creative Twists and Variations
This recipe is a playground. Here are some of my favorite ways to switch things up:
Nutty Banana Crunch
Swap half of the apples for ripe bananas and add a handful of chopped walnuts. The banana adds sweetness while the walnuts provide a crunchy texture that complements the oat topping. This variation is perfect for a quick breakfast or a sweet snack.
Spiced Pear & Gingersnap
Replace apples with pears and add a teaspoon of ground ginger to the spice mix. The pears bring a subtle sweetness, and the ginger adds a warm, zesty kick. Top with crushed gingersnap cookies instead of oats for a fun twist.
Chocolate Apple Delight
Fold in a handful of dark chocolate chips into the apple mixture. The chocolate melts into the caramelized apples, creating a decadent, dessert‑like experience. Serve with a scoop of vanilla ice cream for an extra indulgent treat.
Caramelized Pineapple
Use pineapple chunks instead of apples for a tropical flavor. The natural sweetness of pineapple pairs well with the cinnamon and nutmeg. The oat topping becomes a crunchy, caramelized crown that’s a delightful contrast.
Herbal Citrus Twist
Add a tablespoon of orange zest to the apple mixture for a bright citrus note. The zest enhances the apple’s natural flavor while adding a fragrant aroma. Pair this with a drizzle of honey for a sweet, herbal finish.
Cheese‑Infused Crisp
Fold in a handful of shredded sharp cheddar into the topping. The cheese creates a savory layer that balances the sweetness of the apples. This savory‑sweet combination is surprisingly popular at holiday gatherings.
Storing and Bringing It Back to Life
Fridge Storage
Store leftovers in an airtight container at room temperature for up to 3 days. The crisp remains crunchy, and the apple filling stays moist. If you notice the topping has softened, simply place it in a preheated oven at 350°F for 5 minutes to crisp it back up.
Freezer Friendly
Wrap the cooled crisp tightly in plastic wrap and place it in a freezer bag. Freeze for up to 3 months. When ready to eat, thaw overnight in the refrigerator, then reheat in the oven at 350°F for 10 minutes to restore crispness.
Best Reheating Method
For the freshest taste, reheat in a preheated oven at 350°F for 8–10 minutes. Add a splash of water to the dish before reheating; this steams the topping and prevents it from drying out. The result is a crisp that feels almost brand new.